Entra ID Backup and Restore is a recently released capability designed to help you protect and recover critical tenant data. This feature, currently in preview, provides an automated solution for capturing the state of specific objects, making it easier to bounce back from misconfigurations or other data loss scenarios. This guide walks you through enabling, accessing, and using the feature effectively.
Prerequisites
To use the Entra ID Backup and Restore feature, your tenant must meet the following criteria:
- Entra ID P1 or P2 license. This feature is only available to organizations with one of these premium subscription levels.
- Active License. The license must be active on your tenant.
Note: Since the feature is in preview, it may not be available in all regions initially, but it’s quickly expanding. Check the Entra admin center for availability in your tenant.
Enabling Entra ID Backup and Restore
The feature is designed to be easily accessible directly from the Entra admin center. There’s no complex setup or manual activation process required. Once your tenant has the required P1 or P2 license, the feature should be automatically visible.
Understanding the Architecture: Daily Snapshots
The foundation of the Entra ID Backup and Restore feature is its automated snapshot mechanism. This ensures that a copy of your tenant’s supported object states is consistently maintained.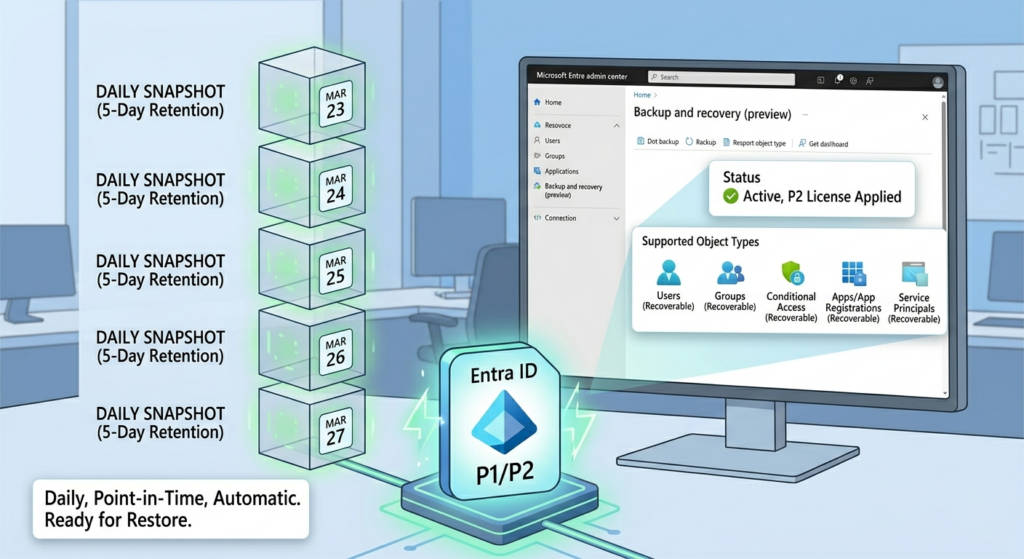
Key Characteristics of the Backup Process:
- Automated Backups: The system creates a comprehensive snapshot of your tenant’s data once per day, completely automated. You don’t need to trigger it manually.
- Point-in-Time Captures: Each snapshot represents the exact state of your supported objects and their attributes at that specific moment in time.
- 5-Day Retention: The five most recent daily snapshots are stored and available for recovery. This provides you with several historical points to roll back to if needed.
This approach guarantees that you have reliable, consistent data available for comparison and restoration, eliminating the need to manage external backup solutions for these specific object types.
Accessing Backup and Recovery in the Entra Admin Center
To view the status of your backups and access restoration options, follow these steps:
- Sign in to the Entra admin center. Use your administrator credentials to log into the portal.
- Navigate to the ‘Roles & admins’ section. In the left-hand menu, expand the Roles & admins section.
- Click on ‘Backup and recovery (preview)’. This dedicated section will provide a complete overview of the feature.
In the Overview section, you’ll find:
- Feature Description: A clear explanation of what Entra ID Backup and Restore provides and its current preview status.
- Recent Backups: A list of the five most recent daily backups, including the timestamp when each snapshot was taken.
What’s Supported (and What Isn’t)
It’s important to understand the scope of what Entra ID Backup and Restore covers. While it provides excellent coverage for essential objects, it’s not a complete backup of every single attribute in your Entra tenant.
Supported Object Types (as of the current preview):
- Users
- Groups
- Service principals (Enterprise Applications)
- Applications (App Registrations)
- Conditional Access Policies
- Named Locations
The primary goal is to include all commonly used and critical properties for these objects. However, you should be aware that some very niche or seldom-used attributes might not be included in the snapshot. The focus is on ensuring the core identity and access management functions can be quickly recovered.
Key Feature: Difference Reporting (Snapshot Comparison)
One of the most powerful and useful aspects of the Entra ID Backup and Restore feature is the Difference Report. This functionality allows you to generate a detailed comparison between a selected backup snapshot and the current, real-time state of your tenant.
How Difference Reporting Works:
- Select a Backup: Within the Backup and recovery section, choose one of your available daily backups.
- Create Difference Report: Click the Create difference report button. The system will start analyzing the snapshot and comparing it to your current environment.
- Review the Report: Once the analysis is complete, you can view a detailed report that highlights all differences. This includes:
- Changed Objects: A breakdown of objects that have been added, modified, or deleted since the snapshot was taken.
- Modified Attributes: For any changed object, the report specifies exactly which attributes were modified (e.g., displayName, members, and conditionalAccessPolicies).
- Old vs. Current Values: Crucially, the report shows you the property value as it existed in the snapshot and its current value, making it easy to see exactly what has changed.
Performance Note:
The first time you run a difference report for a specific snapshot, it might take a bit longer as the system loads initial metadata. However, subsequent reports are significantly faster because much of the data is cached.
Restoring Objects and Configurations
The entire purpose of taking daily snapshots and generating difference reports is to provide a reliable method for restoring data and reverting unwanted changes. You have granular control over the restore process.
What You Can Restore:
You can choose to restore property values exactly as they existed in the selected snapshot. This is particularly valuable for recovering from:
- Malicious Attacks: Reverting malicious changes made by an attacker.
- Accidental Bulk Updates: Undoing a large-scale configuration change that had unintended negative consequences.
- Attribute Corruption: Fixing corrupted or incorrect properties on critical objects.
Restoration Options:
When you initiate a restore, you have several choices:
- Restore All: You can restore all objects and their properties from the difference report, essentially reverting your entire tenant back to the state of that snapshot.
- Restore Specific Object Types: You can choose to only restore specific object types, such as “Conditional Access Policies” or “Users.”
- Restore Specific Objects (by ID): For maximum precision, you can search for and select individual objects to restore based on their unique object ID.
This flexibility ensures you can apply the exact level of restoration needed, from a single user’s properties to an entire system-wide configuration.
Critical Understanding: The Problem of Hard Deletes and the Soft Delete Solution
It’s vital to understand a significant limitation of the Entra ID Backup and Restore feature: it is NOT designed to restore objects that have been hard deleted from your tenant.
What is Soft Delete?
Entra ID uses a “soft delete” mechanism for key objects like users, groups, and applications. When you delete one of these objects, it’s not immediately erased from existence. Instead:
- Moved to Recycle Bin: The object is moved to a “deleted items” area (essentially a recycle bin for identities).
- 30-Day Retention: The soft-deleted object is retained for 30 days.
- Fully Restorable: Within this 30-day window, you can easily restore the soft-deleted object with all its properties intact. The restore process is as simple as going to the “Deleted items” section, selecting the object, and clicking “Restore.”
What is Hard Delete?
A hard delete occurs when an object is permanently removed from the soft-deleted items list before the 30-day retention period ends.
- Permanent Removal: Hard deletion is permanent.
- No Recovery Possible: Once hard-deleted, the object and its unique ID (GUID) are gone forever. It cannot be recovered by the soft delete mechanism.
- The Re-creation Problem: To “get back” a hard-deleted object, you would have to manually create a new object. This new object will have a different object ID, which breaks existing permissions, group memberships, application assignments, and audit trails that were tied to the original object.
Recommendation: Never perform a hard delete unless you are absolutely certain the object is no longer needed and will never need to be restored. It is almost always better to let soft-deleted items expire naturally.
Strengthening Security: Preventing Unauthorized Hard Deletes
Attackers know that soft delete exists and that hard delete is the way to permanently remove a key object. A common attack scenario involves gaining high-level administrative access, then attempting to corrupt data, delete critical accounts, and perform hard deletes to prevent recovery.
To protect against this, you can use Protected Actions in Entra ID to secure the “hard delete” operation with additional security layers.
How to Implement Protected Actions:
The key to preventing unauthorized hard deletes is to configure a protected action for the specific directory operation that controls it.
- Go to Roles and Admins: Navigate to the Roles & admins section in the Entra admin center.
- Access Protected Actions: Click on Protected actions.
- Add Protected Action: Click Add protected actions.
- Define the Action: Select the action “Microsoft.Directory/deletedItems/delete”. This is the specific action that triggers a hard delete.
Enhancing with Authentication Context
To make this protection even stronger, you can assign an Authentication Context to the protected action. This allows you to enforce stricter, more complex Conditional Access policies specifically for this sensitive operation.
Example Enhanced Protection Policy:
- Authentication Context: Create a new authentication context named “High-Security Ops.”
- Link context to Action: Link this context to the “deletedItems/delete” protected action.
- Conditional Access Policy: Create a Conditional Access policy that is triggered whenever the “High-Security Ops” authentication context is requested.
- Enforce Strict Requirements: This policy can require conditions like:
- Phishing-resistant MFA: Such as using a FIDO2 security key or Windows Hello for Business.
- Compliant/Hybrid Joined Device: Ensuring the request comes from a known, managed device.
- Use of Secure Access Workstation (SAW): Restricting access to a hardened workstation.
By setting up this layered defense, you ensure that even if an attacker compromises a global administrator account, they cannot perform a hard delete and permanently destroy your data without meeting these extremely rigorous security requirements.
Conclusion: A Complete Protection Model
Entra ID Backup and Restore is a significant step forward in simplifying and strengthening data protection for your tenant configuration. By utilizing the features outlined in this guide, you can create a comprehensive defense-in-depth model that includes:
- Soft Delete (Built-in): Your first line of defense against accidental deletions.
- Protected Actions (Security): Securing the “hard delete” operation to prevent unauthorized, permanent data destruction.
- Audit Logs and Signals (Visibility): Monitoring for any attempts to modify or delete critical objects.
- Backup and Restore (Recovery): A reliable, automated system to recover corrupted object properties, revert bulk updates, and recover from security incidents.
For the best results, it’s highly recommended to test these functionalities and workflows in a non-production or test tenant first. This allows you to gain a practical understanding of the feature and validate your recovery procedures before depending on them in your live environment.