Lets consider topics such as:
- Containers 101
- Containers at different stages of the software development cycle
- Continuous Delivery with Containers
Containers 101
A lot of articles and books have been written about containers and containerization, so here I will make a small introduction, which, however, does not claim to be final. So, let’s begin.
Containers, technically, is a virtualization method in which the kernel of the operating system supports several isolated instances of user space (containers), instead of one. This visually looks like this:
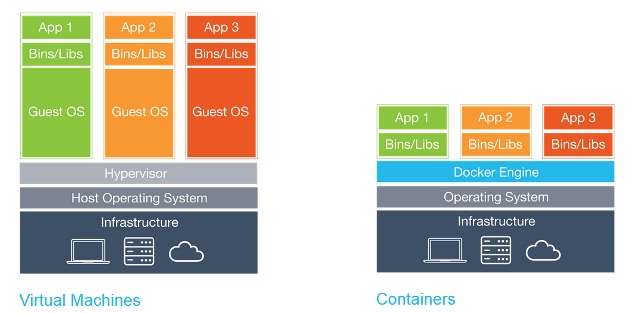
Docker vs VM
It is important to note that containers are not virtual machines.
Container Benefits
There are several benefits to using containers:
- Portability
- Efficiency
- Insulation
- Ease
- Immutability
Portability
The container contains the application along with all the dependencies. This allows you to easily run applications in various environments, such as physical servers, virtual machines, test and product environments, clouds.
Also, portability means that after the Docker image is assembled and it works correctly, it will work anywhere if Docker works there i.e. on Windows, Linux, and MacOS servers.
Efficiency
When working with virtual machine applications, do you really need OS processes, system programs, etc.? As a rule, no, only the process of your application is interesting. Containers provide exactly this: in the container, only those processes that are clearly needed are launched, and nothing more. Because containers do not require a separate operating system, they use less resources. A virtual machine often takes several gigabytes, while a container can be as small as a few megabytes, which allows you to run much more containers than virtual machines on a single server.
Because containers have a higher level of server utilization, less hardware is required, as well as lower costs.
Insulation
Containers isolate the application from all other processes, and although several containers can run on the same server, they can be completely independent of each other. Any interaction between containers must be explicitly declared. If one container fails, it does not affect other containers and can be quickly restarted. Safety is also enhanced by this isolation. For example, exploiting a web server vulnerability on a host can give an attacker access to the entire server, but in the case of a container, an attacker will only gain access to the web server container.
Ease
Since the containers do not require a separate OS, they can be started, stopped or restarted in few seconds, which will speed up all related processes, including Continuous Integration processes. You can start developing faster and not waste time setting up your environment.
Immutability
Immutable infrastructure consists of immutable components that are replaced for each deployment and not updated. Consistency reduces inconsistency and allows you to easily and quickly replicate and move between different states of your application.
New opportunities
All these benefits allow you to manage your infrastructure and applications in a new way.
Orchestration
Virtual machines and servers over time often gain “individuality”, which leads to many generally unpleasant surprises in the future. One solution to this problem is Infrastructure as a Code (IoC) – infrastructure management using a descriptive model using a version control system.
When using IoC, the environment deployment team always brings the target environment to the same configuration, regardless of the initial state of the environment. This is achieved by automatically setting up an existing environment or by re-creating the environment from scratch.
Using IoC, developers make changes to the description of the environment. Subsequently, the target environment is modified to a new state. If it is necessary to make changes on Wednesday, its description is edited.
All this is much easier to do with containers. Turning off the container and starting a new one takes a few seconds, and allocating a new virtual machine takes several minutes.
Scaling
Orchestration tools can also provide horizontal scaling based on current load. It is possible to run as many containers as is currently required, and scale the application accordingly. All this also reduces the cost of the application.
Containers at different stages of the software life cycle
Let’s consider the benefits of containers at various stages of the software life cycle.
Development
The most important advantage is the ease of starting development. After installing Docker, just run two commands: docker pull to load the image and docker run to run it. All dependencies are already resolved at the application build stage.
Debugging
All environments are consistent and their definitions exist, in addition, it is easy to deploy the necessary environment. It is enough to make docker pull the container and start it.
Testing / QA
In case of an error, the problematic environment and the conditions for reproducing the error can be transferred with the container. All infrastructure changes are “documented”. The number of variables is decreasing – versions of libraries, frameworks, OS … It is possible to run several containers to parallelize tests.
Delivery
Using containers allows you to build once, in addition to using containers you need a high level of automation of the assembly and deployment processes. Container delivery of an application can be more secure due to additional isolation.
Continuous delivery
Let’s move from theory to practice.
CD
Three main stages can be distinguished:
- Assembly
- Delivery
- Launch
Assembly
With containers, each assembly is complete. The build result is a Docker Image that can be run anywhere.
Delivery
After our image is compiled and tested, it is uploaded to the Docker Registry, a specialized application for hosting the Docker Image. There it can replace the previous image with the same name (tag). For example, due to a new commit to the master branch, we have assembled a new image (MyProject / MyApp: master), and if the tests are passed, we can update the image in the Docker Registry and everyone who downloads MyProject / MyApp: master will get a new version.
Launch
Finally, the image must be started. A CD system, such as GitLab, can manage this either directly or with the help of a specialized orchestrator, but the process is generally the same – some images are launched, periodically checked for performance and updated if a new version becomes available.
Alternatively, in terms of commit:
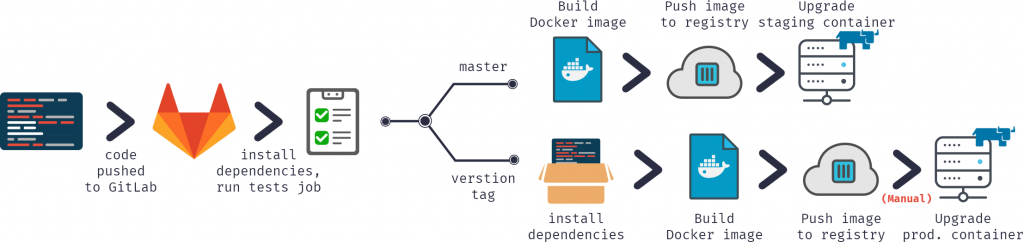
In our continuous delivery configuration, we:
- Commit code to GitLab repository
- Collect the image
- Test it
- Publish a new image in our Docker Registry
- Update the old container to the new version from the Docker Registry
For this we need:
- Docker
- Docker registry
- Registered domain (optional, but desirable)
- GUI tools (optional)
Docker
First of all, we need to run Docker. I would recommend starting with a single server with a common version of Linux, such as Ubuntu, RHEL, or Suse. I do not recommend starting with distributions such as CoreOS, RancherOS, etc. – they are not aimed at beginners. Remember to switch the storage driver to devicemapper.
If we talk about large-scale deployments, then using orchestration tools such as Kubernetes, Rancher or Swarm, you can automate most tasks, but we will not discuss them (at least in the this article).
Docker registry
This is the first container we need to run, it is a standalone application that allows us to store and distribute Docker images. You need to use the Docker Registry if you want:
- Control where your images are stored
- Own an image distribution server
- Integrate image storage and distribution into the development process
Connect Docker Registry and GitLab
To connect the Docker Registry to GitLab, you need to run the Docker Registry with HTTPS support. I use Let’s Encrypt to get certificates. After verifying that the Docker Registry is accessible via HTTPS (you can check this in the browser), follow the instructions to connect the Docker Registry to GitLab. These instructions differ depending on your GitLab installation and the configuration you need. In my case, the setup was to add the Docker Registry certificate and key to / etc / gitlab / ssl, and these lines to /etc/gitlab/gitlab.rb:
registry_external_url 'https://docker.domain.com'

gitlab_rails ['registry_api_url'] = "https://docker.domain.com"
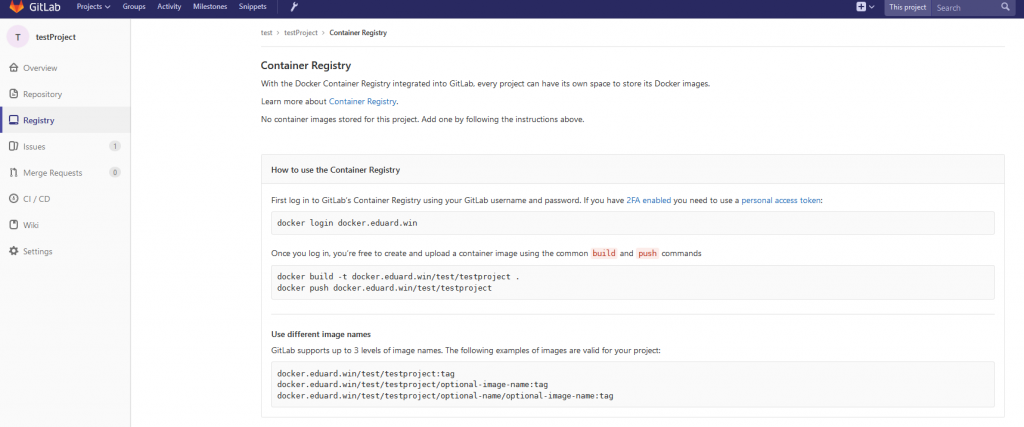
After reconfiguring GitLab, a new Registry tab appeared, which provides information on how to correctly name the created images so that they appear here.
Domain
In our continuous delivery configuration, we will automatically create an image for each branch, and if the image passes the tests, it is published in the Docker Registry and starts automatically, so our application will be automatically deployed from all branches, for example:
- Multiple feature branches at <featureName> .docker.domain.com
- Test version at master.docker.domain.com
- Trial version at preprod.docker.domain.com
- Product version at prod.docker.domain.com
To do this, we need a domain name and a wildcard DNS record that redirects requests to * .docker.domain.com to the IP address of docker.domain.com. Alternatively, you can use various ports.
Nginx
Since we have several environments, we need to automatically redirect requests to subdomains to the correct container. For this, we can use Nginx as a reverse proxy.
GUI Tools
To start working with containers, you can use either the command line or one of the graphical interfaces. There are many available, for example:
- Rancher
- Microbadger
- Portainer
- Simple Docker UI
…
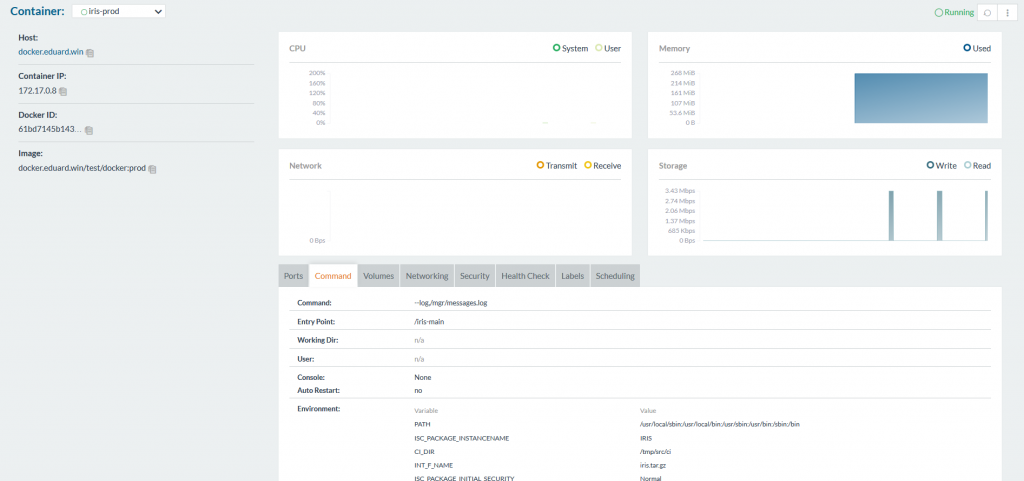
They allow you to create containers and manage them from the GUI instead of the CLI. Here’s what Rancher looks like:
Gitlab runner
As before, to execute scripts on other servers, we need to install the GitLab runner. This question is described in detail in a previous article.
Note that you need to use the executor Shell, not the Docker. Executor Docker is used when you need something from within the image, for example, when creating an Android application in a java container, and you only need apk. In our case, the artifact is the entire container, and for this we need the executor Shell.
Continuous Delivery Configuration
Now that all the necessary components are configured, you can begin to create a continuous delivery configuration.
Assembly
First, we need to assemble an image.
Our code, as always, is stored in the repository, the configuration of the CD in gitlab-ci.yml, but in addition (to improve security) we will store several files related to the image on the build server.