Contains callback code for CD. It was developed in a previous article and is available on GitHub. This is a small library for downloading code, running various callbacks and test code. It is preferable to use git submodules to include this project or something similar in your repository. Submodules are better because it’s easier to keep them up to date. Another alternative is to create a release on GitLab and download it using the ADD command already at build time.
iris.key
License key. It can be loaded during container assembly, and not stored on the server. It is not safe to store the key in the repository. You can get a trial key at WRC or try InterSystems IRIS Experience.
pwd.txt
File containing the default password. Again, storing the password in the repository is rather unsafe.
load_ci.script
It is script that:
- Includes OS Authentication in InterSystems IRIS
- Loads GitLab.xml
- Initializes GitLab Callback Settings
- Loads code
set sc = ## Class (Security.System) .Get ("SYSTEM",. Properties)

write :( 'sc) $ System.Status.GetErrorText (sc)

set AutheEnabled = Properties ("AutheEnabled")

set AutheEnabled = $ ZBOOLEAN (+ AutheEnabled, 16.7)

set Properties ("AutheEnabled") = AutheEnabled

set sc = ## Class (Security.System) .Modify ("SYSTEM",. Properties)

write :( 'sc) $ System.Status.GetErrorText (sc)

zn "USER"

do ## class (% SYSTEM.OBJ) .Load (## class (% File) .ManagerDirectory () _ "GitLab.xml", "cdk")

do ## class (isc.git.Settings) .setSetting ("hooks", "MyApp / Hooks /")

do ## class (isc.git.Settings) .setSetting ("tests", "MyApp / Tests /")

do ## class (isc.git.GitLab) .load ()

halt
Note that the first line is intentionally left blank. If this initial script is always the same, you can just save it to the repository.
gitlab-ci.yml
Now, let’s move on to the continuous delivery configuration:
  build image:
stage: build

  tags:

    - test

  script:

    - cp -r / InterSystems / mount ci

    - cd ci

    - echo 'SuperUser' | cat - pwd.txt load_ci.script> temp.txt

    - mv temp.txt load_ci.script

    - cd ..

    - docker build --build-arg CI_PROJECT_DIR = $ CI_PROJECT_DIR -t docker.domain.com/test/docker:$CI_COMMIT_REF_NAME.
What’s going on here?
First of all, since the image assembly process can only access subdirectories of the base directory – in our case, the repository root directory, you need to copy the “secret” directory (which contains GitLab.xml, iris.key, pwd.txt and load_ci.skript) to cloned repository.
Further, a user / password is required to access the terminal, so we will add them to load_ci.script (for this we need an empty line at the beginning of load_ci.script).
Finally, we create a Docker Image and name it: docker.domain.com/test/docker:$CI_COMMIT_REF_NAME
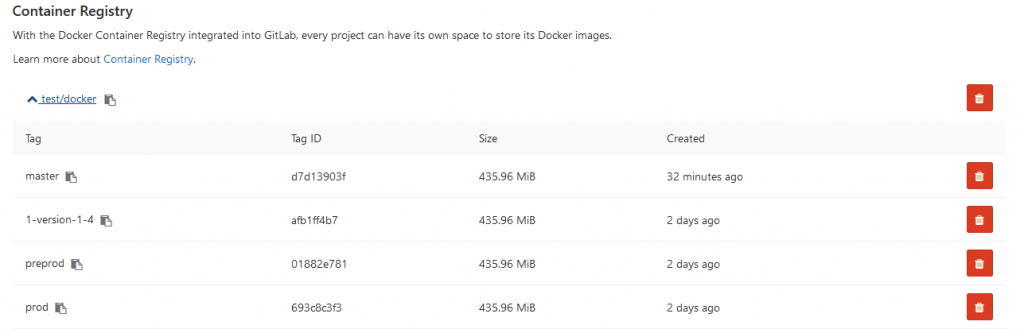
where $ CI_COMMIT_REF_NAME is the name of the branch. Please note: the first part of the image tag must match the name of the repository in GitLab so that it can be seen on the Registry tab.
Dockerfile
Docker Image is created using Dockerfile, here it is:
FROM docker.intersystems.com/intersystems/iris:2018.1.1.613.0

ENV SRC_DIR = / tmp / src

ENV CI_DIR = $ SRC_DIR / ci

ENV CI_PROJECT_DIR = $ SRC_DIR

COPY ./ $ SRC_DIR

RUN cp $ CI_DIR / iris.key $ ISC_PACKAGE_INSTALLDIR / mgr / \

 && cp $ CI_DIR / GitLab.xml $ ISC_PACKAGE_INSTALLDIR / mgr / \

 && $ ISC_PACKAGE_INSTALLDIR / dev / Cloud / ICM / changePassword.sh $ CI_DIR / pwd.txt \

 && iris start $ ISC_PACKAGE_INSTANCENAME \

 && irissession $ ISC_PACKAGE_INSTANCENAME -U% SYS <$ CI_DIR / load_ci.script \

 && iris stop $ ISC_PACKAGE_INSTANCENAME quietly
The following actions are performed:
- We take the image of InterSystems IRIS as the basis. It should be in your Docker Registry.
- First of all, copy our repository (and the “secret” directory) inside the container.
- Copy the license key and GitLab.xml to the mgr directory.
- Change the password to the value from pwd.txt. Note that pwd.txt is deleted during this operation.
- Start InterSystems IRIS.
- Run load_ci.script.
- Stop InterSystems IRIS.
Launch
We have an image, lets run it. In the case of feature branches, you can simply destroy the old container and start a new one. In the case of the product environment, we can start the temporary container first and replace the medium container if the tests pass successfully.
First, the script to delete the old container.
destroy old:

  stage: destroy

  tags:

    - test

  script:

    - docker stop iris- $ CI_COMMIT_REF_NAME || true

    - docker rm -f iris- $ CI_COMMIT_REF_NAME || true
This script destroys the running container and always succeeds (by default, Docker returns an error when trying to stop / delete a nonexistent container).
After that, we launch a new container and register it as an environment.
run image:

  stage: run

  environment:

    name: $ CI_COMMIT_REF_NAME

    url: http: //$CI_COMMIT_REF_SLUG.docker.eduard.win/index.html

  tags:

    - test

  script:

    - docker run -d

      --expose 52773

      --volume / InterSystems / durable / $ CI_COMMIT_REF_SLUG: / data

      --env ISC_DATA_DIRECTORY = / data / sys

      --env VIRTUAL_HOST = $ CI_COMMIT_REF_SLUG.docker.eduard.win

      --name iris- $ CI_COMMIT_REF_NAME

      docker.eduard.win/test/docker:$CI_COMMIT_REF_NAME

      --log $ ISC_PACKAGE_INSTALLDIR / mgr / messages.log
The Nginx container automatically redirects requests using the VIRTUAL_HOST environment variable to the specified port – in this case, 52773.
Since it is necessary to store some data (passwords,% SYS, application data) on the host in InterSystems IRIS, there is the Durable% SYS functionality that allows you to store data on the host such as:
iris.cpf is the main configuration file.
The / csp directory with web application files.
/httpd/httpd.conf with Apache private server configuration.
The / mgr directory in which are stored:
- Databases IRISSYS, IRISTEMP, IRISAUDIT, IRIS, USER.
- WIJ.
- Directory / journal storing journals.
- The / temp directory for temporary files.
- Logs messages.log, journal.log, SystemMonitor.log.
To enable Durable% SYS, the volume argument is specified to mount the host directory and the ISC_DATA_DIRECTORY variable sets the directory for storing Durable% SYS files. This directory should not exist, it will be created automatically.
Thus, the architecture of our containerized application is as follows:
To build such an application, we must at least create one additional database (to save the application code) and create its mapping in the application area. I used the USER scope to store application data, as this scope was added to Durable% SYS by default. Application code is stored in a container so that it can be updated.
- Based on the foregoing,% Installer should:
- Create APP Area / Database
- Upload code to APP area
- Create mapping classes of our application in the USER area
- Perform other configuration (I created a CSP web application and a REST web application)
Code% Installer
I note that to create a database not on the host, I use the directory / usr / irissys / mgr, since the call ## class (% File) .ManagerDirectory () returns the path to the directory for Durable% SYS.
Tests
Now run the tests.
test image:

  stage: test

  tags:

    - test

  script:

    - docker exec iris- $ CI_COMMIT_REF_NAME irissession iris -U USER "## class (isc.git.GitLab) .test ()"

Delivery
Tests passed, we will publish our image in the Docker Registry.
publish image:

  stage: publish

  tags:

    - test

  script:

    - docker login docker.domain.com -u user -p pass

    - docker push docker.domain.com/test/docker:$CI_COMMIT_REF_NAME
Login / password can be passed using secret variables.
Now the image is displayed on GitLab.
And other developers can download it from the Docker Registry. On the Environments tab, all of our environments are available for viewing:
Conclusions
This series of articles discusses common approaches to continuous integration. Automating the assembly, testing, and delivery of your application is possible and easy to implement.
The use of containerization technologies will help optimize application development and deployment processes. Eliminating inconsistencies between environments can simplify testing and debugging. Orchestration allows you to create scalable applications and do not waste a lot of time.ЦЦ