The article describes PoC (Proof of concept) for solving the problem of resource allocation within the framework of CI / CD (Continuous Integration & Continuous Delivery) services and granting privileges for users of these services.
Description
Often, organizations use complex and expensive IDM – a class of Identity Management systems (both in terms of licensing and implementation and maintenance) for access management. We wanted to combine the processes of requesting and providing resources on CI / CD services and providing access to these resources. I wanted to get the most transparent and easy to support and implement a solution that provides the following functionality:
- Creating and Managing CI / CD Service Entities
- Using tools that are convenient for us
- Easy integration with already deployed systems
- Ease of operation
- Replicability
It is worth talking about replication in more detail, we have several network segments with different CI / CD services, and sometimes they have a minimum of network connectivity. The system should serve several environments with minimal cost, which may differ from each other.
What we chose for PoC:
As an approach, IaC (Infrastructure-as-Code) was chosen with the description of the desired states in the form of yaml files.
- Python is a language for writing automation (a suitable option for a prototype);
- Bitbucket – a web service for hosting projects and their joint development;
- Jenkins is a continuous integration service (we need it to visualize the execution of tasks).
How pilot systems for automation were selected:
- Active Directory – well-known directory services (we need groups and users);
- Bitbucket – often needed to create projects, grant privileges;
- Nexus 3 OSS (not advertising, no Wiki page) – a corporate system for storing artifacts, when projects appear, personal project repositories are created and privileges are issued.
A conversation about automation should begin with a general concept.
There are two important entities in Bitbucket: the project and the repository, which is part of the project. To describe the access within the concept, we decided to restrict ourselves to access to the project (more segmented granting of privileges (to the repository) within the concept is not required).
The project in Bitbucket has a project key parameter that will be needed for further manipulations, we took it as a binding basis. It is he who will be the name of the directory in the meta git repository. The project directory will contain the meta-files (maps) of the project described in yaml format.
There are many projects in Plat.Form World, and each has its own specifics. An idea arises to keep in one place information about groups, tools required by the project, stands (sets of servers) and other things that are relevant to the project. The git repository is great for this.
What tasks does it solve?
- First of all, we get a standard description interface that creates the same type of CI / CD service entities.
- At any given time, we can see the real description of users and their privileges within the project.
- By performing automation on a schedule, you can be guaranteed to get exactly what is described in the project metadata (protection from “crazy hands”).
- By expanding the project description in the form of a specific meta data structure, you can automate other entities.
Git repository meta structure:
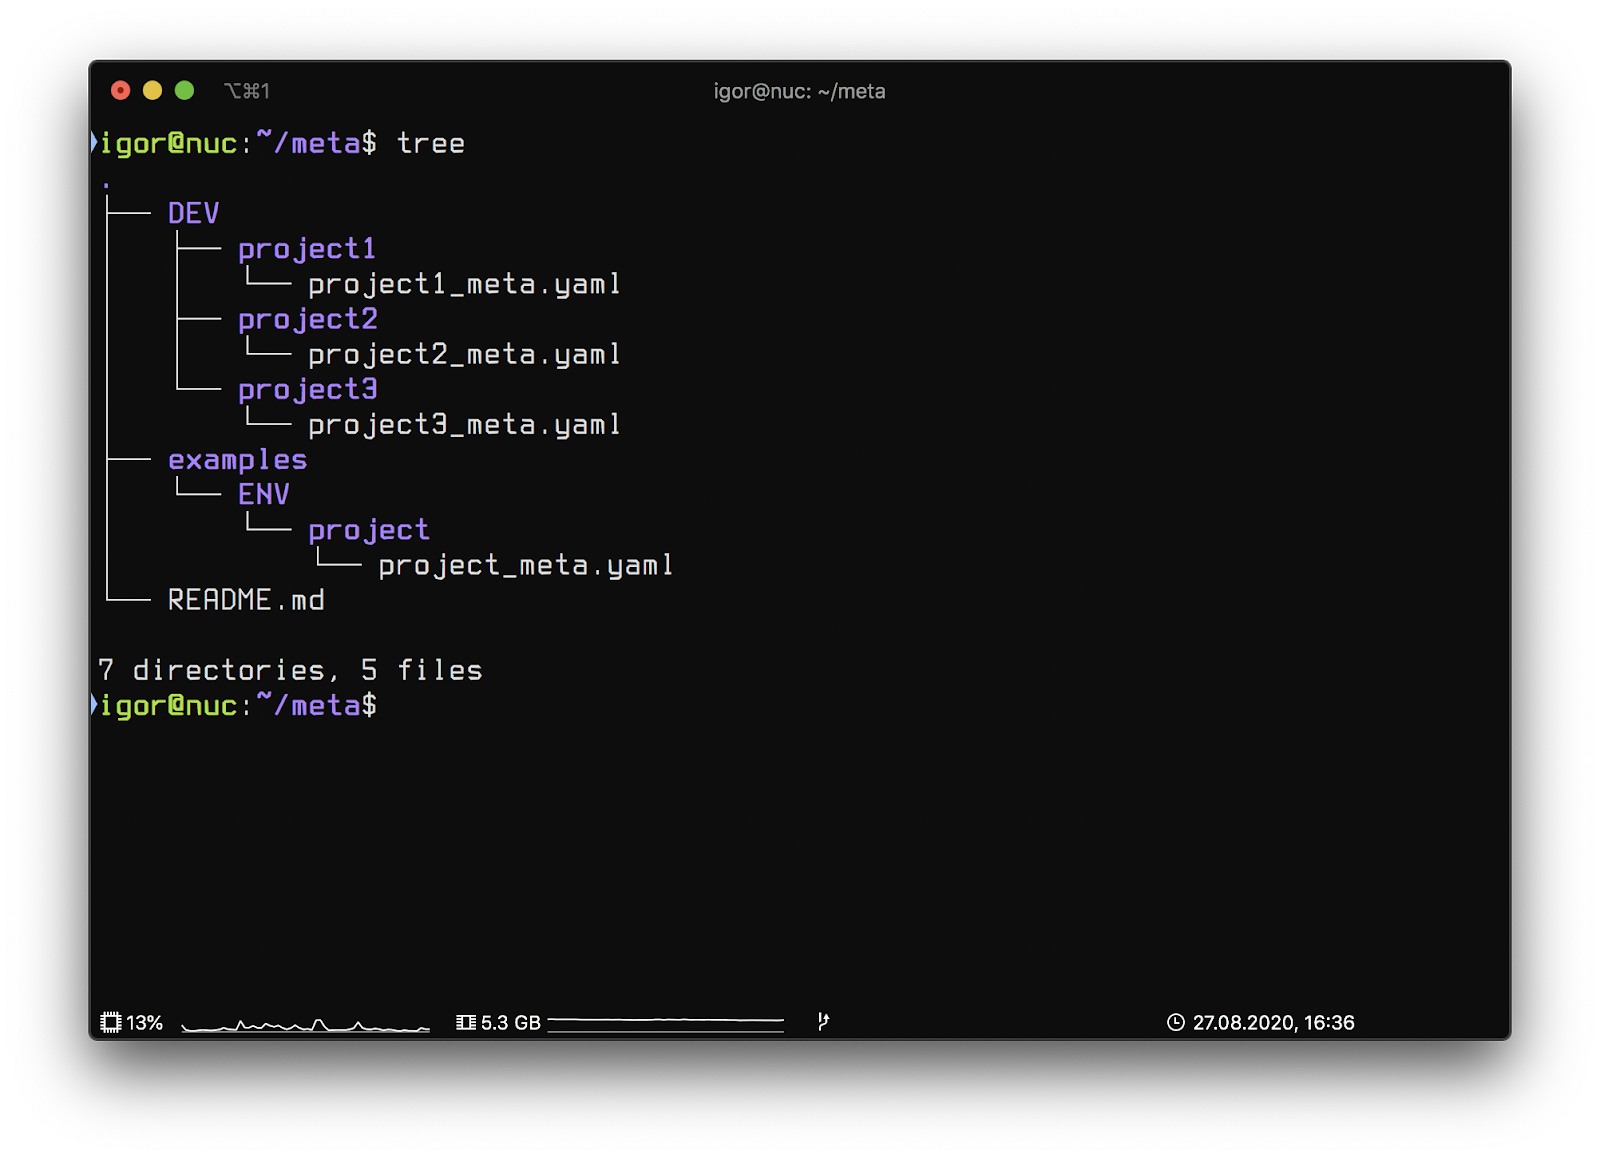
- DEV – network segment name
- project1 – the key of the project in Bitbucket
- project1_meta.yaml – project map
- examples – directory of example description
This structure will allow you to describe several different network segments while maintaining the flexibility to change and differentiate between them. Automation scripts within the concept will be in separate repositories in the project (the names are not important):
- ad-core-automation
- bitbucket-core-automation
- nexus-core-automation
- jjb-core
The purpose of the first three repositories is easy to guess. The last repository jjb-core is the repository in which we will store the Jenkins Job description in the form of recipes for the Jenkins Job builder (it will be discussed below).
Microsoft AD Automation
Active Directory is used by many organizations. A large number of organizational workflows start with it. In the Plat.Form World, all employees have AD accounts and are included in various groups.
The infrastructure division is responsible for AD. For our needs, a technical account (ACU) was allocated, to which the management of one of the Organization unit (OU) was delegated. It is in it with the help of simple automation that we will create groups and fill them with users.
Part of the content of project1_meta.yaml that is responsible for AD:
READY: True
  USER_LOCATION: ldap  # local or ldap
  ROLES:
    owner:
      - owner1
    developer:
      - developer1
      - developer2
    qa:
      - qa1
      - qa2

GLOBAL_PRIVILEGES: &global_privileges

  owner: [read, write, delete]
  developer: [read, write]
  qa: [read]
READY – a boolean value and allows, if necessary, to turn off the automation of processing this meta file
TEAM – section describing the essence of the project
ROLES – arbitrary names of roles on the project, reflecting the essence
GLOBAL_PRIVELEGES – the section describes which role will have which privileges
As part of granting rights for the development environment, in order not to complicate the example, we will focus on 3 main roles: owner, developer, qa (in general, the number and name of roles is arbitrary). For further automation, these roles will allow you to cover most of the daily needs (we immediately had the tech role for ACE, but for example, we will do without it).
As part of the OU project, we will automatically, based on the project meta-files, create the necessary SG (Security group) and fill them with users.
In the scheme, the structure looks like this:
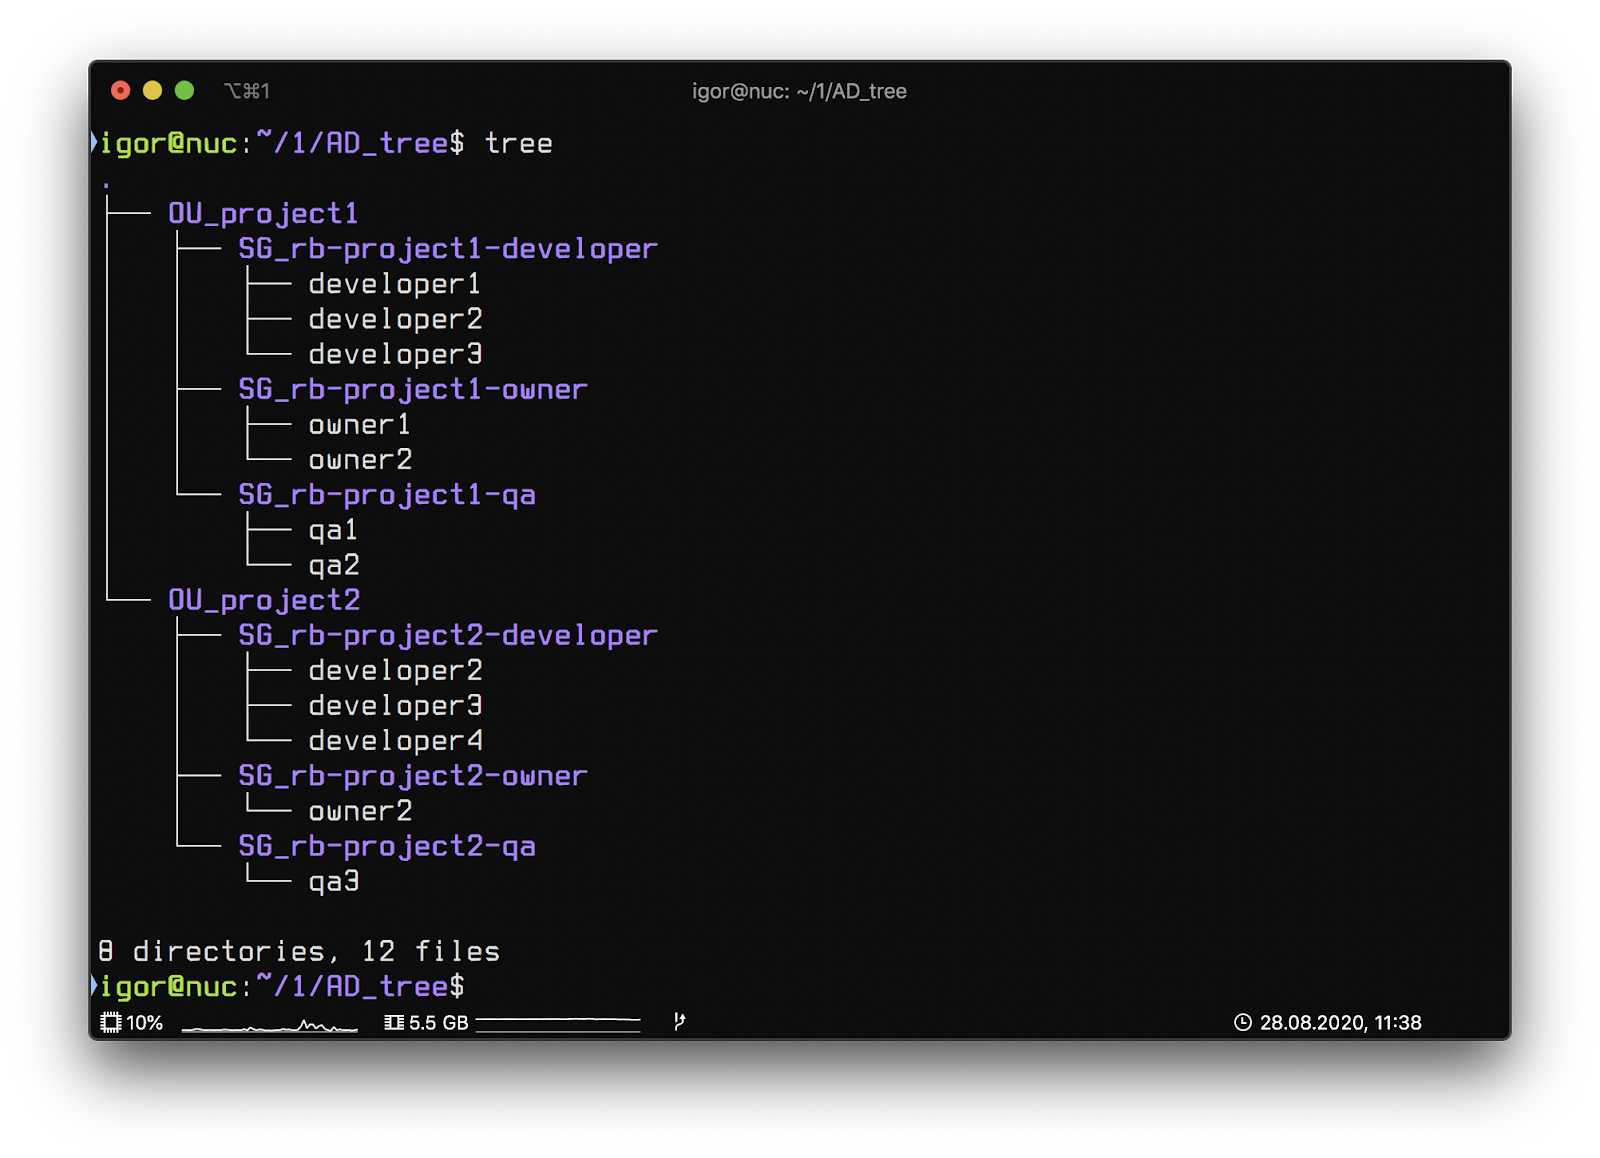
We use a flat hierarchical structure in AD to make it easy to maintain and very intuitive.
The automation script turned out to be very simple. It allows you to track changes in the composition of groups (add / remove users) and create OU / SG.
To run, you need to install the dependencies from requirements.txt (ldap3, PyYAML).
Sonatype Nexus3 OSS Automation
What is Nexus? Nexus is a repository manager that allows you to serve different types and formats of repositories through a single interface (Maven, Docker, NPM, and others).
Why Nexus?
There is a community version that has rich functionality sufficient to perform most tasks related to storing artifacts and proxying external repositories.
The artifact storage process is important when designing a test and deployment pipeline.
What needs to be automated?
Blobstore
All binaries uploaded via proxy repositories (we do not provide direct access to internet repositories, we only use nexus coding) published to hosted (local repositories) repositories are stored in the Blob stores associated with the repository. In a basic Nexus deployment, a single node is usually associated with a local directory on the filesystem, usually the sonatype-work directory.
Nexus version> = 3.19 supports two types of File and S3 storage.
UI Blob stores:
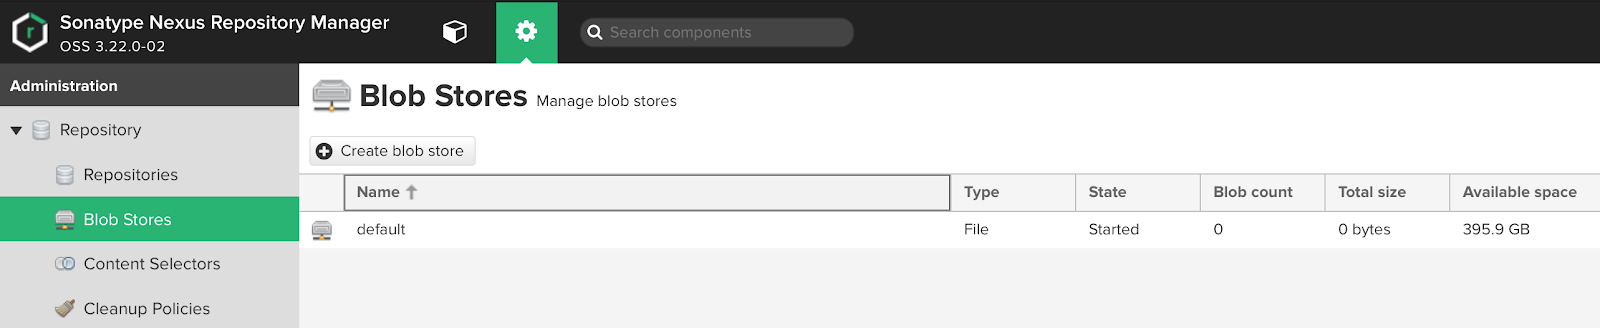
As we can see, the default storage is already available to us by default. From the information above, we can understand that this blob is on disk and the entire volume of the disk partition is available to it, on which the sonatype-work directory is located.
Problematic
In general, everything is logical, but there are at least two problems that you should think about:
In the case that all repositories are tied to one blob, we may have problems with the repository being beaten.
If we assume that our Nexus will be used by several development teams, then we should immediately think about the fact that in some situations, excessive generation of artifacts can clog the entire section and the problem will be not only for the team that generates a large amount of artifacts, but also for other teams. …
A simple solution
The first thing that comes to mind is creating separate blob stores. Obviously, this does not solve the problem of layout on a single disk partition. A good solution is to “slice” sections for each project. Looking ahead, this will also solve the issue of monitoring and sending notifications to those responsible for the project. Convenient solution to the second point of the described problems.
On the first point, the most correct solution is to create a separate blob store for each repository.
Blob stores creation UI:
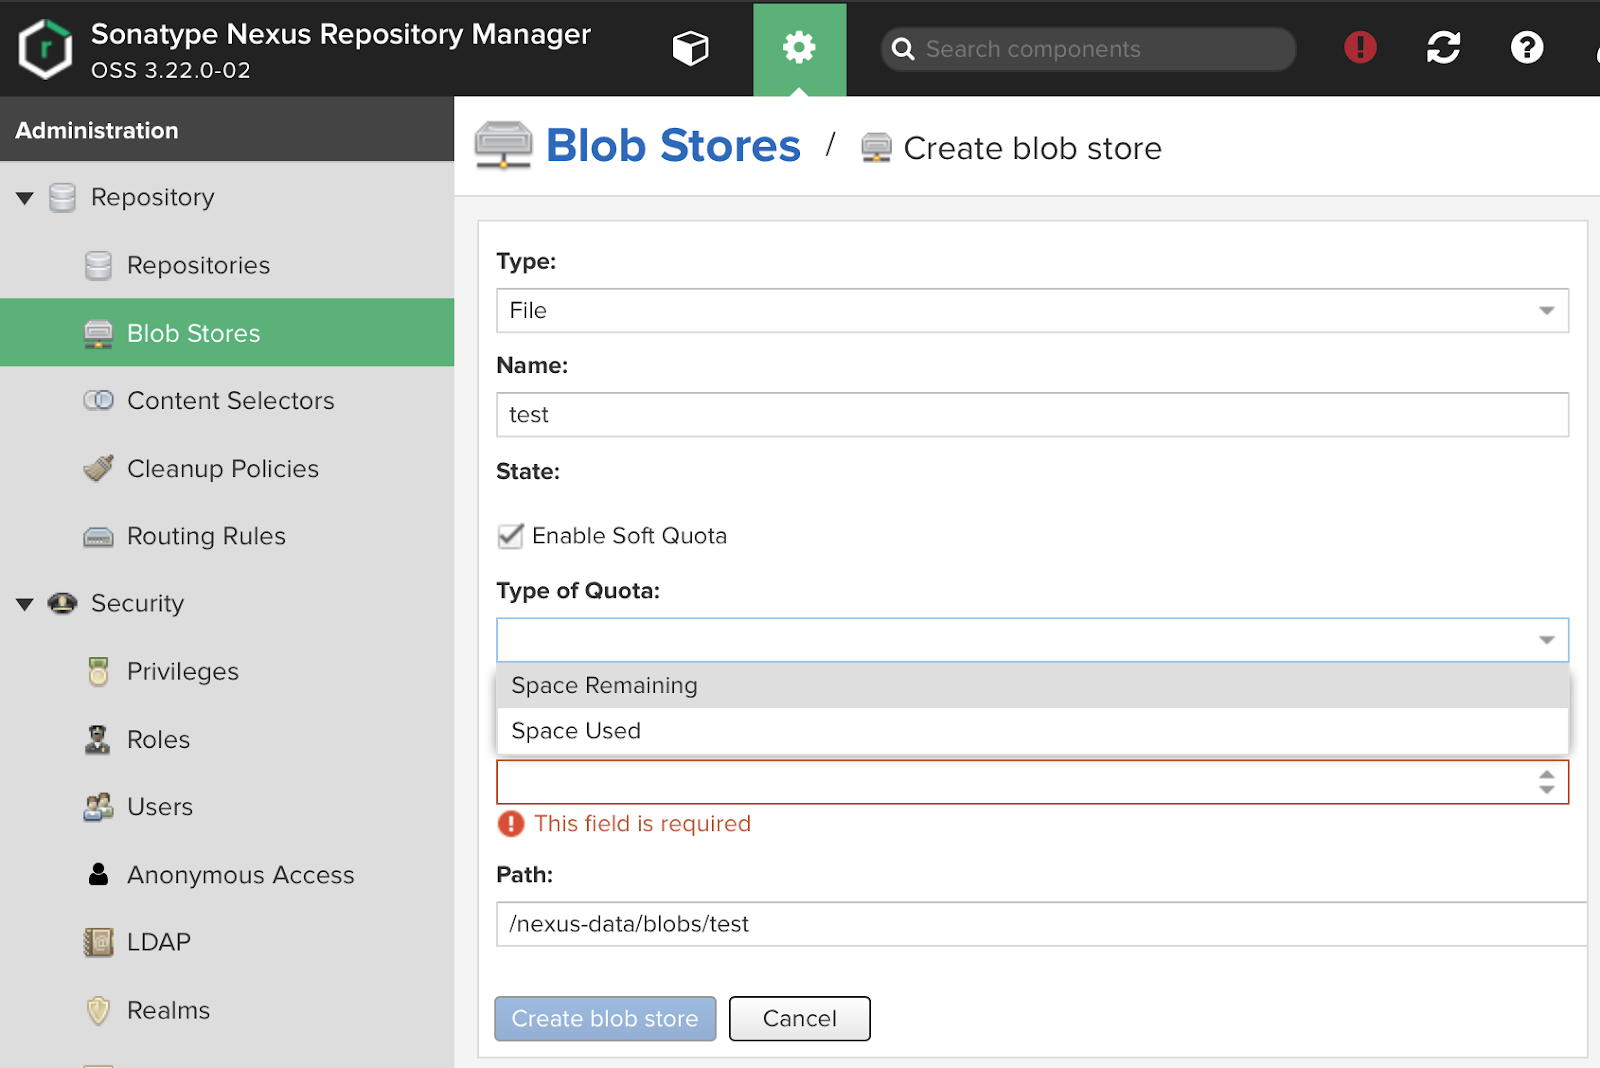
Nexus allows you to customize the Soft quota, a questionable thing. It notifies that there is something wrong with the place, but does not take any action. With the correct application of the steps described above, it is possible to achieve more functionality (There is an easy way to track the volume and disk accesses, and overflow does not cause trouble for “neighbors”).
In the path field, we can indicate the section that is mounted, for example, as nfs.
That allows you to keep the partition directly on the network storage. This can slow down the speed, but it offers several advantages in terms of simplicity.
We run Nexus in Docker, for this we use the compose file. To include new mount points, a simple solution is to add the parent mount point directory to the compose file.
Docker-compose example:
version: "3"

services:
  nexus3:
    container_name: nexus3
    image: sonatype/nexus3:3.27.0
    ports:
      - 8443:8443
      - 50011:50011 # project1-docker-releases
      - 20012:50012 # project2-docker-releases
    volumes:
      - /nexus/sonatyep-work:/nexus-data
      - /mnt-blobs:/mnt-blobs
      - /etc/timezione:/etc/timezone
      - /etc/localtime:/etc/localtime
    logging:
      driver: "json-file"
      options:
        max-size: "10m"
        max-file: "10"
Repositories
Nexus allows you to create repositories of almost all common formats. If we go in the direction of ideal storage, then it is advisable to create a minimum release and snapshot repository for each project, although the ideal option may also contain a release-candidat repository. This will set up a convenient mechanism for cleaning up repositories.
Definitely, the release repository should in many cases have the maximum storage depth, as a requirement, there should be no “garbage” in releases. In contrast, with snapshot repositories, we should be able to clean up safely at any convenient time and without risks.
All repository formats are accessed on ports 80 and / or 443, with the exception of docker. The Docker repository must have a personal port to access it. This leads to some complications. Every time we publish a new port, we must add its publication in the compose file.
LDAP
Nexus has the ability to implement an LDAP connection and use it as user authentication. In our case, we use user groups to grant rights.
Roles
For convenience, roles are created for the project, it is better to go from the minimum, and for ourselves we have chosen three roles for each project:
- qa – have sufficient rights to read
- developers – read, write
- owners – read, write, delete
Groups from AD are matched to local Nexus groups.
API
Starting with Nexus OSS 3.19, a very convenient API for managing the Nexus has appeared, this is a significant innovation that many users have been waiting for will allow us to manage the Nexus and bring it to the desired state.
Swagger UI API:
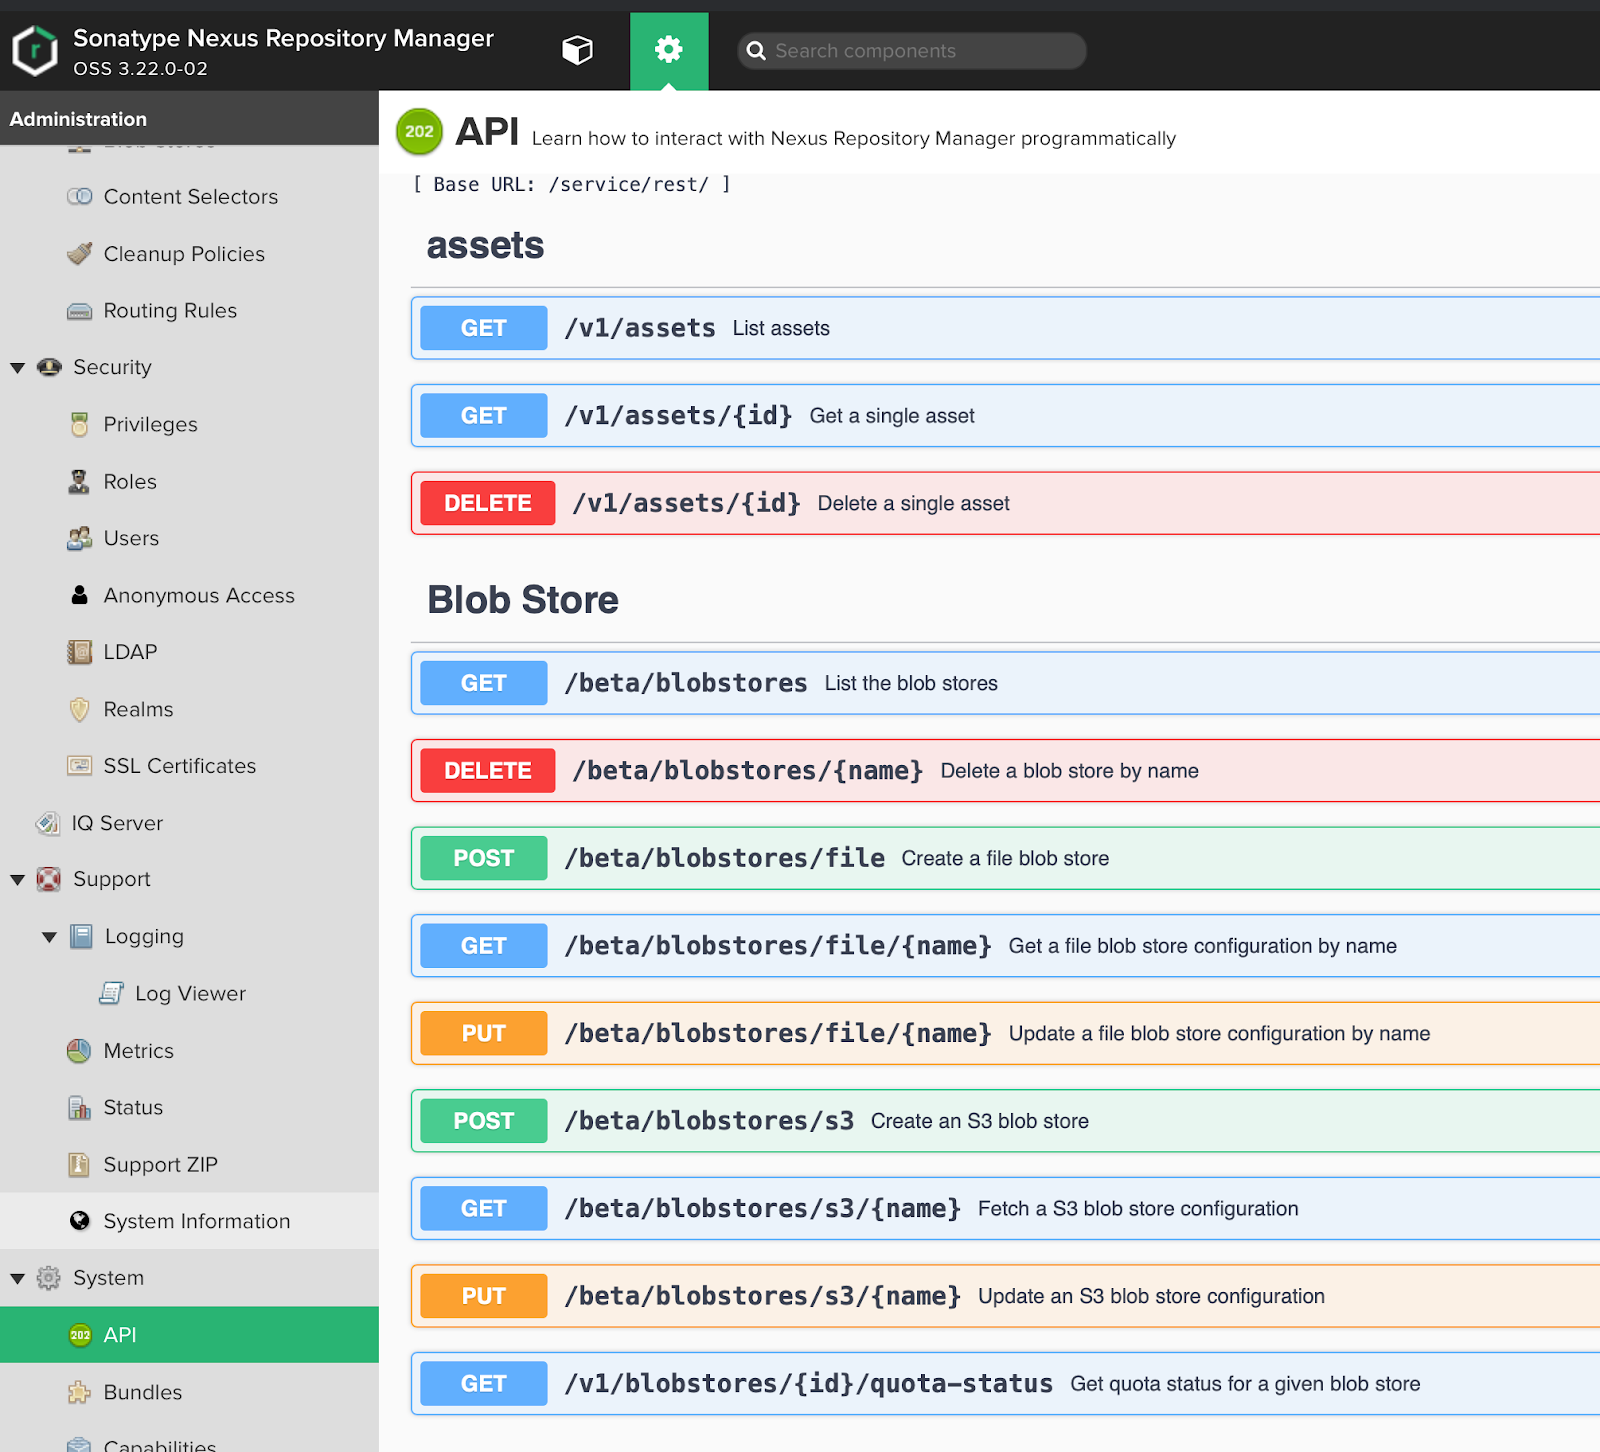
At the time of this writing, the API is, for the most part, in beta status, but despite this, it works without big problems and allows you to automate almost everything you need.
The part of the project1_meta.yaml content that is responsible for the nexus:
RESURCES: # Resources served by automation
nexus:
repository: # Entities
# Maven
- name: test-maven-releases
locationType: hosted
repoType: maven
- name: test-maven-proxy
locationType: proxy
blobStoreName: test
remoteUrl: http://test.ru
repoType: maven
# Docker
- name: test-docker-releases
locationType: hosted
repoType: docker
- name: test-docker-proxy
locationType: proxy
blobStoreName: test-blob
remoteUrl: http://test.ru
repoType: docker
- name: test-docker-group
blobStoreName: test-blob
locationType: group
httpPort: 10555
repoType: docker
memberNames:
- test-docker-releases
- test-docker-proxy
# Npm
- name: test-npm-proxy
locationType: proxy
remoteUrl: http://test.ru
repoType: npm

blob:
- name: test-blob
path: test-blob

privileges:
<<: * global_privileges
Based on such a file, the automation system creates all serviced entities. In our teams, it is assumed that teamlead is responsible for filling the project file, however, anyone can create it. After creating a pull request, the participants involved in the process should agree, after merge with the master branch, the automation works.
It is worth noting that we strive to make the process as simple as possible for the user, which entails the use of configuration templates, which are described in the form of primitive models. The system allows you to override the defaults in case of need for a description of the project map.
Sample model code for maven hosted repository:
def maven_model_hosted (params):
model = {
'name': params.get ('name'),
'online': params.get ('online', True),
'storage': {
'blobStoreName': params.get ('blobStoreName', params ['name']),
'strictContentTypeValidation': params.get ('strictContentTypeValidation', True),
'writePolicy': params.get ('writePolicy', 'ALLOW')
},
'cleanup': {
'policyNames': params.get ('policyNames', [])
},
'maven': {
'versionPolicy': params.get ('versionPolicy', 'MIXED'),
'layoutPolicy': params.get ('layoutPolicy', 'PERMISSIVE')
}
}
return model
This approach allows you to reduce the description of the created entity to a minimum.
Ideologically, anything that can use the defaults should use them, but can be overridden if needed in the project map file.
Atlassian Bitbucket Automation
For a concept, it will be enough to automate the creation of a project and granting privileges to it.
Part of the content of project1_meta.yaml that is responsible for Bitbucket:
...
  bitbucket:
    name: project1-bitbucket-project # Это не project key!
                                                     # project_key получается из имени файла
    description: "Описание проекта в свободной форме"
    privileges:
      <<: *global_privileges
Jenkins Job Builder
JJB is a python utility for describing jenkins entities in the form of yaml manifests, which are translated into API requests that jenkins understands. This allows you to perfectly solve the problem of managing a large number of similar tasks.
Jenkins in this context is an interface for displaying the success of the automation tasks being performed and monitoring them. At the first stage, we plan to perform the tasks themselves on a schedule, for example, every hour. This will get rid of most of the uncontrolled manual changes and will bring the system to the described state every hour.
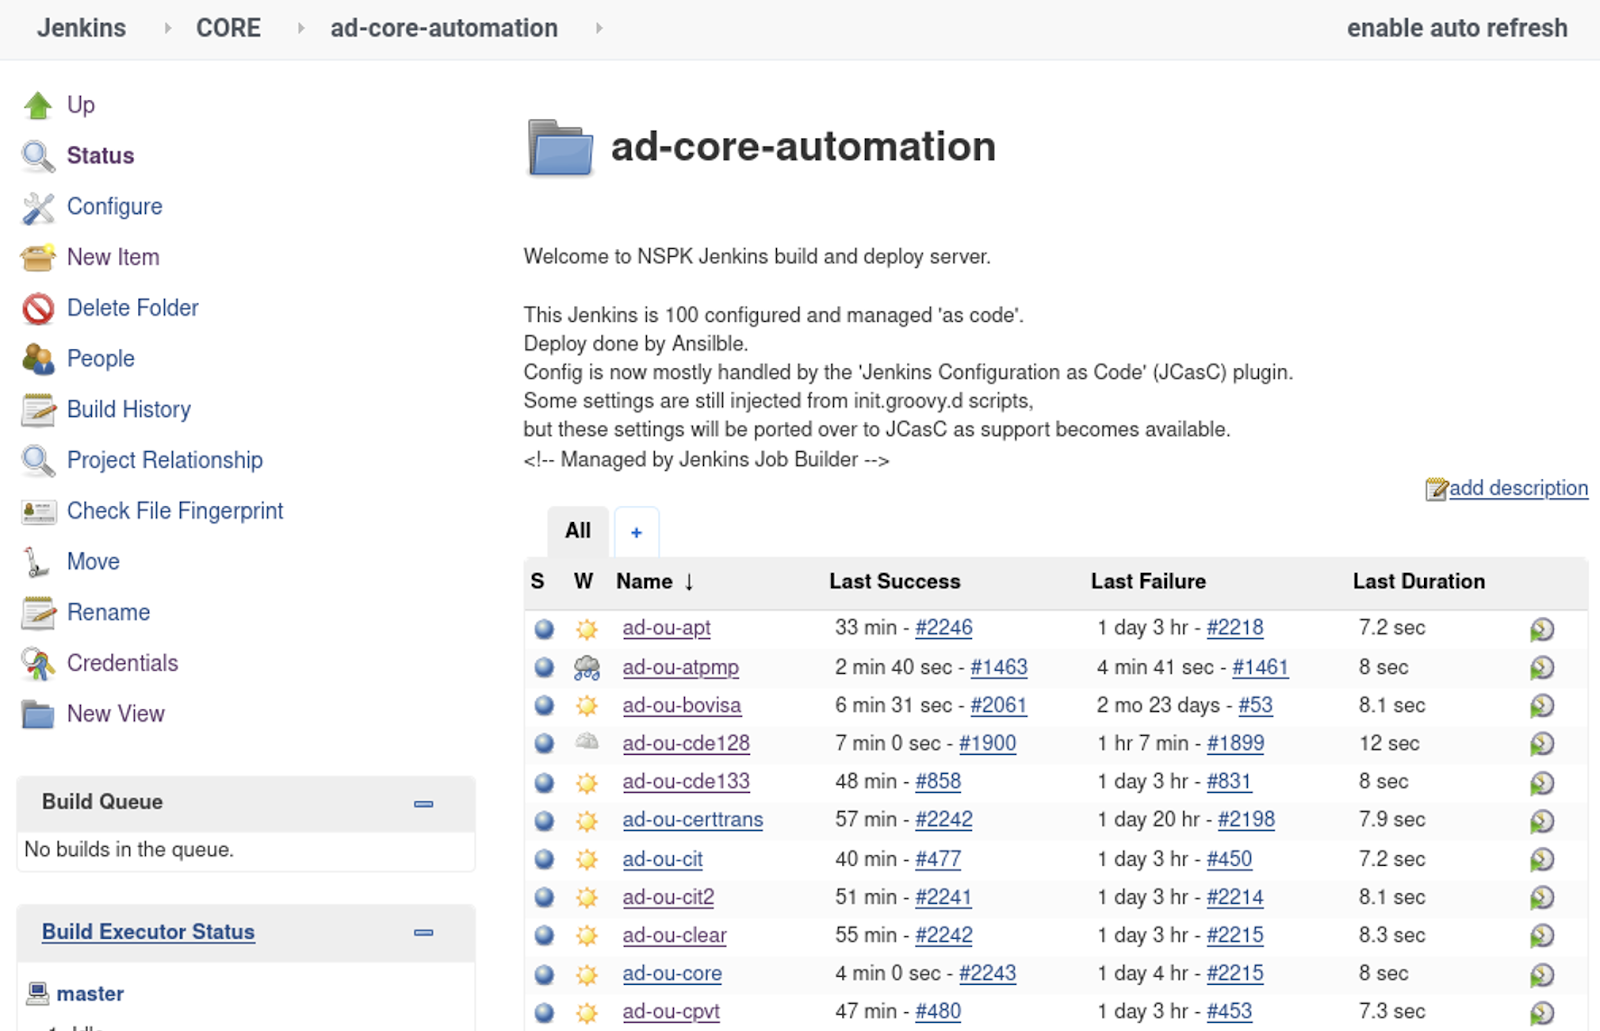
Jjb-core repository structure:

Each directory contains a Jenkins job description consisting of two files.
The yaml file describes the jenkins job template has the following content:
---
- job: # Create the CORE directory
name: CORE
project-type: folder

- job: # Create ad-core-automation subdirectory in CORE
name: CORE / ad-core-automation
project-type: folder

# Template description
- job-template:
name: 'CORE / ad-core-automation / {name} - {project_key}'
project-type: pipeline
job_description: OU and SG management for {project_key}

# Defaults
GIT_BRANCH: master
GIT_CRED_ID: jenkins-ad-integration

triggers:
- timed: 'H (0-59) * * * *'

parameters:
- string:
name: GIT_BRANCH
default: '{GIT_BRANCH}'
description: Git ref (branch / tag / SHA)
- string:
name: GIT_CRED_IDjenkins
default: '{GIT_CRED_ID}'
description: Jenkins credentials ID for BitBucket
- string:
name: META_LOCATION
default: 'DEV / {project_key} / {project_key} _meta.yaml'
description: Meta file location if CORE / meta repository

dsl:! include-raw-escape: ./ad-core-automation.groovy

- project:
name: ad-core
project_key:
- project1
- project2
- project3
jobs:
- 'CORE / ad-core-automation / {name} - {project_key}'
The groovy file is a simple jenkinsfile:
def meta_location = params.META_LOCATION
def git_cred_id = params.GIT_CRED_ID
def git_branch = params.GIT_BRANCH

pipeline {
agent {
label 'common-centos'
}

stages {
stage ('Clone git repos') {
steps {
echo 'Clone meta'
dir ('meta') {
git credentialsId: "$ {git_cred_id}",
url: '[email protected]: Mir-Platform / meta-example.git'
}
echo 'Clone ad-core-automation'
dir ('auto') {
git credentialsId: "$ {git_cred_id}",
branch: git_branch,
url: '[email protected]: Mir-Platform / ad-core-automation.git'
}
}
}

stage ('Install and run') {
steps {
echo 'Install requirements'

withDockerContainer ('python: 3.8.2-slim') {
withEnv (["HOME = $ {env.WORKSPACE}"]) {
sh 'pip install --user --upgrade -r auto / requirements.txt'
sleep (5)
echo 'Run automation'
withCredentials ([usernamePassword (credentialsId: 'ad_tech', passwordVariable: 'ad_pass', usernameVariable: 'ad_user')]) {
dir ('auto') {
sh "./run.py -u $ ad_user -p $ ad_pass -f ../meta/$ {meta_location}"
}
}
}
}
}
}
}
}
All this describes the creation of the following Jenkins structure:
General algorithm of automation:
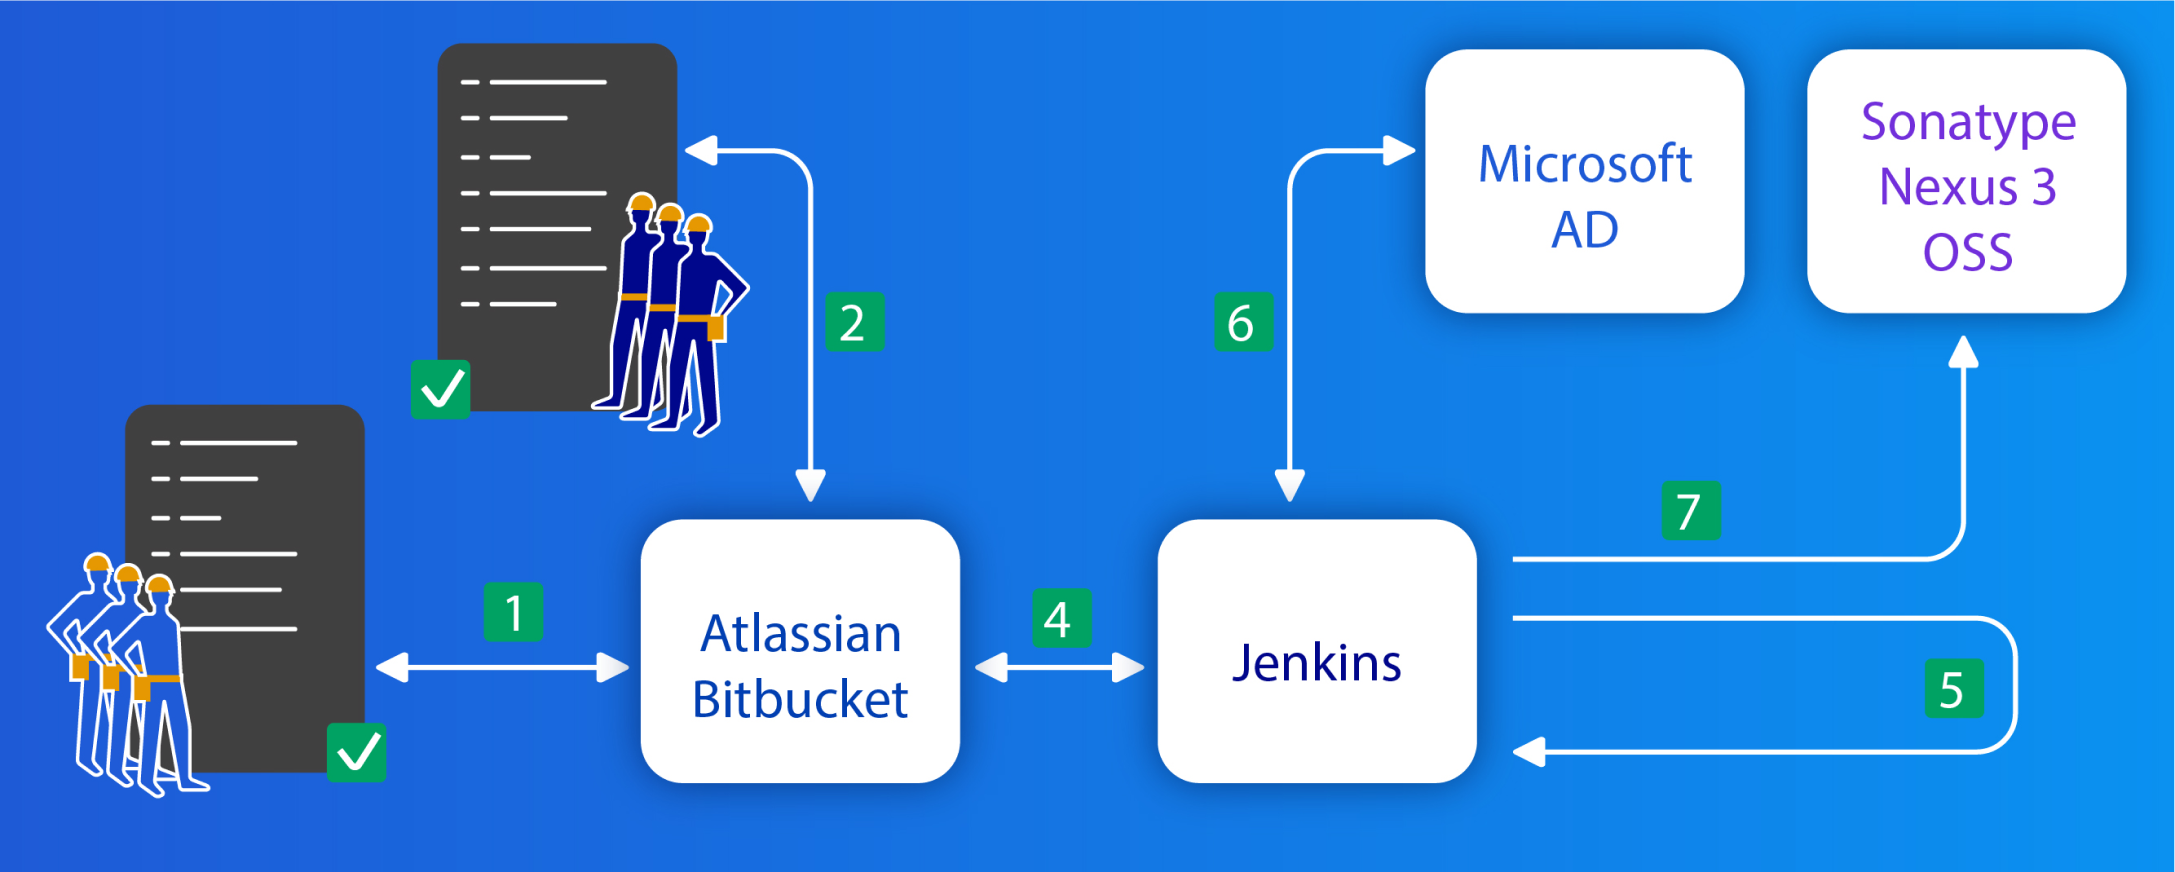
- The initiator creates a new directory with the project map in the meta repository and creates a pull-request to the master branch (1).
- Pull-request gets checked by approvers (2)
- In case the project is new, while in manual mode the engineer prescribes Bitbucket project key for JJB (this action must be performed once)
- Automation after making changes to the JJB templates generates the described jobs for the project (4, 5).
- Jenkins launches AD (6) Automation, which creates the required entities as OUs and SGs in AD. If all entities have already been created, brings the composition of users to the described one (deletes / adds)
- Jenkins starts the Bitbucket automation (4), if the project is not in Bitbucket, then creates it and provides access to the project team groups. If the project already exists, it adds AD groups to it with the necessary privileges.
- Jenkins launches automation for Nexus (7). The described Nexus entities are created and accessed based on AD groups
Result and development
The result of this concept was the emergence of basic automation of the described processes. The interaction interface in the form of yaml project maps turned out to be very convenient, there were requests for improvements. The main indicators of success were the ease and speed of providing the resources needed for projects.