Some people keep at home 24/7 a small and quiet system unit with Windows as a server, which can be accessed via RDP (from the same smartphone), and often worry about the number of "non-random" attempts to connect to it. The task is not new and quite solvable. Today we will try to consider the following options for solving this problem:
1. Configure OpenSSH server, starting from Windows 10 1809 it is officially part of the distribution, enable key authorization and access RDP via SSH tunnel. On the router, accordingly, configure forwarding only for the SSH port. Of the pros – it is safe enough, of the minuses:
- It is not very clear if it is possible to log in from a smartphone (for the iPhone, you will probably need some kind of hybrid RDP client).
- Only TCP is supported, and RDP has been able to take advantage of UDP for quite some time.
- Windows updates have an inexplicable property to disable OpenSSH, I don't know what this is connected with, but this happened several times a year.
2. Configure VPN directly on the router. In general, the solution is working and the disadvantages here are quite subjective:
- I don’t want to put an additional “optional” load on the router.
- An additional attack vector opens directly on the router.
- Requires certain technical skills.
3. Additionally, install the Raspberry Pi and configure a VPN on it (you can run a lot more on it). I still use it, an excellent option if you have the necessary skills and a little money for "raspberry".
4. For the sake of completeness, rather than for real home use, you can install Hyper-V on our Windows machine, create a Linux virtual machine and configure a VPN on it. As in the previous case:
- Requires certain technical skills.
- The load on our not particularly powerful home server is increasing (I usually have an Intel NUC).
- Problems may occur during a power outage (the virtual machine will be in a Saved state and the VPN will be unavailable).
5. Finally, you can install a VPN server directly on Windows. The choice of a specific VPN is a deeply personal matter, but for the last couple of years, I was lucky enough to work with WireGuard and even implement a specialized client for Wandera, so the choice was obvious.
Preliminary research
WireGuard has been part of the mainline Linux kernel for over a year. With Windows, not everything is so rosy, however, due to the specifics of the protocol, the official WireGuard for Windows quite fulfills the function of a server, it only lacks NAT. Thanks to Henry Chang and his inspired micahmo, we roughly know how to do this with standard Windows tools. To be honest, the process looks a bit complicated, although we must give credit to micahmo, which partially automated it. In addition, we are interested in the following comment under the original post:
Good day, excellent article!
I have a Win10 machine that I plan to use as a wireguard server. This machine has the main internet network adapter + OpenVPN client connection that is used for selected routes.
If I understand correctly described above wireguard VPN setup will only allow my wireguard clients to access main internet interface but not the OpenVPN connection, please correct me I’m wrong.
Is there a way for a wireguard client to use all available connections and honor existing routes configuration on wireguard server?Thank you!
Let's formulate the problem
1. Simplify the process of installing and configuring WireGuard as much as possible. The pressure on companies providing VPN services is growing and, you see, it would be nice if any Windows user could:
- Configure WireGuard on a cloud-hosted server without diving into implementation specifics. It may also be necessary to bypass geographic restrictions on certain products or services.
- Install WireGuard on your home Windows server and get permanent secure access to your own network and use ALL the services available to him at home, no matter where in the world he is.
2. Use some kind of Internet Connection Sharing alternative with all due respect to the existing network configuration.
In this case, a working build is currently successfully running on a pair of home PCs with Windows 10 Pro and a VPS in Microsoft Azure (Windows Server 2019 Core, 1vCPU + 1Gb). We also note that in terms of performance, the implementation in the kernel certainly wins, and if it is not difficult for you to configure WireGuard on a VPS with Linux, then this is a better choice. We are considering this case for ordinary Windows users far from IT. In the current implementation, the most difficult thing is to configure UDP port forwarding (on a router or in the control panel of a virtual machine in the cloud).
WireSock Gateway
And with WireGuard it is consonant and in meaning it fits, besides, as luckily, the wiresock.net domain turned out to be free. Installers and brief installation instructions are on the site. In a nutshell, in addition to downloading and installing the application, you need to run 'cmd' as an Administrator and execute 'wg-quick-config -add -start'. wg-quick-config will try to determine the external IP address and free local UDP port, which will be offered by default. If the router is configured with dynamic DNS, then you can change the IP to a domain name. If the ISP / VPS provider gives you a 'white' IPv4 address, then after that it is enough to configure a forward on the router for the selected UDP port. The default virtual network for the WinTun adapter is 10.9.0.0/24, but it can also be changed if desired.
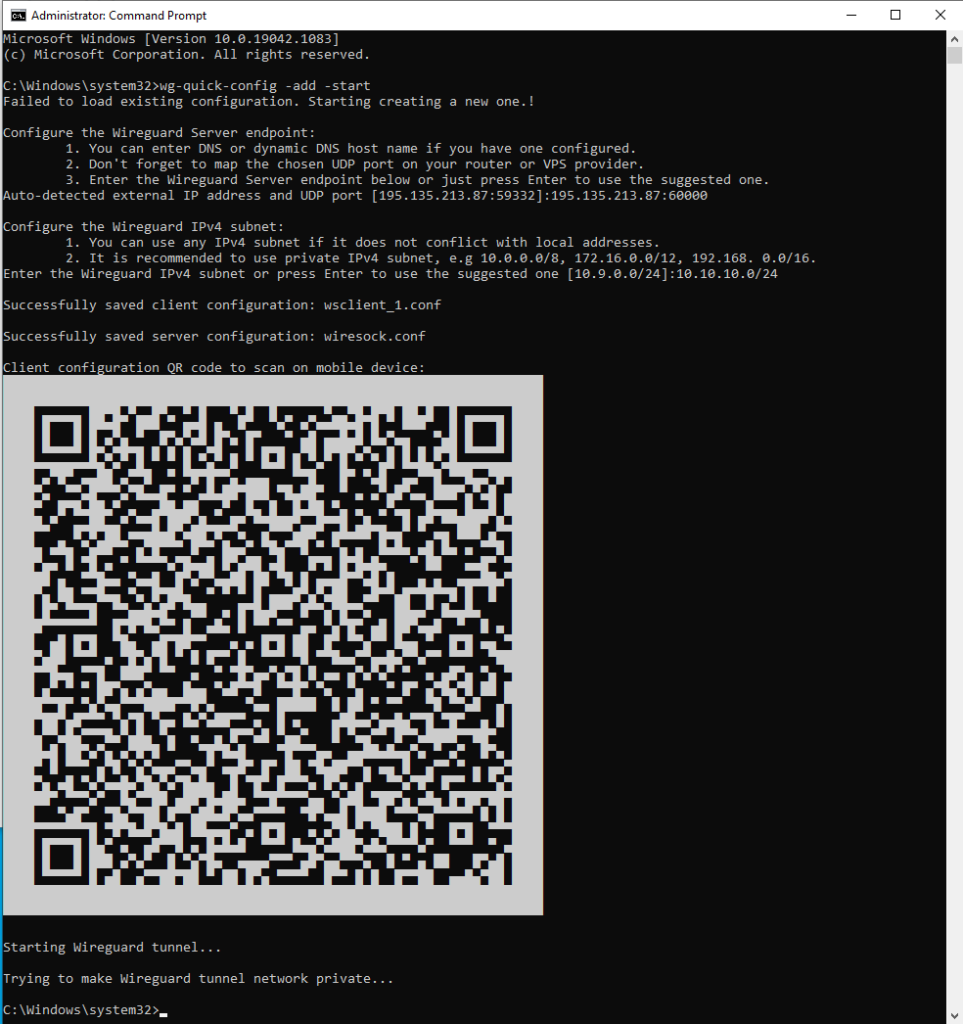
wg-quick-config will create configuration files for the server (wiresock.conf) and client (wsclient_1.conf), create and launch a WIreGuard tunnel, and display the client configuration as a QR code that can be scanned by a smartphone. Additional clients can be added by calling 'wg-quick-config -add -restart'.
The main work is done by the Wiresock Service, which supports two modes of operation: NAT and Proxy.
The first one is classic NAT, the service includes routing (for some types of connections since Windows 7, built-in routing does not work, and they are routed "manually"), determines the "default" external interface on which it is engaged in spoofing addresses in incoming/outgoing packets. It gets almost the same as the built-in Internet Connection Sharing, but without restrictions on the addresses of the client's network.
The second is somewhat more interesting and it is this mode that is enabled by the installer by default. All TCP / UDP connections (conditionally for UDP), except for DNS and NTP, are transparently redirected to local TCP / UDP proxies, which, on their own behalf, establish connections to network resources. Moreover, if the local system has HTTP / SOCKSv5 proxy system settings, then Wiresock Service will respectfully use them. NTP and DNS are handled separately. Wiresock Service itself is responsible for the NTP server, and for DNS requests are redirected to locally configured IPv4 DNS servers, and if there are none for some reason, then 8.8.8.8 and 1.1.1.1 are used. The only drawback of this approach is that ping to external addresses will not work.
Thus, the main tasks seem to have been completed. And if there is interest in the project, then it has a lot to develop, for example:
- Currently (v.1.0.2.4) there is no IPv6 support.
- White IPv4 is gradually becoming a rarity, so I would like to organize a WireGuard server behind a NAT (or even multi-NAT) ISP. Here, however, one cannot do without an external service (with a "white" IP).