In the previous article , we looked at the architecture of Kubernetes and discussed the types of vulnerabilities that can be found in its software components and their settings. Now let’s move on to the practical aspects of protection and talk about how to detect vulnerabilities and how to protect yourself competently from them.
Searching for vulnerabilities in the K8s settings on your own is not a very rewarding task, because for this you need to know what vulnerabilities this or that version is subject to, what errors can be found in the settings, and much more. It is much more convenient to search for vulnerabilities automatically using vulnerability scanners. As an example of such scanners, I will give a couple of projects.
Kube-bench
Let’s start with a simple kube-bench utility . This utility is designed to test how securely a Kubernetes infrastructure is deployed. The CIS Kubernetes Benchmark document is used as verification criteria. We will talk more about this document a little later, when we consider building protection, but for now let’s return to scanners.
So, kube-bench uses custom tests for validation that are configured using YAML files, making it easy to update this tool as test specifications evolve.
By default, kube-bench attempts to automatically detect the running Kubernetes version and match it against the corresponding CIS Benchmark version. For example, Kubernetes version 1.15 maps to the CIS cis-1.15 reference version valid for Kubernetes 1.15.
The utility also tries to identify the components running on the server, K8s, in order to understand which tests to run (for example, run tests on the master node only if it is running the API server).
The utility can be run inside a pod as a separate task, but it will need access to the host’s PID namespace to inspect running processes, as well as access to some directories on the host where configuration files and other files are stored.
As an example, let’s prepare a job.yaml file that can be used to perform checks as a task. As you can see later in this file, you will need to mount several external directories for it to work.
---
apiVersion:   batch/v1
kind: Job
metadata:
    name: kube-bench
spec:
    template:
      metadata:
        labels:
          app: kube-bench
      spec:
        hostPID: true
        containers:
          - name: kube-bench
            image: aquasec/kube-bench:v0.6.8
            command:   ["kube-bench"]
            volumeMounts:
              - name: var-lib-etcd
                mountPath: /var/lib/etcd
                readOnly: true
              - name: var-lib-kubelet
                mountPath: /var/lib/kubelet
                readOnly: true
              - name: var-lib-kube-scheduler
                mountPath: /var/lib/kube-scheduler
                readOnly:   true
              - name: var-lib-kube-controller-manager
                mountPath: /var/lib/kube-controller-manager
                readOnly:   true
              - name: etc-systemd
                mountPath: /etc/systemd
                readOnly: true
              - name: lib-systemd
                mountPath: /lib/systemd/
                readOnly: true
              - name: srv-kubernetes
                mountPath: /srv/kubernetes/
                readOnly: true
              - name: etc-kubernetes
                mountPath: /etc/kubernetes
                readOnly: true
                # /usr/local/mount-from-host/bin is mounted to access kubectl / kubelet, for   auto-detecting the Kubernetes version.
                # You can omit this mount if you specify --version as part of the command.
              - name:   usr-bin
                mountPath: /usr/local/mount-from-host/bin
                readOnly:   true
              - name: etc-cni-netd
                mountPath: /etc/cni/net.d/
                readOnly:   true
              - name: opt-cni-bin
                mountPath: /opt/cni/bin/
                readOnly: true
        restartPolicy: Never
        volumes:
          - name: var-lib-etcd
            hostPath:
              path: "/var/lib/etcd"
          - name: var-lib-kubelet
            hostPath:
              path: "/var/lib/kubelet"
        -   name: var-lib-kube-scheduler
            hostPath:
              path: "/var/lib/kube-scheduler"
        -   name: var-lib-kube-controller-manager
            hostPath:
              path: "/var/lib/kube-controller-manager"
        - name: etc-systemd
            hostPath:
              path: "/etc/systemd"
          - name: lib-systemd
            hostPath:
              path: "/lib/systemd"
          - name: srv-kubernetes
            hostPath:
              path: "/srv/kubernetes"
          - name: etc-kubernetes
            hostPath:
              path: "/etc/kubernetes"
          - name: usr-bin
            hostPath:
              path: "/usr/bin"
          - name: etc-cni-netd
            hostPath:
              path: "/etc/cni/net.d/"
        - name: opt-cni-bin
            hostPath:
              path: "/opt/cni/bin/"
You can start this task for execution as follows:
$ kubectl apply -f job.yaml

style='background:white'>job.batch/kube-bench created
Next, check if the pod is running correctly:
$ kubectl get pods

NAME                      READY   STATUS              RESTARTS   AGE

kube-bench-j76s9   0/1     ContainerCreating   0          3s
After a few seconds, check that the sub works:
# Wait for a few seconds for the job to complete

$ kubectl get pods

NAME                      READY   STATUS      RESTARTS   AGE

kube-bench-j76s9   0/1     Completed   0          11s
And we look at the scan results in the logs of the pod:
# The results are held in the pod's logs
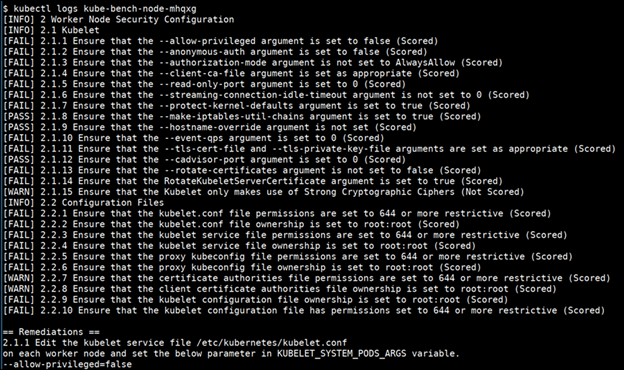
kubectl logs kube-bench-j76s9
[INFO] 1 Master Node Security Configuration
[INFO] 1.1 API Server
...The figure below shows the results of a real scan of K8s using Kube-bench.
Scanner
If kube-bench is a small utility that runs directly as a Kubernetes task, then the Checkov scanner is a much more powerful tool.
Checkov not only validates the Kubernetes manifest, but it also helps you detect incorrect infrastructure settings such as shared resources, and helps you maintain cloud infrastructure security best practices.
For example, Kubernetes manifest checks can support Kubernetes asset security best practices and detect issues such as over-privileged containers, bad image lifecycle practices, QoS misconfiguration, health checks, and more.
This scanner has a free edition designed for small organizations up to 50 nodes. For a larger number of nodes, it is proposed to use paid editions, in which the scanner interacts with the bridgecrew cloud service and allows you to automatically not only detect, but also eliminate vulnerabilities, thereby providing a full cycle of vulnerability management.
To install the scanner, run the following commands:
pip install checkov

#install via homebrew:

brew tap bridgecrewio/checkov https://github.com/bridgecrewio/checkov

brew update

brew install checkov
Next, to start the scan, run:
checkov -l --framework kubernetesLet’s see how the scanner works with a few examples.
git clone https://github.com/kubernetes/examples

checkov -d examples/
The result of the checks is a list of items from the same CIS Kubernetes Benchmark and the status of their check. In the snippet below, we see one validation pass and two vulnerabilities, with the problematic fragment of the JSON file for each of them:
…

kubernetes scan results:

Passed checks: 1650, Failed checks: 2502, Skipped checks: 0

Check: CKV_K8S_27: "Do not expose the docker daemon socket to containers"

        PASSED for resource: Deployment.selenium-hub.default

        File: /staging/selenium/selenium-hub-deployment.yaml:1-37

Check: CKV_K8S_8: "Liveness Probe Should be Configured"

        FAILED for resource: Pod.mongo.default (container 0)

        File: /staging/meteor/mongo-pod.json:22-36


                22 |       {

                23 |         "name": "mongo",

                24 |         "image": "mongo:latest",

                25 |         "ports": [

                26 |           {

                27 |             "name": "mongo",

                28 |             "containerPort": 27017

                29 |           }

                30 |         ],

                31 |         "volumeMounts": [

                32 |           {

                33 |             "name": "mongo-disk",

                34 |             "mountPath": "/data/db"

                35 |           }

                36 |         ]


Check: CKV_K8S_12: "Memory requests should be set"

        FAILED for resource: Pod.mongo.default (container 0)

        File: /staging/meteor/mongo-pod.json:22-36


                22 |       {

                23 |         "name": "mongo",

                24 |         "image": "mongo:latest",

                25 |         "ports": [

                26 |           {

                27 |             "name": "mongo",

                28 |             "containerPort": 27017

                29 |           }

                30 |         ],

                31 |         "volumeMounts": [

                32 |           {

                33 |             "name": "mongo-disk",

                34 |             "mountPath": "/data/db"

                35 |           }

                36 |         ]
If necessary, unnecessary checks can be disabled, for example, in the case when one or another checked service is not used in the Kubernetes production environment.
For example, the following command skips the CKV_AWS_20 check.
checkov -d . --skip-check CKV_AWS_20We build protection
With tools for finding vulnerabilities, I think everything is clear, in addition to the two described above, you can find descriptions of a dozen more similar utilities on the Internet. But now let’s move on to how to protect K8s.
Let’s start with the CIS Kubernetes Benchmark document .
The main sections regarding Kubernetes in this document are as follows:
- Enable Kubernetes Role-Based Access Control (RBAC).
- Use Third-Party Authentication for API Server.
- Protect etcd with TLS, Firewall and Encryption.
- Isolate Kubernetes Nodes.
- Monitor Network Traffic to Limit Communications.
- Use Process Whitelisting.
- Turn on Audit Logging.
- Keep Kubernetes Version Up to Date.
- Lock Down Kubelet.
Consider the requirements of each of the sections in more detail.
role model
Role Based Access (RBAC) can help you determine who has access to the Kubernetes API and what permissions they have. RBAC is usually enabled by default in Kubernetes 1.6 and up. Because Kubernetes consolidates authorization controllers, when you enable RBAC, you must also disable legacy attribute-based access control (ABAC).
When using RBAC, give preference to namespace-specific permissions over cluster-wide permissions. Even when debugging, don’t grant cluster administrator privileges. It’s safer to allow access only when it’s needed in your particular situation.
To enable RBAC, you need to start the API server with the flag --authorization-mode flagas in the example below:
kube-apiserver --authorization-mode=Example,RBAC --other-options --more-optionsHere is an example of setting a role for the default namespace that can be used to grant read access to a pod:
apiVersion: rbac.authorization.k8s.io/v1

kind: Role

metadata:

  namespace: default

  name: pod-reader

rules:

- apiGroups: [""] # "" indicates the core API group

  resources: ["pods"]

  verbs: ["get", "watch", "list"]
You can read more about role settings on the website.
Using Third Party Authentication for Server API
It is recommended to integrate Kubernetes with a third party authentication provider. This provides additional security features such as multi-factor authentication and ensures that kube-apiserver does not change when users are added or removed. If possible, ensure that users are not managed at the API level. You can also use the OAuth 2.0 protocol and the Dex provider.
etcd protection
Etcd is a distributed key value store that is used to store the state of the cluster. Since etc stores the state of the cluster and its secrets, it is a sensitive resource and an attractive target for attackers. If unauthorized users gain access to etcd, they can take over the entire cluster. Read access is also dangerous because attackers can use it to elevate privileges.
To configure client-server communication over TLS for etcd, use the following configuration options:
cert-file=: certificate used for TLS;--key-file=: unencrypted certificate key;--client-cert-auth: Indicates that etcd should check incoming HTTPS requests for a trusted CA signature;--trusted-ca-file=: Trusted certificate authority;--auto-tls: Use a self-signed certificate for client connections.
To configure TLS on etcd server-to-server connections, use the following settings:
--peer-cert-file=: certificate used for SSL/TLS connections between servers;--peer-key-file=: unencrypted certificate key;--peer-client-cert-auth: when this option is set, etcd checks the validity of client certificate signatures for all incoming requests;--peer-trusted-ca-file=: Trusted certificate authority;--peer-auto-tls: Use an auto-generated self-signed certificate for point-to-point connections.
Also, you need to install a firewall between the API server and the etcd cluster.
Kubernetes Node Isolation
When building the K8s network architecture, keep in mind that Kubernetes nodes should be on a separate network and should not be directly connected to public networks. Even better, avoid direct connections to the corporate network. But for this, it is necessary to completely separate Kubernetes management traffic and data traffic into separate subnets, isolating them from each other. This can be done by creating an ACL on the firewall with traffic divided into separate subnets. More details on setting up network policies can be found in the document.
Network traffic monitoring
Containerized applications typically make extensive use of cluster networks. Monitor active network traffic and compare it to traffic allowed by Kubernetes network policy to understand how your application is interacting and identify anomalous connections.
At the same time, if you compare active traffic with allowed traffic, you can identify network policies that are not actively used by cluster workloads. This information can be used to further enforce the allowed network policy, removing unnecessary connections to reduce the attack surface.
Process whitelisting setup
Process whitelisting is an effective way to detect unexpectedly running processes. First, you need to monitor the application for a certain period of time to determine all the processes that are running during the normal behavior of the application. You can then use this list as your whitelist for future analysis of the correctness of the application’s behavior. The unexpected appearance of third-party processes, without making obvious changes to the operation of the application, is a clear sign that something is wrong with the application.
Enable audit logs
Audit logging should definitely be enabled in order to track down unusual or unwanted API calls, especially failed authentication attempts. Authorization denied may mean that the attacker is trying to use stolen credentials or guess the correct password.
When uploading files to kube-apiserver, you can use the flag –audit-policy-fileto enable audit logging as well as specify exactly which events should be logged. You can set one of the following logging levels:
- No , metadata only,
- Request, which logs the metadata and the request, but not the responses,
- RequestResponse which logs all three.
Regular component updates
Update your Kubernetes infrastructure components regularly. Despite the obviousness of this advice, many still neglect it.
At the top level, the upgrade process consists of the following steps:
- Updates to the primary control node.
- Updates to additional control nodes.
- Work node updates.
The process of updating components is not an easy task, so it is recommended to refer to the documentation for technical details.
Secure Kubelet Agent Configuration
A kubelet is an agent that runs on each node that interacts with the container runtime to run pods and report metrics for the nodes and pods. Each kubelet in the cluster provides an API that you can use to start and stop pods and perform other operations. If an unauthorized user gains access to this API (on any node) and is able to run code on the cluster, they can compromise the entire cluster.
Here are the main steps you can take to secure Kubelet:
Disable anonymous access to the agent with --anonymous-auth=falseso that unauthenticated requests receive an error response. To do this, the API server must identify itself with the kubelet. This can be done by adding flags -kubelet-clientcertificateand --kubelet-client-key.
The parameter --authorization modemust be set to a value other than AlwaysAllow to ensure that all incoming requests are authorized.
Include NodeRestriction in the API setting server –admission-controlto restrict kubelet permissions. This only allows the kubelet to modify the modules bound to its own node object.
Set --read-only-port=0to close read-only ports. This prevents anonymous users from accessing information about running workloads. This port prevents hackers from making changes to the cluster, but can be used during the reconnaissance phase of an attack.
Disable the cAdvisor option, which was used in older versions of Kubernetes to provide metrics and has been replaced by Kubernetes API statistics. Set -cadvisor-port=0to avoid exposing information about running workloads. This is the default for Kubernetes v1.11.
Conclusion
In this rather voluminous article, we reviewed the main points related to automating the search for vulnerabilities in a Kubernetes cluster, and also gave basic recommendations for configuring the security of K8s components.