Bolt Senior Engineer shared the ability to use infrastructure as code with AWS CDK using a web game as an example.
architecture pattern
The architecture shown below accurately represents the resources used for the web version of the familiar game Snake (image 1): Key features:
- It’s a serverless architecture: no reserved computing power and no upfront costs.
- Amazon API Gateway serves as the only entry point into the application.
- S3 storage is used to host the static website and media content (in our case, the game itself).
- AWS Lambda is used as the API runtime.
- Dynamo DB saves the state of the system (in this case, the game score).
- For the sake of simplicity of the example, I have to bypass the integration with Cognito, which in the real solution was used to identify users.
According to the diagram above, the repository contains three projects:
/aws-snake
/snake-API # node/express API
/snake-client # normal JavaScript game
/snake-iac # AWS CDK project
The original commercial project is built on .NET Core, but for the current sample, I’m using TypeScript for three reasons:
- TypeScript looks like a cross between Java/C# and JavaScript.
- JavaScript-like syntax is almost universally understood.
- To prove that the CDK really works regardless of the chosen programming language.
Getting started with CDK
Getting started with AWS CKD is quite simple, you can either follow the official getting started instructions or follow these steps:
-
- Create an AWS account.
- Create an AWS Access Key.
- Install AWS CLI .
curl "https://awscli.amazonaws.com/AWSCLIV2.pkg" -o "AWSCLIV2.pkg"
sudo installer -pkg AWSCLIV2. pkg -target /
- Configure AWS CLI using a pre-generated key
aws configure
- Install NodeLTS.
brew install node #mac
sudo apt-get install nodejs #debian
- Install the AWS CDK toolkit.
npm install -g aws-cdk
- Set the target runtime (in our case TypeScript) .
npm install -g typescript
- Create an empty CDK project.
mkdir test -iac
cd test -iac
cdk init app --language typescript
- Get familiar with CDK commands.
cdk list # List all program stacks
cdk synthesize # Synthesize and print the CloudFormation for the current stack
cdk bootstrap # Deploying the CDK tool stack in an AWS environment
cdk diff # Compares the local stack with the expanded stack and prints the difference
cdk deploy # Deploying a stack in an AWS account
cdk destroy # Destroy the unrolled stack
That’s all! Now you know all the necessary CDK commands. Although basically you will only use two:
cdk diff
And
cdk deploy
Stack setup
A CloudFormation stack is a collection of AWS resources managed as a single entity, configured as a JSON or YAML template
. Basically, the AWS CDK wraps the CloudFormation stack, allowing you to create it using a general purpose programming language.
cdk init app
creates an empty stack with the corresponding code file depending on the target language. In our case, this
lib/snake-iac-stack. ts
import *  as cdk from '@aws-cdk/core' ; export class  SnakeIacStack extends  cdk . Stack {
constructor ( scope: cdk. Construct , id: string, props?: cdk. StackProps ) {
super ( scope, id, props ) ;
// The pre that defines your stack goes here
}
}
Adding a new resource to the stack is simply creating a new class instance, for example, to create an S3 store to host our JavaScript game, we simply add the following lines:
// pre that defines your stack goes here
// Snake Web Client
const snakeClient = new  s3. Bucket ( this , nameIt ( "website-s3" ) , {
 bucketName: nameIt ( "website-s3" ) ,
 versioned : false
 publicReadAccess: true ,
 websiteIndexDocument: "index.html" ,
 removalPolicy: cdk. RemovalPolicy . DESTROY // remove on stack destruction
}) ;
Note that it is very important to set a universal naming convention for all resources, for example:
< environment > - < project > - < resource >
To do this, we use the following helper function:
const envName = 'test' ;
const nameIt = ( name: string ) = >  ` $ { envName } -snake- $ { name } ` . toLowerCase () ;
Combination of resources
An essential feature of the CDK is the ability to logically link resources together using them as dependencies. For example, we can set the s3 configured above as the default route (entry point) to our web application:
// API Gateway
const snakeClientIntegration = new  integration. HttpProxyIntegration ( {
 method:gate. HttpMethod . RECEIVE ,
 url: snakeClientBucket. bucketWebsiteUrl ,
}) ;
const httpApi= new  gate. HttpApi ( this , nameIt ( "Api-GateWay" ) , {
 apiName: nameIt ( "Api-GateWay" ) ,
 defaultIntegration: snakeClientIntegration,
}) ;
Next, we can set the API routes in the same way:
const apiGateway = new  gate. HttpApi ( this , nameIt ( "Api-GateWay" ) , {
// ... //
}) ;
// Snake API
const apiLambda = new  lambda. Function ( this , nameIt ( "api-lambda" ) , {
// ... //
}) ;
const snakeApiIntegration = new integration. LambdaProxyIntegration ({
 handler: apiLambda, // api integration
}) ;
APIGateway. addRoutes ({ // api route
 path: "/api/{proxy+}" ,
 methods: [ gate. HttpMethod . ANY ] ,
 integration: snakeApiIntegration
}) ;
APIGateway. addRoutes ({ // swagger route
 path: "/swagger/{proxy+}" ,
 methods: [ gate. HttpMethod . GET ] ,
 integration: snakeApiIntegration
}) ;
The same goes for managing access control, granting database access to an API component:
// persistence layer
const table = new  dynamodb. Table ( this , nameIt ( 'DynamoDb - Table ' ) , {
// ... //
}) ;table. grantReadWriteData ( apiLambda ) ; // give api access to dynamo DB table
To complete the stack configuration sample, refer to the project repository
Stack View
First, you can find the CloudFormation stacks in the AWS web console (image 2):
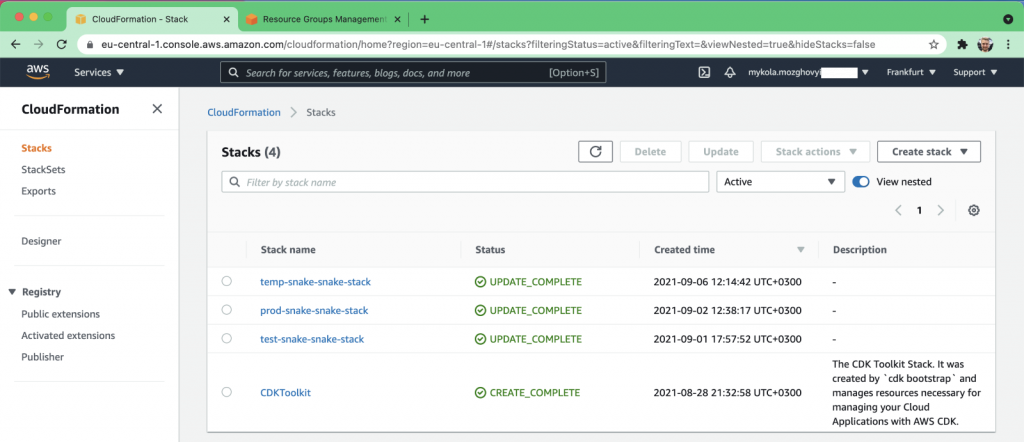
Image 2. CloudFormation stacks in the AWS console
Second, the same list of stacks can be obtained by running the following command in the terminal:
aws cloudformation list-stacks
Configuration Drift Handling
Unfortunately, this is a weakness in both AWS CDK and CloudFormation, as configuration drift detection and handling is not yet “out of the box” (see open question ).
Handling configuration drift is possible, but not trivial (see article ).
Therefore, I would suggest starting with preventing the possibility of making unauthorized changes to the configuration.
Ideally, all changes to the infrastructure should be made programmatically, on behalf of a separate account used exclusively by the CDK application.
This approach can also be automated (see open question ).
CI/CD
AWS CDK can be easily integrated into continuous delivery workflows. This sample uses GitHub Actions, while we used Azure DevOps for the original project, the differences are not significant.
The CI/CD configuration sample consists of two important elements:
- Script to compile deployed packages (./build.sh)
- Setting up GitHub Workflow as a YAML file describing delivery to multiple environments (test, prod) with admin approval (/.github/workflows/ci-cd.yml)
The resulting delivery result is shown below (image 3):
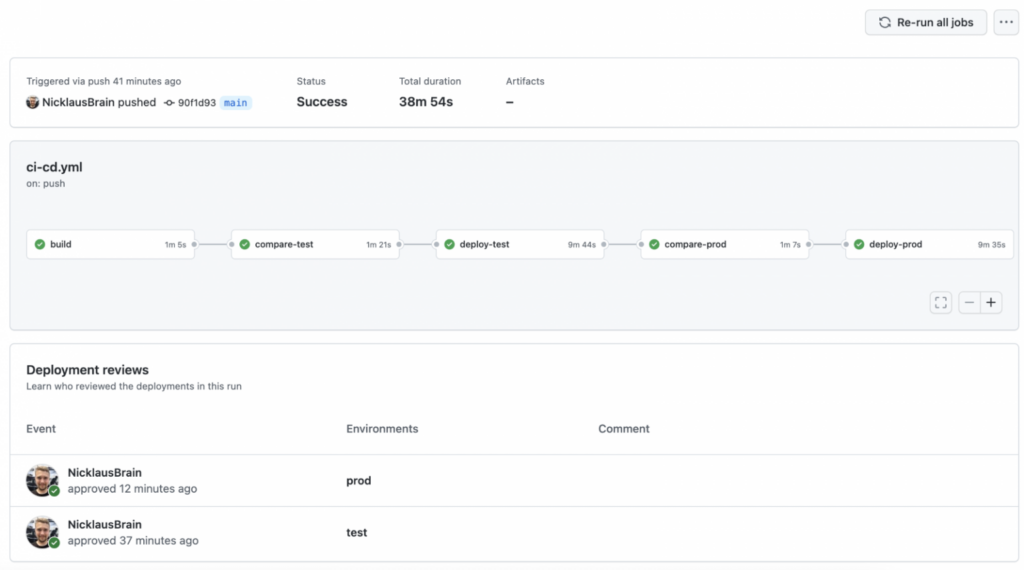 Image 3. GitHub Workflow Delivery Result
Refer to the CI/CD guide in the Readme.MD for setup.
Output
The AWS CDK has set a precedent for the DevOps practice of the future, and the ongoing development of the Terraform CDK proves that there is a broad interest in using general purpose languages to implement “infrastructure as code”.
This approach makes the discipline of continuous delivery more accessible, allows developers to be involved in maintaining the infrastructure, and also use existing quality control tools like static analysis, or even unit tests.