Microsoft’s Copilot Studio provides a powerful way to create, test, and deploy AI-powered agents using various tools — one of which is Prompts. Prompts allow you to apply AI to text, documents, or images for analysis, summarization, or transformation. Below is a detailed walkthrough on how to use prompts effectively within Copilot Studio and how to integrate them into your agents.
Getting Started in Copilot Studio
Navigate to copilotstudio.preview.microsoft.com.
If you already have agents created, select one to work with — for example, a Demo Agent.
From there, open the Tools section. You can add a new tool by clicking Add a tool, and several tool types will appear: Prompt, REST API, Agent Flow, MCP, and Custom Connector.
For this guide, we’ll focus on Prompts.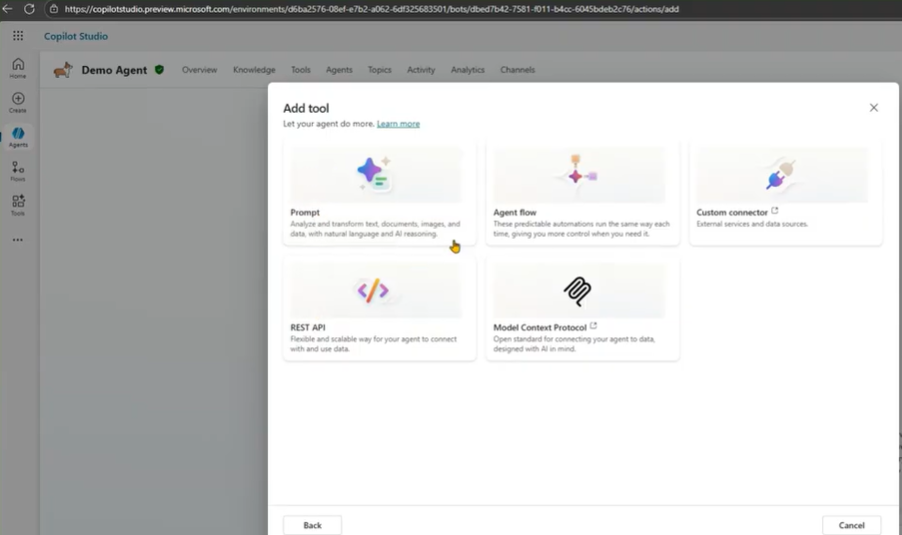
Creating a Prompt
You can create prompts either inside an agent or independently. Independent prompts can be reused across multiple agents, making them versatile and efficient.
- Click Tools → New Tool → Prompt.
- The prompt interface allows you to define its purpose and functionality.
- You can apply AI to text, documents, or images for various tasks like summarization, extraction, or classification.
For example, create a prompt named “ABC Prompt” as a placeholder.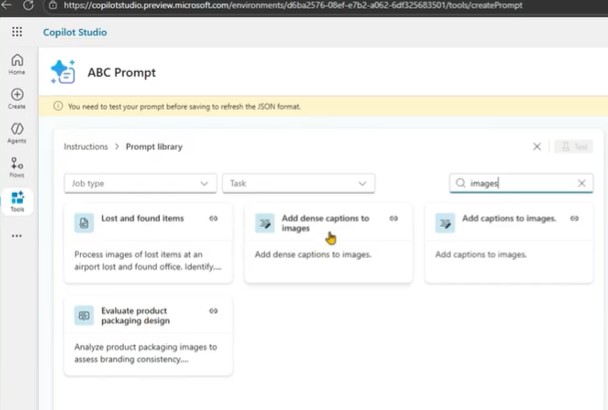
Configuring the Prompt
Within the prompt interface, you can:
- Write custom instructions describing what the prompt should do.
- View responses in multiple formats: Text, JSON, or Document Preview.
- Select a model to use (for example, one from Azure AI Foundry).
- Access additional settings via the three-dot menu:
- Configure temperature (controls creativity),
- Set record retrieval limits,
- Include links in responses,
- Enable the Code Interpreter.
Exploring the Prompt Library
The Prompt Library is a central feature that allows you to choose from existing templates or categories, such as Architecture, Communications, or Image Analysis.
For instance:
- Selecting Architecture might show prompts like Extract Information from a Floor Plan.
- Choosing Communications offers options like Pitch Perfection Review.
When you select a prompt, it automatically loads into your workspace, and you can modify it or replace it with another from the library. Some prompts include sample input data such as text or PDF documents.
Example: Adding Captions to Images
Let’s create a prompt to generate image captions:
- In the prompt library, search for “Images”.
- Choose “Add Captions to Images.”
The description reads: Generate a human-readable sentence that describes the content of an image. - The default sample image might be helicopter.jpg.
- You can test the prompt by clicking Test, which produces a response like:
“The image shows a helicopter hovering near a tall building.”
You can upload your own image instead of using the default one:
- Click Image → Upload Image or Document.
- Select your file (for example, Capybara.jpg).
- The model (e.g., GPT-4.1 Mini) processes the image and returns a description:
“The image shows a large brown furry rodent with a stout body and short legs.”
Save the prompt and name it something meaningful, like “Explain Image Caption.”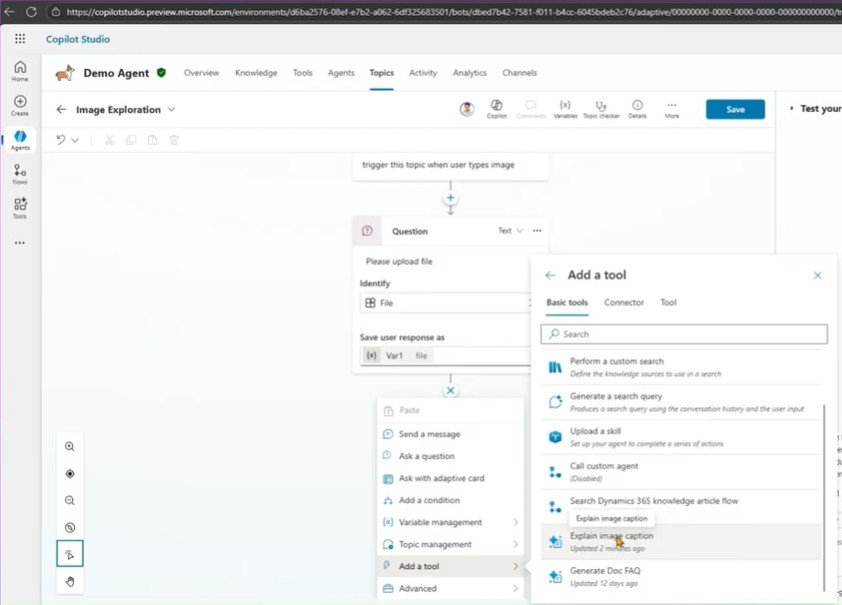
Using the Prompt Inside an Agent
Once your prompt is created, you can integrate it directly into an agent:
- Select Configure for Use in Agent.
- Add the prompt to a specific agent — for example, the Demo Agent.
- The prompt now becomes part of that agent’s toolset.
When you open the agent and check Tools, the prompt (e.g., Explain Image Caption) will appear in the list, ready for use.
Creating a Topic to Use the Prompt
To make your agent interact with users using this prompt:
- Go to Agents → Demo Agent → Topics.
- Create a new topic from blank.
- Add a question node requesting a file upload:
- For example: “Please upload a file.”
- Set a trigger phrase such as “image.”
When a user types “image,” this topic activates. - Save the user’s file response as a variable (e.g., var1).
- Add a tool node and connect it to the prompt Explain Image Caption.
- Map the input (user’s uploaded image) to the prompt.
- Save the output as another variable (e.g., var2).
Finally, add a message node to display the output — for example:
“Here’s the description of your image: [Prompt Output].”
When you test the conversation by typing “image,” upload a file (for instance, wombat.jpg), and the system will analyze it and return a caption such as:
“The image shows a realistic detailed illustration of a wombat with brown fur standing on all four legs, facing slightly to the right.”
Using Prompts Across Power Platform
One of the main advantages of Copilot Studio prompts is cross-platform integration.
Prompts created in Copilot Studio can also be used in:
- Power Apps
- Power Automate
In Power Apps
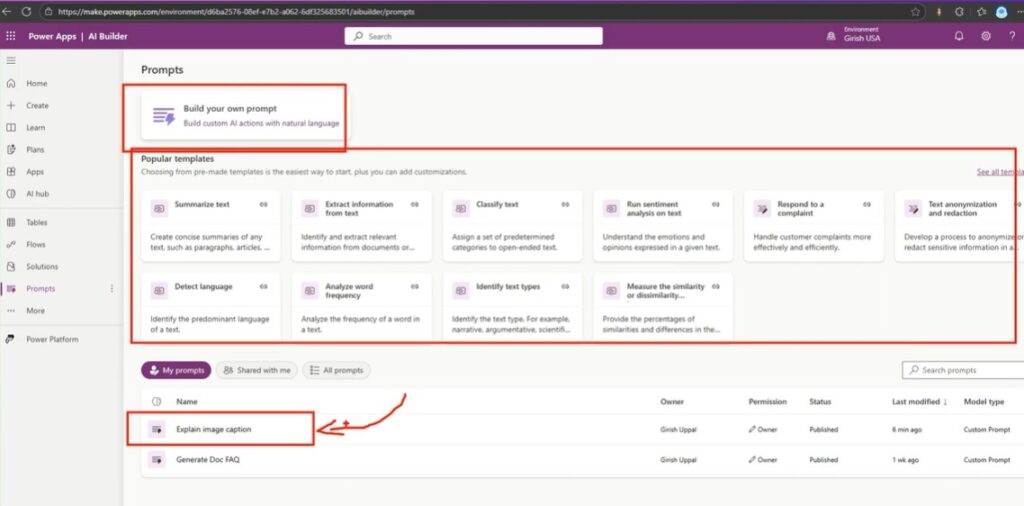
- Navigate to make.powerapps.com.
- Open the correct environment (e.g., Gishusa USA).
- Go to More → Discover All → Prompts.
- Pin the Prompts section for easy access.
You’ll see the same interface used in Copilot Studio, where you can build, edit, or reuse existing prompts.
In Power Automate
- Visit make.powerautomate.com.
- Choose your environment.
- Go to More → Discover All → Prompts.
- The prompts you created in Copilot Studio will appear here as well.
This demonstrates how a single prompt can be created once and reused across multiple Microsoft Power Platform environments — Power Apps, Power Automate, and Copilot Studio — ensuring consistency and saving time.
Conclusion
Prompts in Copilot Studio provide a flexible and powerful way to integrate AI into your workflows.
By creating reusable prompts, you can analyze text, extract data from documents, or describe images — all within a unified environment.
These prompts can then be seamlessly shared across Power Apps, Power Automate, and Copilot Studio, making your AI solutions more efficient and scalable.