In this article, I want to briefly talk about how to host your web application on Amazon CDN. This may be of interest to anyone who wants to improve access to their resource, namely, to speed up the loading of static content by users.
Often the best solution is to use a Content Distribution Network (CDN). Static content here can be either a whitewashed JavaScript Application (React or Angular), or an image or static HTML. In this article, we will operate with AWS S3 (for storage and hosting), CloudFront (as a CDN) and the functionality of a DNS provider (it can be any), in our case it is CloudFlare. We will use a TLS / SSL certificate from Cloudflare in order for the resource to work on HTTPS (with support for Cloudflare “Full Strict” mode).
The task seems simple and there are many resources on covering this, however, as it turned out, there are many pitfalls, and similar content is often out of date.
Here we will not consider creating and building a JS application, creating an S3 bucket (or “bucket”), uploading content to a bucket, or registering a DNS domain.
HTTP on S3
So, we create an S3 bucket and upload the compiled code there, to the root. However, there is a nuance here – a restriction from Amazon: the bucket must have the same name as the domain (subdomain). For example,
if you plan to host a build on the my . react-app. com, then the name of the bucket should also be my . react-app. com.
Next, in the properties of the bucket (Properties tab), enable Static website hosting. Below, in the Index Document field, you must specify the index file (usually index.html).
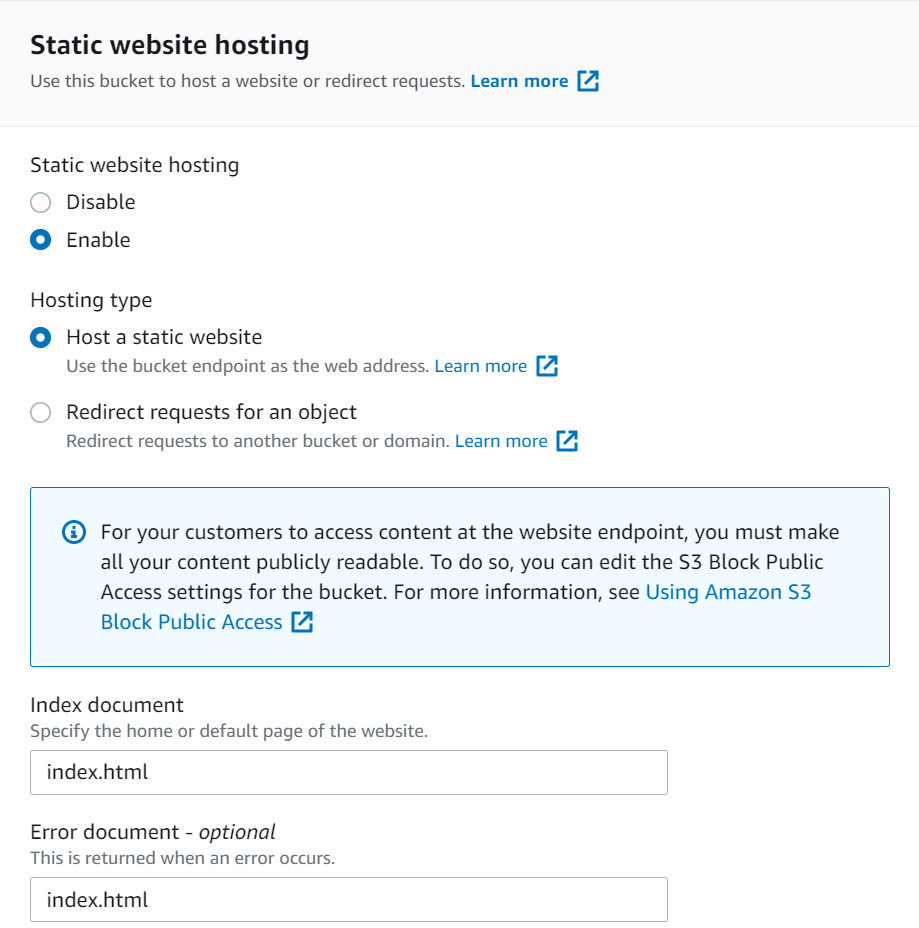
We save the settings and go to the access tab (Permissions).
Here we need to disable blocking access, if it is active (Block public access).

In Bucket Policy (Access Policy) we need to grant access to CloudFront. To simplify the task, we will provide access to all AWS services (this can be reconfigured later).
Copy the following into the JSON field:
 {
    "Version" : "2012-10-17" ,
    "Id" : "Policy1638279142165" ,
    "Statement" : [
        {
            "Sid" : "Statement1" ,
            "Effect" : "Allow" ,
            "Principal" : {
                "aws" : "*"
            } ,
            "Action" : "s3:GetObject" ,
            "Resource" : "arn:aws:s3:::my.react-app.com/*"
        }
    ]
}
where in the “Resource” line: “arn:aws:s3:::my” . react-app. com/*”
” my. react-app. com” should be replaced with the name of this bucket.
We save the settings and try to access the application via HTTP. To do this, on the properties tab of the bucket (Properties) in the Static website hosting field, follow the link indicated under the “Bucket website endpoint” item.
At this point, we should be able to access our resource under the generated domain via HTTP. If you have problems with this, then you should try to go through the preliminary settings again before moving on.
SSL/TLS certificate
For the resource to work over HTTPS, you need to use a certificate generated for the required domain. If AWS already has a certificate (for example, if the domain is on Route 53), you can skip this step.
For certificate management, AWS has a Certificate Manager (ACM) service. We go there and select the option to request a certificate (Request certificate). Next, select the option of a public certificate (Request a public certificate).
There is a first nuance here: in order for the certificate to be used in Cloudfront, it must be added exactly in the “N.Virginia” (us-east-1) availability zone, which is not at all intuitive.
Fill in the domain name there:

And the validation method:
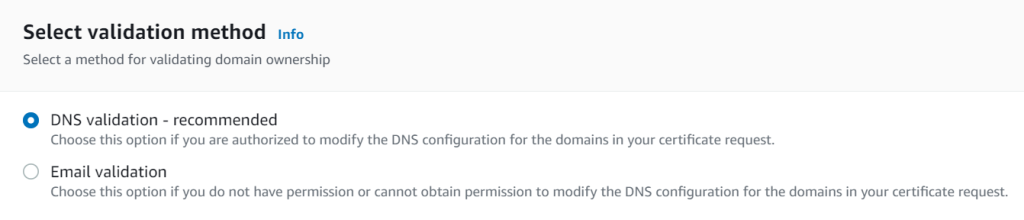
We choose DNS validation, because this is the recommended method. Click Request to create a certificate request.

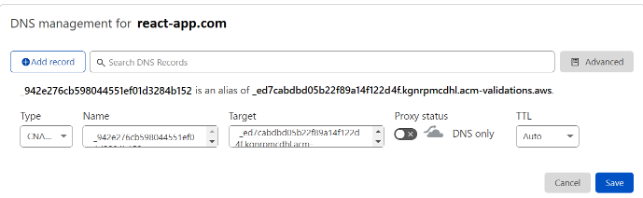
After that, the certificate will appear in the list of certificates with the status Pending validation. To validate it, you need to create a DNS entry according to the generated values:

We have confirmed that the current resource belongs to the specified domain (and hence the certificate).
So, add the corresponding CNAME record to DNS (in our case, to Cloudflare):
After a while, our certificate will be validated and will receive the status “Issued”.
cloudfront
Cloudfront is a CDN service from Amazon that caches content using globally distributed proxy servers, we have the components of the application. Therefore, we need to configure the distribution to distribute with the data source to the created S3 bucket.
In Distributions, select Create and fill in the Origin domain.
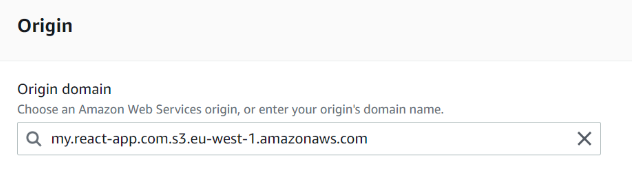
Here is another completely non-intuitive moment: when we enter the name of the bucket, our S3 resource will be pulled up to us. However, this is not what we need.
In this field, you need to insert the URL by which we previously had access to our bucket via HTTP. To get it, go to the “Properties” of our bucket (Bucket Properties) and copy the address from the website endpoint field. We insert it without http:// and without a slash at the end.
For example, in our case, in the Origin domain field, when creating a distribution kit, we will have a hint:
” my. react-app. com. s3. amazonaws. com ” (ends with “s3. amazonaws. com”)
but you need:
” my. react-app. com. s3-website-eu-west-1 . amazonaws. com”
Next, look for the Alternate domain name field . Here you need to specify the domain (bucket name), for example my . react-app. com .
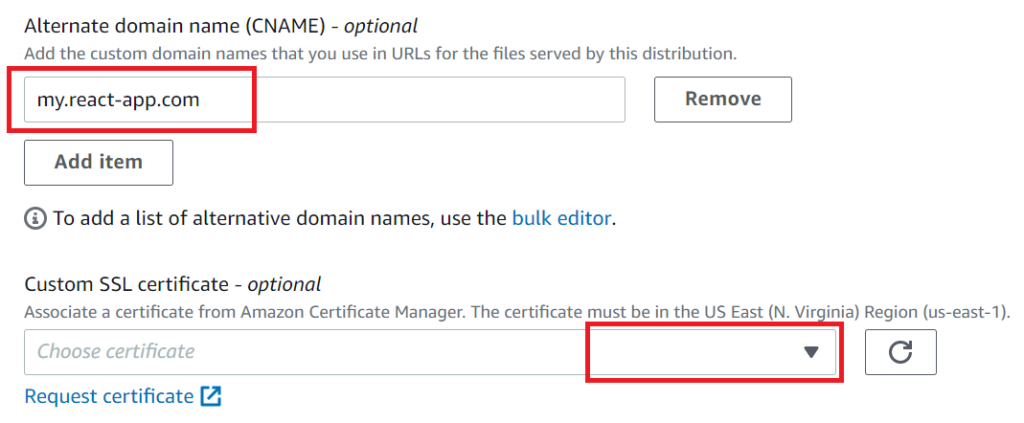
And select the generated certificate.
We leave all other fields unchanged and create a distribution kit.
The distribution will first receive the deploying status, and when it is ready to use, the status will change to Enabled.
At this point, our resource should be available via the desired HTTPS on the Amazon CDN. To verify this, you need to go to the URL specified in the details of the new distribution:

final touch
Now, in order for this application to work under our domain, we need to create an appropriate DNS record, in which we will write that the content for the specified domain should be accessed from the Cloudfront distribution kit configured above ( Distribution domain name ). Since the distribution is accessible by URL, we use the same CNAME record.

It takes a certain amount of time for the DNS record to take effect.
Cloudflare DNS provider
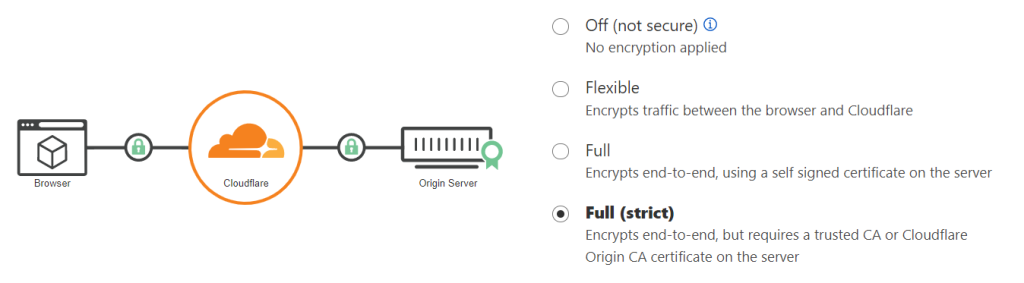
If everything went well, and all other DNS records meet the requirements for end-to-end HTTPS encryption, you can enable the “Full (strict)” mode.
index file not found
If at some point, instead of an application, XML is opened with a list of files in the bucket, then it is likely that cloudfront does not know which file index to use. To fix this, you can set the file index path (Origin path) in the Cloudfront distribution.