In Kubernetes, a cluster consists of many nodes , which are virtual or physical machines running applications. Node Pools are groups of nodes with the same configuration that are managed as a single entity.
With Node Pools, you can have different pools for different tasks or applications, optimize cost by using different types of virtual machines, and run different OSes within the same cluster.
Azure Kubernetes Service (AKS) is a managed Kubernetes service from Microsoft designed to make it easy to deploy, manage, and scale container-based applications. AKS automatically manages host infrastructures, removing the burden of configuration and monitoring, allowing you to focus on application development.
Node Poole
To work with AKS, you can use the Azure CLI by logging in through the command az login.
Let’s start by creating an AKS cluster. We use the following command:
az aks create --resource-group myResourceGroup --name myAKSCluster --node-count 1 --enable-addons monitoring --generate-ssh-keys --location eastusHere we created an AKS cluster named myAKSClusterin a resource group myResourceGroupwith one node. Monitoring is enabled, SSH keys are generated automatically, and the cluster is hosted in the eastus.
To add a new Node Pool there is a command:
az aks nodepool add --resource-group myResourceGroup --cluster-name myAKSCluster --name myNodePool --node-count 3The command adds a new Node Pool named myNodePoolto the cluster myAKSCluster, which is located in the resource group myResourceGroup. This Node Pool will have 3 nodes.
You can configure Node Pool by specifying additional parameters such as virtual machine size and disk type. For example:
az aks nodepool add --resource-group myResourceGroup --cluster-name myAKSCluster --name myCustomNodePool --node-count 2 --vm-size Standard_DS2_v2 --os-type LinuxWe add a Node Pool with a name myCustomNodePoolto the cluster myAKSCluster, which is located in the resource group myResourceGroup. This Node Pool will have 2 nodes, each using a virtual machine the size Standard_DS2_v2of a Linux OS.
Azure Portal provides a graphical interface for managing Azure resources:
Login to the Azure Portal . In the navigation panel, select “Kubernetes services” and go to the AKS cluster.
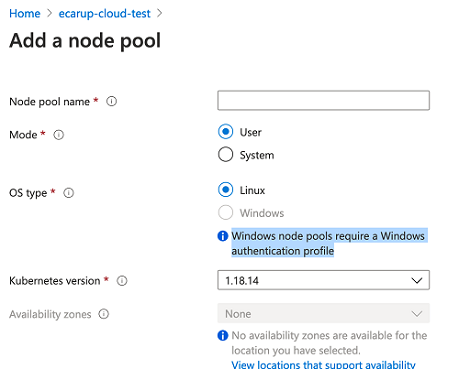
Adding a Node Pool looks pretty simple:
- In the AKS cluster menu, select Node pools .
- Click the + Add node pool button .
- In the form for adding a Node Pool, enter a name, select the size of the virtual machine, the number of nodes and other parameters
- After setting the parameters, click Add to create a Node Pool.
Once you’ve added a Node Pool, you can monitor and manage its status through the Node pools section of your AKS cluster in the Azure Portal. Here you can edit the number of nodes, the size of virtual machines and other parameters.
You can remove nodes by reducing the number of nodes in the Node Pool using the Azure CLI, or you can remove the entire Node Pool if you no longer need it:
You can use the command az aks nodepool scaleby specifying a smaller number of nodes:
az aks nodepool scale --resource-group myResourceGroup --cluster-name myAKSCluster --name myNodePool --node-count 3This will reduce the number of nodes to 3 in the Node Pool myNodePool.
If Node Pool is no longer needed, you can simply remove it:
az aks nodepool delete --resource-group myResourceGroup --cluster-name myAKSCluster --name myNodePoolUpdating nodes to new versions allows you to implement the latest features, security fixes, and performance improvements. In practice, upgrading nodes usually involves upgrading the Kubernetes version of Node Pool. This is done using az aks nodepool upgradeand checking the available versions using az aks get-versions:
az aks nodepool upgrade --resource-group myResourceGroup --cluster-name myAKSCluster --name myNodePool --kubernetes-version 1.29AKS updates nodes in the Node Pool one at a time to minimize downtime. For each node in the Node Pool, the process includes the following steps:
- AKS marks a node as unschedulable to prevent new pods from being placed on it.
- Existing pods on a node are moved to other nodes in the cluster using a pod evacuation mechanism.
- The node is upgraded to the new version of Kubernetes.
- After a successful upgrade, the node is returned to the cluster as production-ready, and pods can be scheduled on it again.
Taints and Tolerations
Taints are applied to nodes and can push back pods that do not have the appropriate tolerations . This allows you to limit which pods can be run on certain nodes. Taints consist of a key, a value, and an effect, which determines what happens to pods that do not have the appropriate tolerance. The effects may be as follows:
NoSchedule: Pod will not be scheduled to the node.PreferNoSchedule: The system will try not to schedule under per node, but this is not guaranteed.NoExecute: The pod will be kicked out of the node if it is already running and does not have the appropriate toleration.
Suppose there are nodes with high-performance GPUs that need to be used only for ml tasks. You can add taint to these nodes:
kubectl taint nodes gpu-node-1 gpu=true:NoScheduleThis means that only pods with the appropriate tolerance will be able to be scheduled on this node.
Toleration example for a pod:
apiVersion: v1
kind: Pod
metadata:
  name: ml-pod
spec:
  containers:
  - name: ml-container
    image: ml-image
  tolerations:
  - key: "gpu"
    operator: "Equal"
    value: "true"
    effect: "NoSchedule"
This pod will be able to run on the node gpu-node-1, since it has the appropriate tolerance.
Labels and Selectors
Labels are a label key/value that can be attached to objects such as pods and nodes, and then selectors can be used to select objects based on those labels.
You can label nodes based on their physical location:
kubectl label nodes node-1 location=europe
kubectl label nodes node-2 location=asia
To run a pod on a node in a specific region, you can use the node selector in the pod specification:
apiVersion: v1
kind: Pod
metadata:
  name: my-pod
spec:
  containers:
  - name: my-container
    image: my-image
  nodeSelector:
    location: europe
This pod will be scheduled on the node labeled location=europe.
Examples
Stateless applications do not store state information about user sessions on the server. For example, for a web page, the Node Pool configuration might look like this:
az aks nodepool add \
  --resource-group myResourceGroup \
  --cluster-name myAKSCluster \
  --name statelessNodePool \
  --node-count 3 \
  --enable-cluster-autoscaler \
  --min-count 1 \
  --max-count 10 \
  --node-vm-size Standard_F8s_v2 \
  --labels app=stateless \
  --no-wait
This has autoscaling enabled with a minimum of 1 and a maximum of 10 nodes, and uses virtual machines of size Standard_F8s_v2.
Let’s deploy with the yaml manifest:
apiVersion: apps/v1
kind: Deployment
metadata:
  name: web-app
spec:
  replicas: 3
  selector:
    matchLabels:
      app: web
  template:
    metadata:
      labels:
        app: web
    spec:
      containers:
      - name: web-container
        image: nginx
        ports:
        - containerPort: 80
Stateful applications require persistence of data or state between sessions or requests. Let’s deploy a PostgreSQL database in an AKS cluster
Node Pool configuration:
az aks nodepool add \
  --resource-group myResourceGroup \
  --cluster-name myAKSCluster \
  --name batchNodePool \
  --node-count 2 \
  --node-vm-size Standard_D16s_v3 \
  --labels app=batch \
  --no-wait
We use nodes Standard_D16s_v3that generally provide good CPU performance
Let’s create a PVC for PostgreSQL and deploy a StatefulSet:
apiVersion: v1
kind: PersistentVolumeClaim
metadata:
  name: postgres-pvc
spec:
  accessModes:
    - ReadWriteOnce
  resources:
    requests:
      storage: 10Gi
---
apiVersion: apps/v1
kind: StatefulSet
metadata:
  name: postgres
spec:
  serviceName: "postgres"
  replicas: 1
  selector:
    matchLabels:
      app: postgres
  template:
    metadata:
      labels:
        app: postgres
    spec:
      containers:
      - name: postgres
        image: postgres:latest
        ports:
        - containerPort: 5432
        volumeMounts:
        - mountPath: "/var/lib/postgresql/data"
          name: postgres-storage
      volumes:
      - name: postgres-storage
        persistentVolumeClaim:
          claimName: postgres-pvc