In the first part of the article, we looked at various options for running containers in the cloud using Amazon Web Services as an example. In this article, we will examine in practice what the creation and launch of an Elastic Kubernetes Service cluster looks like.
So, before we get started with EKS, we need a few tools:
- Awscli – a console utility for working with the AWS cloud (you need a key to access your account, because there is no easy way to log in via login / password, but you already know this);
- Ekscli – console utility for working with EKS;
- Kubectl is a console utility for working with Kubernetes clusters;
- Terraform is an Infrastructure as Code solution from HashiCorp that helps you declaratively manage your infrastructure.
There are several ways to deploy a cluster, we will cover two of them and will intentionally ignore the GUI configuration option. I already see a raised hand and an indignant question: “Are we going to pay this much money to enter commands in the AWS console utilities?”. This time, yes. In fact, of course, you can click on the web console and configure everything you need, but if you are deploying EKS for the first time, I would recommend using the console utilities. Yes, and I will show exactly the commands and configs, so that it is clear what happens at each stage, and you can then reproduce it.
Method number 1
The easiest trick is to use the Eksctl utility. It is available for free on the Weaveworks website. The command itself will look something like this:

To create it, we used the following keys:
- create – creates a cluster;
- version – indicates which version of Kubernetes we are deploying. (The latest version is usually available plus a few previous ones, if you need compatibility, it’s best to check the current documentation);
- region – indicates in which region we are creating the cluster;
- nodegroup-name – sets the name of the NodeGroup within which work nodes will be created;
- node-type – indicates the type of nodes. In AWS, as in other similar providers, you can choose nodes depending on the technical characteristics. You can choose any, but you need to remember that Kubernetes is a demanding service, and it is better to calculate the expected load in advance;
- nodes – indicates the number of nodes to be created.
The same can be reproduced by preparing a configuration file, which will describe all the desired parameters of our future cluster:
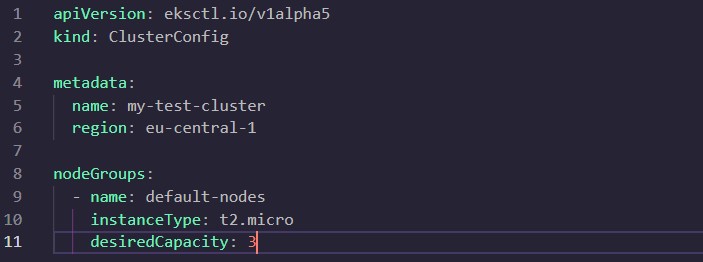
This method can be considered more preferable, especially if you save the configuration file for future use.
After executing the command, which usually takes quite a long time, the config for connecting to the cluster will be in the folder, and the kube in the user’s home directory. Everything is as usual. Accordingly, now you can use yaml files through kubectl, which of course you already have ready.
Method number 2
The second option is to work with Terraform. If you use this method, then it can work outside of AWS with minimal edits. Plus, if you do everything else in AWS using Terraform, then you can use this tool in this case as well. If you need to change or delete any resource, then doing it through Terraform is much easier than by hand.
If you have downloaded Terraform, it remains to prepare the configuration files and run the necessary commands. HashiCorp has a great example in their repository, based on which we will complete our task. We clone this repository for ourselves and get a small set of files:
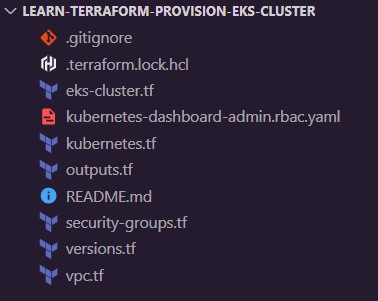
When using Terraform, our task is to create the AWS cloud objects that will make up the future cluster. The repository for all the necessary objects has ready-made tf-files:
- vpc.tf – creates VPC (Virtual private cloud), availability zones and subnets using the AWS VPC module;
- security-groups.tf – creates security groups that our cluster will use;
- eks-cluster.tf – Creates all cluster resources using the AWS EKS Module. This will display the cluster name, Kubernetes version, node groups, etc.;
- outputs.tf – defines the configuration that we will get at the output;
- versions.tf – indicates the version of Terraform itself and the modules that will be used.
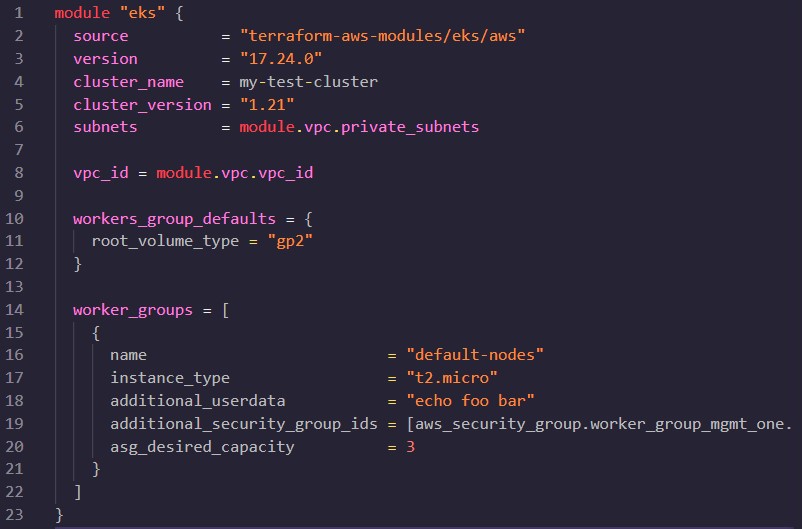
In the eks-cluster.tf file, we will enter all the parameters of our cluster, as in the previous examples:
And then, everything is as usual in Terraform: terraform init > terraform plan > terraform apply. And it turns out the same cluster as above.
We have discussed two ways to create an EKS cluster, but these are only the most popular options. You can also look at Cloudformation on your own – AWS’s own Infrastructure as Code system, or, for example, see how to deploy a cluster using systems like Ansible or Chef.