Greetings readers. In the practice of our company, there is often a need to configure servers for simple single-server projects or small clusters. In this article, I would like to tell you about our experience of such a configuration, highlight the features that may be useful to you in further administration. The article is intended for people who are just getting into administration, as well as for those who independently administer their small project and want to gain experience in this matter. If you are an experienced administrator, you can safely skip this material.
https://systemadminspro.com/setting-up-a-lemp-server-for-simple-projects-instructions-for-the-little-ones-part-two/ – second part
https://systemadminspro.com/setting-up-a-lemp-server-for-simple-projects-instructions-for-the-little-ones-part-three/ – third part
The purpose of the series of articles is to describe how to prepare a server with a LEMP stack ( Linux, Nginx, MySQL, PHP, Apache ), how to deploy the stack and raise working sites on it. The instruction is suitable for small Bitrix projects, as well as for projects deployed under any popular CMS.
Despite the fact that the topic has already been covered in sufficient detail on the web, we decided to describe in detail the general standards of administration from scratch, since we regularly receive a large number of basic questions from people who are somehow related to our field.
Most of the projects are based on Ubuntu, Debian , the articles will reflect the settings for these systems.
This article will cover things like:
- General scheme of server operation
- Basic packages
- Setting up git-autocommit
- Basic SSH setup, adding to the admin server
- Basic FTP setup:
- Exim4 basic setup (smarthost)
General scheme of server operation:
Imagine that you received a server with an installed OS, without any additional settings and customizations from the DC. The purpose of the server is to serve the site with the LEMP stack deployed on it .
For convenience, below is a diagram of the operation of such a server with all the necessary software for operation:
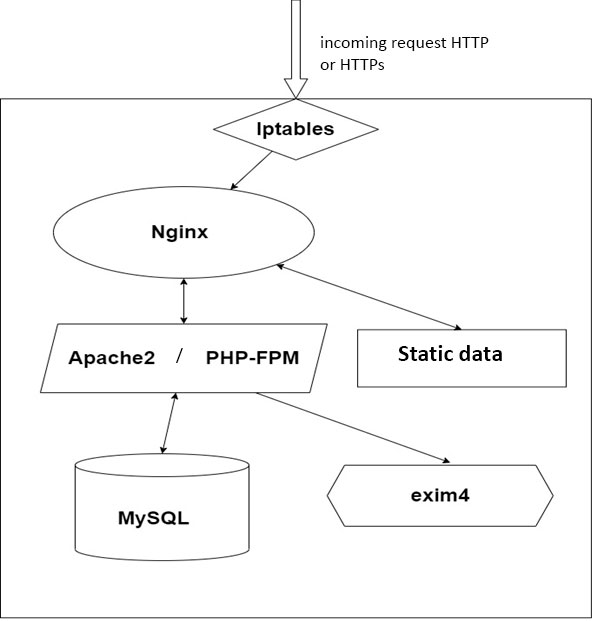
In our case, instead of PHP-FPM , Apache2 will be deployed , so this stack is not exactly LEMP, but instead of Apache2 , you can deploy PHP-FPM without any problems , the purpose of the article is to point out the main basic points when setting up servers for simple projects.
This scheme does not reflect all the software necessary for the operation and analysis of problems, these are only the main components required for the operation of our future site. The article will provide a more complete list of software, as well as describe in more detail the operation of each component of this circuit.
Basic packages:
In order to start deploying the project, you need to install the basic packages for work. The following commands are relevant for their deployment:
apt-get update && apt-get install dirmngr mc iotop htop telnet tcpdump nmap curl console-cyrillic hexedit sudo zip unzip patch pwgen vim less parted subversion ntp bzip2 lsof strace mutt s-nail ncdu smartmontools tree dnsutils logrotate rsyslog
Here we install tools for working on the server, as well as tools for analyzing future problems in the server. I will not dwell on all packages, but only list the most necessary ones:
- dirmngr – needed to add repository keys.
mc – aka Midnight Commander, a file manager that needs no introduction - iotop – a utility that shows I / O channels; will be useful in analyzing the operation of disks.
- htop is our everything, a powerful resource monitor that displays all the information about the current consumption of system resources. It also allows you to send system calls to processes, change their priority in the system, and much more.
- telnet – in practice, we often use it to check the availability of remote ports. If the port is closed, we will know for sure that the problem is not on our side.
- tcpdump and nmap – utilities for analyzing network traffic
- Curl – we use to send various requests, debug web servers.
- console-cyrillic – package for russification of the console (Cyrillic support in the local terminal).
- hexedit is a package for editing data, in which data is presented as a sequence of bytes..
- zip, unzip, bzip2 – also need no introduction, well-known data archivers.
- pwgen is a utility for generating passwords, it will be useful for quickly creating accesses of any level.
- strace is a utility for analyzing process system calls, used for advanced analysis of processes running in the system. In fact, we use strace in cases where the service logs do not indicate a specific problem.
- ncdu is a handy tool for quickly displaying the size of data in a directory.
- logrotate – a tool for rotating logs in the system, also does not need a separate introduction.
After installing the base packages, set the time on the server according to the current time zone using the command:
dpkg-reconfigure tzdata
Next, select the desired locales in the system ( RU-UTF8, RU-KOI8R, RU-CP1251 ):
dpkg-reconfigure locales
Applying locales:
/etc/default/locale
Set MC as the default editor:
update-alternatives --config editor
where we select the item mcedit .
Setting up git-autocommit
In the process of administration, we often encounter the need to quickly find out who and when made changes to certain configuration files. To solve this problem, we use git-autocommit , which commits changes in configs to the server’s local git repository. Its setting will be described below:
We put on the Git server :
apt-get install git
Create a configuration file in the root directory of the root user with the necessary rights:
touch ~/.gitconfig
chmod 600 ~/.gitconfig
The file has the following content
[user]
           	name = root
           	email = root@$HOSTNAME
$HOSTNAME is replaced with the corresponding server name in the project. Next, you need to create a repository using the commands:
cd
git init && mv .git config.git
chmod 700 /root/config.git
echo "gitdir: /root/config.git" > /.git && chmod 600 /.git
Next, we set the directories for which autocommit should not commit changes to the file ~/config.git/info/exclude :
/*
!/etc
!/usr
/usr/*
!/usr/local
/usr/local/*
!/usr/local/scripts
!/var
/var/*
!/var/spool
/var/spool/*
!/var/spool/cron
/var/spool/cron/*
!/var/spool/cron/crontabs
In practice, we are interested in the /usr and /etc directories . In case the project has configurations of docker containers that are not placed in an external git repository, we also add the directory where docker-compose is located to autocommit to track changes. Recently, we have also been monitoring changes in user crontabs /var/spool/cron/crontabs , as there is a problem of losing cron tasks on Bitrix projects. Also, some clients may delete the required task by inattention.
After we make the first commit and check:
git add -A && git commit -m 'Creating a repository @system'
We also implement continuous monitoring of installed packages on the server using git autocommit, for this we write all currently installed packages to a file using task crons:
* * * * * root /usr/bin/dpkg -l > /etc/package_list
The autocommit itself is launched using the following cron:
* * * * * root sleep 10;cd / && git add -A && git commit -m "Autocommit @system" > /dev/null
Thus, we can see exactly what changes were made to the service configuration and at what time. An example of a commit for the etc/nginx/nginx.conf file is called with the command:
git log --follow -p /etc/nginx/nginx.conf
Result:
git log --follow -p /etc/nginx/nginx.conf

Результат:
commit be993a2734e9f206ed7cb8ee52f54a52ca642cc9
Author: root
Date:   Tue Oct 12 14:37:11 2021 +0300

    Autocommit @system

diff --git a/etc/nginx/nginx.conf b/etc/nginx/nginx.conf
index 8c9ed7c..8d694c9 100644
--- a/etc/nginx/nginx.conf
+++ b/etc/nginx/nginx.conf
@@ -52,12 +52,12 @@ deny 178.166.163.237;
     	#limit_conn_zone  $binary_remote_addr  zone=cglob:16m;


-    	map $http_user_agent $spam_bots {
-            	default '';
-            	~*(321039152) 1;
-    	}
+#    	map $http_user_agent $spam_bots {
+#            	default '';
+#            	~*(321039152) 1;
+#    	}

-    	limit_req_zone   $spam_bots      	zone=spambots:16m  rate=2r/s;
+#    	limit_req_zone   $spam_bots      	zone=spambots:16m  rate=2r/s;

     	include /etc/nginx/conf.d/*.conf;
     	include /etc/nginx/sites-enabled/*;

commit 2df8332dc97681489e43e9aaa85f9078fc50e321
Author: root
Date:   Tue Oct 12 14:11:11 2021 +0300

    Autocommit @system

diff --git a/etc/nginx/nginx.conf b/etc/nginx/nginx.conf
index 8d694c9..8c9ed7c 100644
--- a/etc/nginx/nginx.conf
+++ b/etc/nginx/nginx.conf
@@ -52,12 +52,12 @@ deny 178.166.163.237;
     	#limit_conn_zone  $binary_remote_addr  zone=cglob:16m;


-#    	map $http_user_agent $spam_bots {
-#            	default '';
-#            	~*(321039152) 1;
-#    	}
+    	map $http_user_agent $spam_bots {
+            	default '';
+            	~*(321039152) 1;
+    	}

-#    	limit_req_zone   $spam_bots      	zone=spambots:16m  rate=2r/s;
+    	limit_req_zone   $spam_bots      	zone=spambots:16m  rate=2r/s;

     	include /etc/nginx/conf.d/*.conf;
     	include /etc/nginx/sites-enabled/*;
Thus, we see who and when made changes. This solution is extremely useful in case of disputes within the team or when a problem in the configuration surfaced after making changes not immediately, but after a while.
Basic SSH setup, adding to the admin server
After that, you can start installing and configuring basic services. Let’s start with SSH. Install the service if for some reason it was not installed earlier
apt update
apt install ssh
On our servers, we restrict all SSH users via the AllowUsers directive , adding and removing users as needed:
AllowUsers USERS_NAMES
We immediately disable access for the root user by changing the line in /etc/ssh/sshd_config:
PermitRootLogin no
We make changes to the rights to the SSH directory , for security purposes:
chmod 750 /etc/ssh
Restart the service to apply the changes:
/etc/init.d/ssh restart
Further login to the server via SSH will be available only for users specified in AllowUsers . Adding system administrators to servers is done using our internal utilities, however, I will describe the process of adding as if it were done manually:
To add a system administrator to the server, you will need:
Log in to the server as root user
Create a system user and group (site users and administrators have a UID and GID of 10000 or more , this is a common standard for non-system users):
groupadd -g 10001 david
useradd -g 10001 -u 10001 -s /bin/bash -d /home/david
Next, create the user’s home directory and the rights for it:
mkdir -p /home/david
cd /home/david david
chown -R david: /home/david
chmod 751 /home/david
chmod -R o-rwx /home/david
After that, all that remains for us is to forward the public SSH key for the david user to the server, and also give the user the rights to execute sudo . To do this, just add a line to the /etc/sudoers file like this:
david ALL=(ALL) NOPASSWD: ALL
You need to do this exclusively by executing the command:
visudo
It will check the syntax of the /etc/sudoers file before saving. Since if you edit the file manually and it will have a syntax error, you will not be able to log in to the system as the desired user or go to /etc/sudoers , which will essentially break the system.
In this case, it is necessary to comment out the line in the /etc/sudoers file:
%sudo ALL=(ALL) ALL
to restrict other users from executing sudo . After entering all
After making all the changes , the david administrator will be able to get into the server, and to go to root , it will be enough to enter the sudo su – command . Pay attention to the “-“ in this command, often many novice system administrators forget about it. The hyphen is needed to pull up system environments, so, for example, without it you will not be able to correctly run scripts on the server.
After making all the changes, go to the david user’s console and generate a pair of SSH keys :
su david -
ssh-keygen -t rsa
Finally, be sure to generate a password for the david user in the system:
pwgen 15 1
This command will generate a random 15 digit password. After applying it, to do this, as the root user , run the command:
passwd david
On this, setting up SSH and granting access to the administrator can be considered complete. Further administrators will be added in this manner as well.
Basic FTP setup:
Next, let’s move on to setting up access to the server via FTP . For these purposes, we will use the Vsftpd package , which is in the standard repositories. Installing the package:
apt install vsftpd
The standard Vsftpd configuration file is located at /etc/vsftpd.conf, but storing the configurations of all FTP users in one file is not very convenient for administration, so we will create a separate directory for the service configurations and create a symbolic link to the configuration file /etc/vsftpd.conf to prevent conflicts in the system.
Delete the main service configuration file:
rm /etc/vsftpd.conf
Create a new directory that will be the main one for the service configurations:
mkdir /etc/vsftp/
Next, create the main configuration file /etc/vsftp/vsftpd.conf :
touch /etc/vsftp/vsftpd.conf
With the following content:
listen=YES
log_ftp_protocol=YES
anonymous_enable=NO
local_enable=YES
write_enable=YES
anon_upload_enable=NO
anon_mkdir_write_enable=NO
anon_other_write_enable=NO
dirmessage_enable=YES
pasv_enable=YES
port_enable=NO
connect_from_port_20=NO
pasv_max_port=30005 #
pasv_min_port=30000 #
xferlog_enable=YES
xferlog_file=/var/log/vsftpd.log
ascii_upload_enable=NO
ascii_download_enable=NO
ftpd_banner=Welcome to FTP server.
local_umask=0777
user_config_dir=/etc/vsftp/vsusers
chroot_local_user=NO
chroot_list_enable=YES
chroot_list_file=/etc/vsftp/vsftpd.chroot_list
userlist_file=/etc/vsftp/vsftpd.user_list
userlist_enable=YES
userlist_deny=NO
allow_writeable_chroot=YES
seccomp_sandbox=NO
force_dot_files=YES
pasv_promiscuous=YES
Here are the main settings, you can change them depending on your needs. Here we specify the files and directory in which we will describe FTP users:
/etc/vsftp/vsftpd.chroot_list
/etc/vsftp/vsftpd.user_list
/etc/vsftp/vsusers
Service logging moved to a separate file:
xferlog_file=/var/log/vsftpd.log
Optionally, you can use the following functions if necessary:
You can use the force_dot_files parameter to show hidden files in the connection listing, regardless of the FTP client settings :
force_dot_files=YES
To eliminate constant checks for matching the IP addresses of the connection and the manager, in order to eliminate the error ” 425 Security: Bad IP connecting.” , you need to add the following parameter to the /etc/vsftp/vsftpd.conf file :
pasv_promiscuous=YES
Next, create the necessary files and directories:
touch /etc/vsftp/vsftpd.chroot_list
touch /etc/vsftp/vsftpd.user_list
mkdir /etc/vsftp/vsusers
And also create a symbolic link for the correct operation of the service:
ln -s /etc/vsftp/vsftpd.conf /etc/vsftpd.conf
After that, you will need to open ports 21 and 30000:30005 for external connections at the firewall level, for example, as follows:
IPTABLES -A tcp_packets_inet  -p tcp -s 0/0 --dport 30000:30005 -j allowed
IPTABLES -A tcp_packets_inet  -p tcp -s 0/0 --dport 21 -j allowed
We recommend that you do not open ports for all addresses, but only for those IPs that need FTP access .
After completing these steps, apply the rights to the /etc/vsftp/ directory for security purposes:
chmod 750 /etc/vsftp/
Restarting the service:
service vsftpd restart
And check that it works and is running:
service vsftpd status
● vsftpd.service - vsftpd FTP server
   Loaded: loaded (/lib/systemd/system/vsftpd.service; enabled; vendor preset: enabled)
   Active: active (running) since Sun 2021-12-19 17:08:13 MSK; 1s ago
  Process: 1285 ExecStartPre=/bin/mkdir -p /var/run/vsftpd/empty (code=exited, status=0/SUCCESS)
 Main PID: 1286 (vsftpd)
    Tasks: 1 (limit: 1171)
   Memory: 608.0K
   CGroup: /system.slice/vsftpd.service
       	└─1286 /usr/sbin/vsftpd /etc/vsftpd.conf
Dec 19 17:08:13 31-31-192-22.cloudvps.regruhosting.ru systemd[1]: Starting vsftpd FTP server...
Dec 19 17:08:13 31-31-192-22.cloudvps.regruhosting.ru systemd[1]: Started vsftpd FTP server.
At the end of all actions, we check that the necessary ports are open and listened to by the service. To check availability, use telnet :
telnet 0.0.0.0 21
Where 0.0.0.0 is the external IP address of your server. If the command returns the connected status, then the ports are open correctly and the vsftpd service is listening on them.
At this stage, the basic FTP setup is completed, I will tell you how to add a specific user in the third part of the article.
Exim4 basic setup (smarthost)
After setting up work via FTP , we proceed to setting up sending mail from the server. Since we have a simple server for a small project, we will configure exim4 in the smarthost configuration . That is, the mail server will only send mail from the server, no more.
Let’s install the package:
apt update
apt install exim4 exim4-base exim4-config exim4-daemon-light
Then we proceed to edit the file /etc/exim4/update-exim4.conf.conf , and bring it to the following form:
dc_eximconfig_configtype='internet'
dc_other_hostnames='DOMAIN.RU'
dc_local_interfaces='127.0.0.1 : EXTERNAL_IP'
dc_readhost=''
dc_relay_domains=''
dc_minimaldns='false'
dc_relay_nets='127.0.0.1 : RELAY_FROM_HOST_IPs'
dc_smarthost=''
CFILEMODE='644'
dc_use_split_config='false'
dc_hide_mailname=''
dc_mailname_in_oh='true'
dc_localdelivery='mail_spool'
Where:
- DOMAIN.RU – Domain name of the server registered in the reverse zone.
- EXTERNAL_IP – External IP of this server
- RELAY_FROM_HOST_IPs – IP addresses of satellite servers , if any.
The dc_eximconfig_configtype parameter is responsible for the mode of operation of the mail server, by default it will be set to local , which will prevent you from sending mail to remote servers.
Next, go to the /etc/exim4/exim4.conf.template file and change the values of two lines there:
qualify_domain = DOMAIN.RU
primary_hostname = DOMAIN.RU
Here we also set the main domain name, to the DNS zone of which we have access. We will need these settings later, when setting up mail records.
For system administration, it is important that server service notifications sent by mail to the root user are sent to the correct mailbox, for this, the following changes will need to be made in exim4.conf.template to ensure that mail addressed to the root user is delivered :
mail_for_root:
  driver = redirect
  domains = DOMAIN.RU
  condition = ${if eq{$local_part}{root}}
  data = [email protected]
where:
DOMAIN.RU is the name of the project
[email protected] – mailbox of the server administrator
After completing all the steps, restart exim4 :
service exim4 restart
check that it is running:
service exim4 status
● exim4.service - LSB: exim Mail Transport Agent
   Loaded: loaded (/etc/init.d/exim4; generated)
   Active: active (running) since Sun 2021-12-19 18:18:11 MSK; 1s ago
     Docs: man:systemd-sysv-generator(8)
  Process: 943 ExecStart=/etc/init.d/exim4 start (code=exited, status=0/SUCCESS)
    Tasks: 1 (limit: 1171)
   Memory: 2.1M
   CGroup: /system.slice/exim4.service
       	└─1191 /usr/sbin/exim4 -bd -q30m
Verify that the permissions on Exim’s files and directories are as follows:
drwxr-x--- 3 root Debian-exim [...] exim4
Remember that for the mail service to work in smarthost mode, opening port 25 is not required, since only mail is sent.
At this stage, you can check the sending of mail from the console, it will be enough just to enter a command like:
echo "Hello there" | mail -s "world" -r sender@address recipient@address
However, given the current settings, mail for your domain is unlikely to reach recipients. In the third part of the article, we will tell you how to set up all mail records so that your mail does not end up in SPAM.
Conclusion
Please note that this article does not describe firewall configuration. You can set up firewall rules with any of the solutions available to you. For simple projects, we use the iptables add-on in the form of the nxs-ferm package , which is based on the standard ferm with a few changes.
In the second part of the article, we will talk about setting up web servers.
Creating sites and site users, providing them with access, as well as setting up mail records for sending mail will be reflected in the third part of the article.
[…] Setting up a LEMP server for simple projects. Instructions for the little ones. Part one […]