The CI / CD development methodology is already applied to most projects. It is the automation of testing and delivery of new projects of the developed project to developers, analysts, quality engineers, end-users, and other interested parties. The method ensures the promptness of the output of the new functionality of the product and the improvement of the quality of the developed solution.
In one of the projects, we faced a CI / CD and the task of setting up from scratch the delivery of scripts for migration of the Oracle 19 database. For this, it was decided to use standard tools – GitLab and Liquibase. The first is a well-known environment for managing project repositories with the ability to work with the CI / CD pipeline. And Liquibase is an open-source platform for rolling forward database migrations.
If we talk about the specific capabilities that were used to solve the problem, then we used:
- GitLab Community Edition 13.x – as a Git repository;
- GitLab Runner – the main tool for working with CI / CD;
- Liquibase is a tool for describing database roll-forward and failure scripts using chageset files consisting of SQL commands or database-independent structures.
Action plan
Before starting development, you need to make a plan for how the future migration script will work. In theory, when a developer makes a commit or a merge request, the CI / CD pipeline is launched – the very pipeline. The pipeline includes stages consisting of jobs.
The script being developed will have one stage – deployment. Basically, this is just a roll-forward script application. And the number of jobs will be equal to the number of stands. For example, we have dev and prod. These are two stands and then there will be two jobs too – deploy-dev and deploy-prod. Both jobs will access different databases. In addition, deploy-dev will be executed automatically on every merge request or commit, while deploy-prod will be executed manually. Deploy to production is done manually in order to be able to choose the right time. It is usually agreed in advance. For example, we will deploy the product in the evening so as not to interfere with users' work.
Both jobs are handled by the GitLab Runner. This is a program that downloads project sources and executes scripts on the deployment server. Runner is flexibly configurable using environment variables, into which the address, username, and password for accessing the database, branch name, author, commit text, and so on can be entered.
Remember that GitLab Runner itself accesses the repository via the http protocol. Therefore, the workstation running Runner must have access to GitLab. Otherwise, nothing will work. If deploy-dev and deploy-prod are on the same machine, then one Runner is sufficient. But most often the products are placed on another network. Therefore, we set up a separate Runner for deploy-prod.
For the script being developed, Runner will call Liquibase via the command line. The call parameters will contain information about the target database and the driver being used. Roll-forward scripts will be automatically generated by Liquibase from migration descriptions.
If everything goes according to plan, the pipeline will be considered complete and the merge request will be added to the branch. In this case, the developer will see this status:

If the scripts run with errors, then the pipeline will report errors:

In this case, you will have to study the job logs to find the error. If the problem was in network access, then it is enough to restart the pipeline.
Configuring the deployment server
The case uses virtual machines based on Centos 7. For deployment, it is not necessary to create a dedicated server, you can use an existing one. But for safety, we will isolate the server from other resources and create a working environment.
Installing Java
It is recommended to use Java 11+ to work with Liquibase. The installation process for OpenJRE 11 on Centos 7 looks like this:
sudo yum install java-11-openjdk

java --version
Installing Liquibase
In fact, no installation of Liquibase is required because it is a Java application. You just need to go to the official website of the project and download the archive. Next, unpack it into a convenient folder – in our case /usr/share/liquibase/4.3.4. Create the driver folder and copy the required driver for the used database into it. For our task, this is ojdc10.jar.
To check if the installation is correct, run a simple command:
cd /usr/share/liquibase/4.3.4

liquibase --version
Installing Git
Here the attentive reader may ask: "Why do we install Git separately if it comes as a dependency to the GitLab Runner and will be installed automatically?". That's right, dear reader, only for some unknown reason now GitLab Runner pulls behind a buggy build of Git 1.8, which does not allow you to take full advantage of CI / CD.
On the working machine, check the Git version and, if it is 1.8, install a more recent one:
# checking the current version of the git

git --version

# remove the git if it is version 1.8

sudo yum remove git*

# install the latest version of the git at the time of this writing (2.30)

sudo yum -y install https://packages.endpoint.com/rhel/7/os/x86_64/endpoint-repo-1.7-1.x86_64.rpm

sudo yum install git
Installing GitLab Runner
To install GitLab Runner, you will need to specify a specific repository:
# add

curl -L "https://packages.gitlab.com/install/repositories/runner/gitlab-runner/script.rpm.sh" | sudo bash

# install

export GITLAB_RUNNER_DISABLE_SKEL=true; sudo -E yum install gitlab-runner
This completes our working environment. It remains to move on to setting it up.
Setting up the working environment
It was originally intended that the GitLab Runner would call Liquibase to pass the database migration script. So let's start setting up these two tools.
Configuring GitLab Runner
Initially, you need to give GitLab Runner execution rights. This is done with a simple command:
# determine the installation location

which gitlab-runner # /usr/bin/gitlab-runner

# we issue performance rights

sudo chmod +x /usr/bin/gitlab-runner
If during the installation process a user for the GitLab Runner was not created and the daemon was not installed, then we do it with the following commands:
# create user

sudo useradd --comment 'GitLab Runner' --create-home gitlab-runner --shell /bin/bash

# start the dаemon

sudo gitlab-runner install --user=gitlab-runner --working-directory=/home/gitlab-runner
The workflow for GitLab Runner is very similar to systemctl. At least the commands for work will be similar:
sudo gitlab-runner status

# service launch

sudo gitlab-runner start

# service stop

sudo gitlab-runner stop

# getting a list of registered runners

sudo gitlab-runner list
We get a token for a project in GitLab. Find the Setting section in the storage interface, go to CI / CD and click on Runners. If you have already worked with GitLab Runners, then the list will display runners for a group of projects or a specific project. This list looks like this:
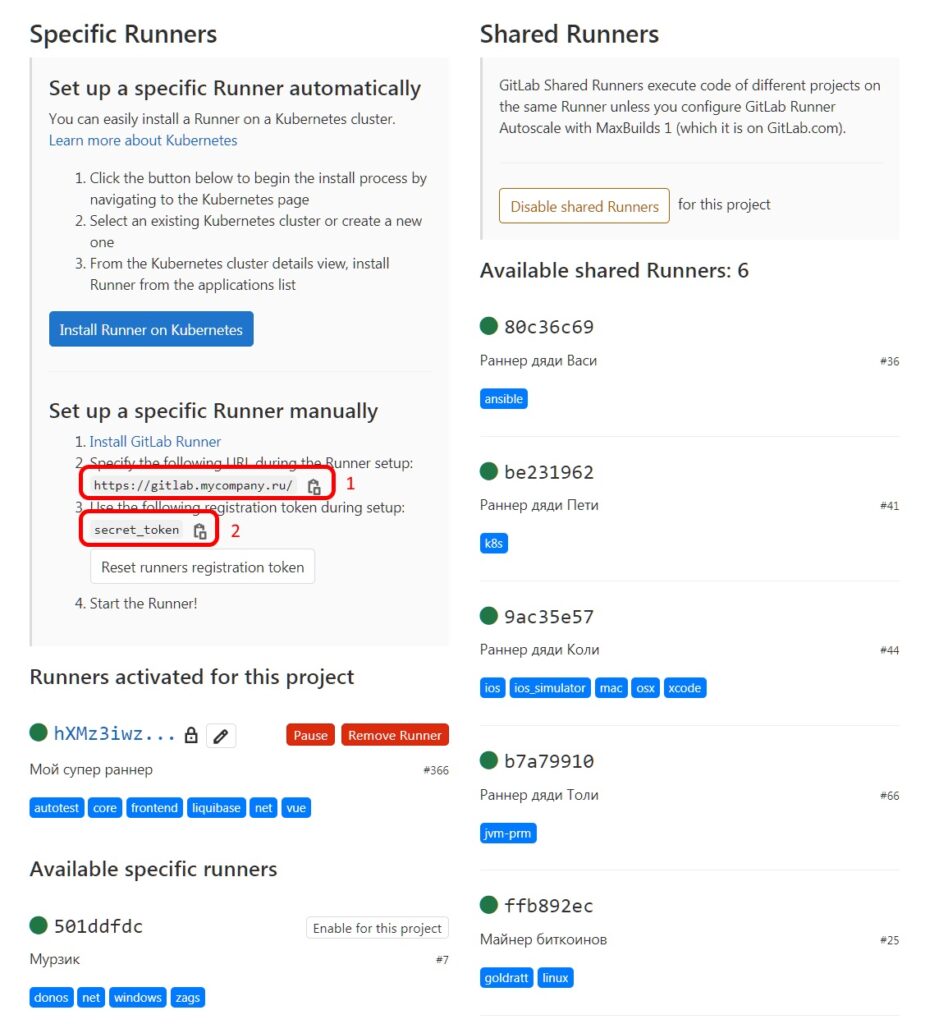
Each runner also has tags – blue tags. To run GitLab Runners, it is important that the runner tags contain job tags.
We register the runner using the command:
sudo gitlab-runner register
Next, we follow the step-by-step instructions:
Enter the GitLab instance URL

Enter the registration token

Enter a description for the runner

Enter tags for the runner

Enter an executor
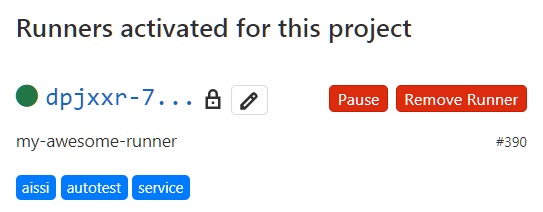
After completing the registration of the runner, we check the availability through the command:
sudo gitlab-runner list
By the way, you can check the correctness and change some parameters through Git, according to the already familiar Settings ⇨ CI / CD ⇨ Runners scheme.
That's it, this completes the work on setting up GitLab Runner and you can proceed to the next step.
CI / CD setup
Instructions on what to do in the CI / CD process are stored in the project files. To work with CI / CD, GitLab uses the main file .gitlab-ci.yml. We will use additional bash scripts, which we will place in a separate / ci folder.
Before configuring .gitlab-ci.yml, you should check out the example, which can be found at https://gitlab.example.com/gitlab-org/my-project/-/ci/lint It will help you understand which section of settings is for what answers.
In our case, the config got the following form:
variables:

LIQUIBASE_VERSION: "4.3.4"

stages:

- deploy

deploy-dev:

stage: deploy

tags:

- liquibase

- dev

script:

- 'bash ./ci/deploy-db.sh $DEV_DB $DEV_DB_USER $DEV_DB_PASS'

environment:

name: dev

only:

- dev

deploy-prod:

stage: deploy

tags:

- liquibase

- prod

script:

- 'bash ./ci/deploy-db.sh $DEV_DB $DEV_DB_USER $DEV_DB_PASS'

environment:

name: prod

when: manual

only:

- prod
Let's take a look at what each section means in order.
The variables section
This section is used to describe environment variables. With the help of LIQUIBASE_VERSION: "4.3.4" we pointed to the version of Liquibase that we plan to use. When installing a new version of Liquibase, it will be enough to change the indication of the version in this section for the script to work again.
variables:

    LIQUIBASE_VERSION: "4.3.4"
You can describe this variable in the project itself – it will be even more correct. To do this, in the storage interface, find the Setting section, go to CI / CD and click on Variables. On a project, variables may look like this:

Stage section
Here we indicate the stages of the deployment. As you remember from the beginning of the article, we have one.
stages:

    - deploy
Jobs section
The section is designated by the name of the jobs. In our case, these are deploy-dev and deploy-prod. As you can see, they are also divided into blocks.
deploy-dev:

    stage: deploy

    tags:

        - liquibase

        - dev

    script:

        - 'bash ./ci/deploy-db.sh $DEV_DB $DEV_DB_USER $DEV_DB_PASS'

    environment:

        name: dev

    only:

        - dev

deploy-prod:

    stage: deploy

    tags:

        - liquibase

        - prod

    script:

        - 'bash ./ci/deploy-db.sh $DEV_DB $DEV_DB_USER $DEV_DB_PASS'

    environment:

        name: prod

    when: manual

    only:

        - prod
Stage block
Indicates the stage a particular jobs belongs to.
stage: deploy
Block tags
Enumeration of tags. They are indicated by a regular array. Remember that when we created the runner, we also specified tags? Here we will use similar ones so that GitLab Runners understands which job it is working with.
Remember that we have split runners for dev and prod. If the dev tag is in the dev, then the sell will have – prod.
    tags:

        - liquibase

        - dev
Script block
We indicate the list of scripts that will be executed by the runner.
    script:

        - 'bash ./ci/deploy-db.sh $DEV_DB $DEV_DB_USER $DEV_DB_PASS'
Environment block
The environment is specified here.
    environment:

        name: dev
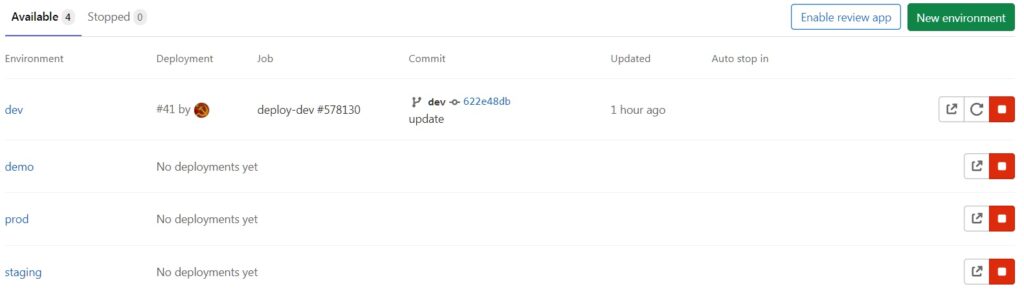
The environment can be configured in the Operations section by choosing Environments. This is, in fact, a dashboard of stands, where you can see their status, set up variables for the environment, manually start a deployment, and so on. The Environments page might look like this:
When block
This is an optional block that indicates the need to start the job in manual mode. As you can see, it is not used for deploy-dev, since we first determined that everything will be triggered here automatically. And for deploy-prod, it is a mandatory option so that the launch occurs only in manual mode.
when: manual
Only / except block
The only block indicates the application of the job to specific branches. If you need to exclude the application of a job to branches, then the except block is used.
    only:

        - dev
Liquibase call script
We will write scripts for calling Liquibase in bash. Variables for the script will be passed automatically using the previously configured environment variables. However, we have two stands with two different databases. The best way out here is to pass variables directly when calling the script.
To complete the task, the following script was created ./ci/deploy-db.sh:
#!/bin/bash

echo "Environment: $CI_ENVIRONMENT_NAME"

cd db/changelog

/usr/share/liquibase/$LIQUIBASE_VERSION/liquibase \

--classpath=/usr/share/liquibase/$LIQUIBASE_VERSION/drivers/ojdbc10.jar \

--driver=oracle.jdbc.OracleDriver \

--changeLogFile=master.xml \

--contexts="$CI_ENVIRONMENT_NAME" \

--defaultSchemaName=STROY \

--url=jdbc:oracle:thin:@$1 \

--username=$2 \

--password=$3 \

--logLevel=info \

update
Let’s take a closer look at the call parameters:
- classpath – path to the driver;
- driver – the type of the database driver;
- changeLogFile – path to the changelog master file;
- contexts – database context for changeset filters by context;
- defaultSchemaName – default schema name;
- url – DB address. In the script, it is used as the DEV_DB variable through $1;
- username – username in the database. The script uses the DEV_DB_USER variable through $2;
- password – user password in the database. The script uses the DEV_DB_PASS variable through $3.
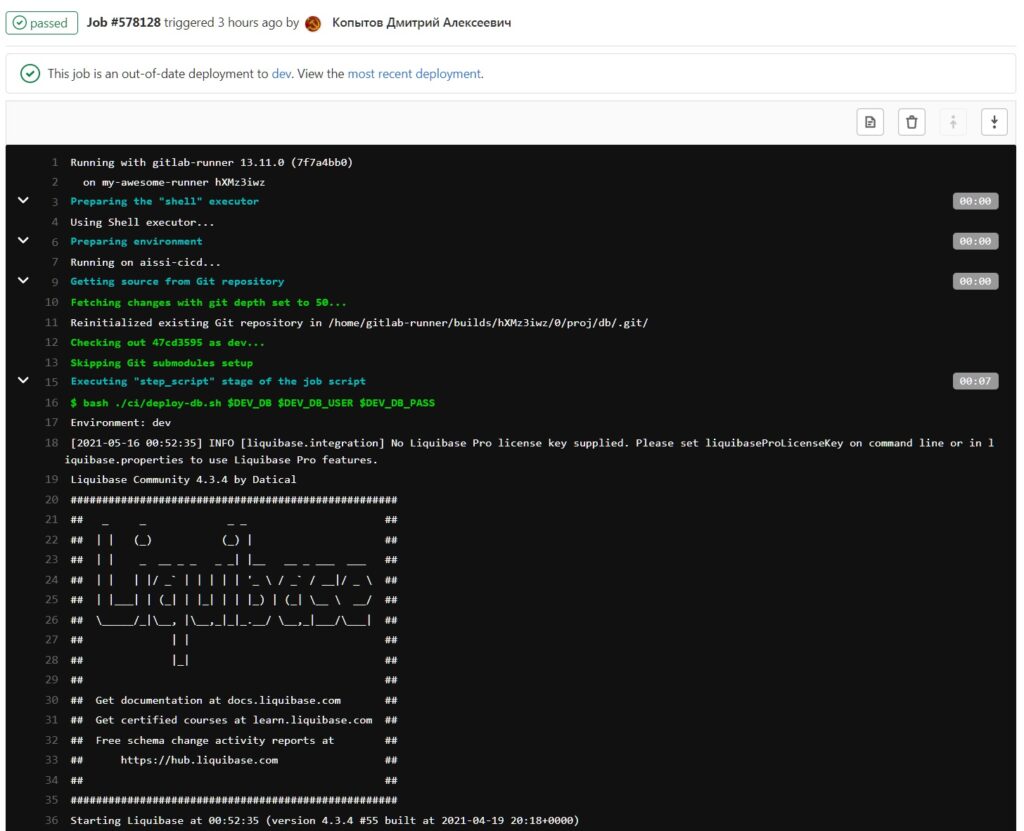
If configured correctly, we will see the following in the pipeline log for Liquibase:
Working with erroneous merges
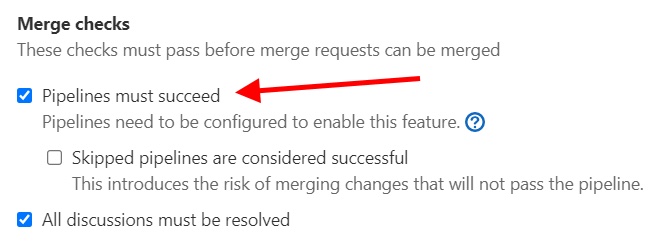
Let's improve the CI / CD process by disabling merges if the deployment process goes wrong. To prohibit such merges, you need to find the Merge checks item in the General section of the repository and check the corresponding box. But you need to do this after setting up the CI / CD.
You need to look for a checkmark here:
What happened?
After all the settings, our process works as follows:
- The developer makes a merge request or commits to a branch.
- The pipeline starts.
- The job associated with the branch is launched.
- With the help of a job, the runner is launched.
- The runner downloads the sources and calls it using the Liquibase script.
- Liquibase generates and executes roll forward or rollback scripts.
Exactly what we needed initially.