We continue the cycle of training articles for novice system administrators: if you are an experienced administrator, you can safely skip this material. In this article, we’ll take a look at docker-compose.
Let me remind you that the goal of the series is not to show how to deploy an ideal environment, but only to point out the nuances in the work and protect beginners from basic configuration mistakes.
Links to our previous articles:
Setting up a LEMP server with docker for simple projects. Part One: Base
Setting up a LEMP server for simple projects. Instructions for the little ones. Part one
So, in this article we will consider the following points:
- docker-compose.
- Why is docker-compose useful?
- Installation.
- Training.
- Let’s start writing a yml file.Item 1. Indication of the version.Point 2. We declare services.Point 3. We declare containers.Item 4. Local network of containers.Clause 4.1. Basic configurations and keys of the docker-compose.
Point 5. We write nginx.
Point 6. We write php-fpm.
Point 7. We write mysql.
Item 8. Grand total of docker-compose.yml.
docker-compose.
Why is docker-compose useful?
docker-compose allows you to manage all containers from a single file (file – yml format). Now there will be no need to write a bunch of docker run and long commands to start containers: it will be enough just to run one docker-compose up command , after which all containers will be raised without our intervention, and with all the settings that will be written in the yml file. Docker-compose also allows you to interact with the code repository management system. For example: gitlab.
Installation.
Let’s install the tool first. Download the current stable version:
сurl -L "https://github.com/docker/compose/releases/download/1.29.2/docker-compose-$(uname -s)-$(uname -m)" -o /usr/local/bin/docker-composeMaking the downloaded file executable:
chmod +x /usr/local/bin/docker-composeWe check:
#:/# docker-compose --version
docker-compose version 1.29.2, build 5becea4c
Everything is installed and working.
Training:
What services will be needed?
- front end: nginx.
- backend: php8.1-fpm.
- Database: mysql.
First of all, let’s prepare the directories for work. First, let’s create a directory where docker-compose.yml will be located. We have accepted as a standard that in our company all docker-compose files are located in the /var/apps/ directory. Create a directory and change into it:
mkdir /var/apps
cd /var/apps
Create a project directory:
mkdir DOMAIN_NAME
cd DOMAIN_NAME/
Create a docker-compose.yml file:
touch docker-compose.ymlNow let’s create a directory where our site configuration files, php.ini configurations and so on will be stored:
mkdir volumesLet’s create all the directories and configurations of our services in advance:
cd volumes/
mkdir etc build- etc – directory with configuration files of services;
- build – directory with Dockerfile files in which all commands for building the image will be stored.
Further:
mkdir etc/nginx etc/mysql etc/php-fpm8.1
mkdir etc/nginx/sites-enabled etc/nginx/ssl etc/mysql/conf.d etc/php-fpm8.1/fpm.pool.d
touch etc/nginx/nginx.conf etc/nginx/sites-enabled/DOMAIN_NAME.conf etc/mysql/conf.d/config-file.cnf etc/php-fpm8.1/php.ini etc/php-fpm8.1/fpm.pool.d/DOMAIN_NAME.conf
mkdir build/nginx build/php-fpm8.1 build/mysql
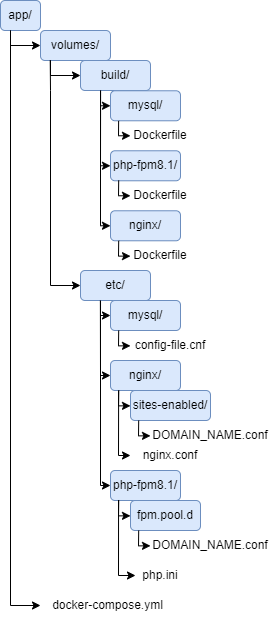
touch build/nginx/Dockerfile build/php-fpm8.1/Dockerfile build/mysql/DockerfileThis resulted in the following directory structure:
- app/
- volumes/ (directory with configuration files)
- build/ (directory c Dockerfile for our containers)
- mysql/
Dockerfile - nginx/
Dockerfile - php-fpm8.1/
Dockerfile
- mysql/
- etc/ (directory with configuration files for our services)
- mysql/
- config-file.cnf
- nginx/
- sites-enabled/
- DOMAIN_NAME.conf
- nginx.conf
- sites-enabled/
- php-fpm8.1/
- fpm.pool.d/
- DOMAIN_NAME.conf
- php.ini
- fpm.pool.d/
- mysql/
- docker-compose.yml
Or like this:
In ./app/volumes/etc/mysql/config-file.cnf you can specify all the necessary settings for mysql. In our case, we will add:
[mysqld]
port = 3310
wait_timeout = 9000000
max_allowed_packet = 1024M
innodb_buffer_pool_size = 512M
innodb_log_buffer_size = 256M
innodb_log_file_size = 1G
innodb_write_io_threads = 16
innodb_flush_log_at_trx_commit = 0
net_read_timeout=500
net_write_timeout=500
interactive_timeout=600
connect_timeout=500
skip-log-bin
# Slow query settings:
slow_query_log=1
slow_query_log_file=/var/log/mysql/slow.log
long_query_time=2
# Error query settings:
log_error=/var/log/mysql/mysql_error.log
general_log_file=/var/log/mysql/mysql.log
general_log=1
In ./app/volumes/etc/nginx/nginx.conf, you can specify all the necessary settings for nginx and the site. In this case we will add:
nginx.conf:
user  nginx;worker_processes  6;
error_log  /var/log/nginx/error.log warn;
pid        /var/run/nginx.pid;
events {
	worker_connections  16384;
}

http {
include       /etc/nginx/mime.types;
default_type  application/octet-stream;

    log_format  main  '$remote_addr - $remote_user [$time_local] "$request" '                      '$status $body_bytes_sent "$http_referer" '                      '"$http_user_agent" "$http_x_forwarded_for"';

    access_log  /var/log/nginx/access.log  main;

    ### gzip    gzip on;
    gzip_disable "msie6";

    gzip_vary on;
    gzip_proxied any;
    gzip_comp_level 6;
    gzip_buffers 16 8k;
    gzip_http_version 1.1;
    gzip_types text/plain text/css application/json application/x-javascript text/xml application/xml application/xml+rss text/javascript image/svg+xml;

    client_body_buffer_size         1m;
    client_max_body_size            75m;

    tcp_nopush on;
    tcp_nodelay on;
    keepalive_timeout 65;
    types_hash_max_size 2048;

    sendfile        on;
    #tcp_nopush     on;
    #gzip  on;

    include /etc/nginx/sites-enabled/*.conf;

    }
The site file ./app/volumes/etc/nginx/sites-enabled/DOMAIN_NAME.conf can be taken from the previous article .
In ./app/volumes/etc/php-fpm8.1/fpm.pool.d/DOMAIN_NAME.conf add the settings for the php-fpm site:
[DOMAIN_NAME]
	listen = 172.16.1.5:9010   ;ip адрес и порт на котором будет находится php-fpm площадки.
	listen.mode = 0666
	user = DOMAIN_NAME   ;Пользователь площадки.
	group = DOMAIN_NAME  ;Группа пользователя площадки.
  pm = dynamic
  pm.max_children = 50
  pm.start_servers = 1
  pm.min_spare_servers = 1
  pm.max_spare_servers = 35
  pm.max_requests = 500
  request_terminate_timeout = 5m
  request_slowlog_timeout = 2s
  slowlog = /var/log/php/php-fpm.slow.log
  php_admin_value[opcache.max_accelerated_files] = 20000
  php_admin_value[realpath_cache_size] = 4096K
  php_admin_value[realpath_cache_ttl] = 600
  php_admin_flag[display_errors] = off;
  php_admin_value[error_log] = /var/www/DOMAIN_NAME/log/php-fpm/fpm-php.log
  php_admin_flag[log_errors] = on
  php_admin_value[open_basedir] = /var/www/DOMAIN_NAME
  php_admin_value[upload_tmp_dir] = /var/www/DOMAIN_NAME/upload
  php_admin_value[session.save_path] = /var/www/DOMAIN_NAME/sess
In ./app/volumes/etc/php-fpm8.1/php.ini you can add all settings for php. In our case, we will add:
upload_max_filesize = 500
Mmax_file_uploads = 20
post_max_size = 500
Mmemory_limit = 4096
Mdate.timezone = Europe/Moscow
Before further work, let’s clean up all the images collected earlier in the previous article. For this action, the command is suitable:
docker system prune --volumes --allThis command cleans up all non-running container images. An important clarification – it is not running !
Check running containers:
docker ps
CONTAINER ID   IMAGE                       COMMAND                  CREATED        STATUS                          PORTS                                                                      NAMES
5f3353afe4fc   nginx:stable                "/docker-entrypoint.…"   4 months ago   Up About a minute               0.0.0.0:80->80/tcp, :::80->80/tcp, 0.0.0.0:443->443/tcp, :::443->443/tcp   nginx
88c83f238c5c   php-fpm                     "/docker-entrypoint.…"   4 months ago   Up About a minute               9000/tcp                                                                   php-fpm
To stop all containers, you can use the command:
docker stop $(docker ps -a -q)docker stop $(docker ps -a -q)
5f3353afe4fc
88c83f238c5cNext, clean up the images with the docker system prune –volumes –all command:
:~# docker system prune --volumes --all
WARNING! This will remove:
  - all stopped containers
  - all networks not used by at least one container
  - all volumes not used by at least one container
  - all images without at least one container associated to them
  - all build cache
Are you sure you want to continue? [y/N] y

Deleted Containers:
d25fadd1ace48b1e1d7285c79c924928fd2df54395f3cab9d1184bf25745404f
a156787f2e2d20585272f90b86fbfd82c6ff28fd6bd3e17785be1530e0dcf433
034a89f5322498cd272436515a43a9d82e0f32cdbd2da230a8211f1af7134619
c422454c2b997aec3e473998b3f51cbe5b322c00c094de9bfc20aba3af403830
5f3353afe4fc381fb2aa554700fb0a37ef378e923b5662241549722b243f84ea
88c83f238c5cfe7c71293793d54149e5e6aaf9db92dce9f0f1c9ac2e5e35be3c
77f498f59e80623dd325f6297dcc1c0b068c0fc0b373ca5c137d49052f71276f
Deleted Networks:
default
docker_default
Deleted Volumes:
171304f87cde0dbe4142c80e10e30076acfdae1c9d1ac0ed73125e8938bd13af
65e26f00da5308b81afe3d870d63243716df4935445b25648c5c69392151fefe
a016235f662b38c657f5e04283fc54d779d18c6e9d778c04e2a5fc264fec428b
a20375ceb893d7ae95c2b5ffd10c8557b49f02896a456c22a9015d17f34bd490
untagged: nginx:stable
untagged: nginx@sha256:74fb4c9d7e4fe6a8ab699d66fb5ffbf3daf1025bbb6f65a3217dde6e8f4d6e56
deleted: sha256:50fe74b50e0d0258922495297efbb9ebc3cbd5742103df1ca54dc21c07d24575
deleted: sha256:5c89b8cf56a58aa2a96ab1ed19ffd8e0630355776b1db7082fd897f8a5d285d4
deleted: sha256:e45a683cc5d56e842fc90c7ad0535abb1e909f733c2c0c29f4cf43f7247f8438
deleted: sha256:7ffdf2d40e75d1028ecbdba3cd5c548dc7a2b6c6b6598c2ff0af1f864df662e8
deleted: sha256:43828a7cbba35611955d78d1849ba6e48f176c96795ea881a7a9adcf5eb23bfa
deleted: sha256:e6ffc9b8132b8380efc5dd578d3e369890abaa492863968a5c41bdf9a8e5070e
deleted: sha256:2edcec3590a4ec7f40cf0743c15d78fb39d8326bc029073b41ef9727da6c851f
untagged: php-fpm:latest
deleted: sha256:cac496cb3198354a8bf68188c5cec929ba149e4f8f331c32f38e45ecc0bd0e67
deleted: sha256:21c4defd66f2e9e64c7b331a7580466403d4e2008d12864f2a29790ff1473a76
deleted: sha256:90f506af9c6530b6cc3c27ad661a9f4c4bfe64a57f313bad65ab67064ca7a880
deleted: sha256:45e703bc20b6aa77dd834ae2c81d1889be7a8b025d7570aa6034569210f25612
deleted: sha256:0f9ac9b1acec55805e6a2cb53b85406b39b07c5154bea03dc575f632e860cff9
deleted: sha256:5e1a9584d37f2f438eb4f9719591b72d9113d0b93e9fd336ee61e9653faaf156
deleted: sha256:bf23cc62c0e983ea1ed5b3b38bd78a86d26ab85de691802a81a800475a1a4e75
deleted: sha256:adf7df76ecb09fcd0fb8c283c8ac1aada505ed57bfa733461cc555d8ca23a816
deleted: sha256:2e09cf02796f006bde367ee89fcfd0053abbf080ef240e715343d6ead0b44851
deleted: sha256:c41477d2876d165d26869efd878a6e3b2fee7fafa10e51c5246909b6622d3b2c
deleted: sha256:9f0f98eb9fa7bd5d06653241253eda67fd08326b2634e903bb66dea0e2fb5139
deleted: sha256:4442cb52388be2f9a3ba0e6d6682e87d4586677d94c31af9064fc9315d0370cc
deleted: sha256:7ea425a7c077487583d85343140c2200a35bf98839a7228a789c74d4419c708f
deleted: sha256:cf3704308d18d0e52028613a7795a39658b02f345c647cf6aa0d82ec6dd51908
deleted: sha256:d943dbca5ecfa509906e2644be6e918c1c5961914271a320b895923c5324014f
deleted: sha256:ffc6430b96530f2b7d3f53e1cc64ec24852d9a1a826f687d87e0f6e4eec54869
deleted: sha256:8e32d40714a5cca10289b3fc0ded459b05320abc120bee3525f17c696c4bdb2e
deleted: sha256:3c4d7d6769cd7accbd1ccf61175010a1dfabbe435dab26ec2d771daba9de6f86
deleted: sha256:49143d13ba872d32b27bb2765beb496ac60d6b85414cd371a518c9946ec90b25
deleted: sha256:4883d13c15029dd0eab0e9fb7b3e00d8b0139e0d643e4c6e4bc144228e9e7e8f
deleted: sha256:2004464b54089dd15804882cb4803381532e0589d38f47f9729f7fb6ef169c34
deleted: sha256:c71714a613ec902f20bf8dce9866f62702302994af53bdd104331c19c7339da4
deleted: sha256:b1783cc83184509d3fffd30ba119ea1f11ec8602fdc50ba2c3e062e02df56e80
deleted: sha256:3e84bd99827c4963eab48a3e54bd088f7a206adb3aacd45361027327d5ca8443
deleted: sha256:d10560a7f2e4534ce146753b0748f1e73ce1b50f458f1e12385e19222b221b69
deleted: sha256:9c84657b917192c0490faf836824a113e6c397146db7a73fc2dc47755224c026
deleted: sha256:c13bd6861c9c7576cb27df56517347b5b7b28e68ce93e69a6ff25d8f1b4b4f6e
deleted: sha256:ced7cbb4abb893d33743c81fcbe3caf9c64da09a6fd9fa2f75efdfa0fd6efd6b
deleted: sha256:32f19a4eb0921d3b110352c4bdcdc7b64bd47092e1e15fe918e94cf6039037d8
deleted: sha256:054e2126fd90e29711637456090b61fc9b883eeb95ccf94430026ab7d5d14541
deleted: sha256:e8f41b5970d0e2b904babde28c490135b83b0a0be9ff7101171c203cc23af5fb
deleted: sha256:e022aa4b2c5f34b58acd5050d77cc23c087395010ab525ae9802ddc0ea52559c
deleted: sha256:ebdafce0fbc3adbde2ec9308930be55d3df801a2f62b31bd5b0b1162a54fea7e
deleted: sha256:c3744e7ff118e96f517ff1b4f97ee8ee62695d7cf97aec267b9bd73df77581ee
deleted: sha256:3b56d7cccfcf2579595d9d21f0788129276743ea2957f05cd9e49317fefd852f
deleted: sha256:d204f4d10e96af88215de15a6b47de64668572bfe9f143bc17f0adf0285c02bd
deleted: sha256:8c5518abda1bc707b21cc845ea17ebf5dcb4d05f8b5b5164d863255ea59390d4
deleted: sha256:9321ff862abbe8e1532076e5fdc932371eff562334ac86984a836d77dfb717f5
Total reclaimed space: 1.813GB
All containers and images have been removed from the server.
Basic setup completed.
Let’s start writing our yml file.
ATTENTION! An important clarification: since this is a yml file, it is very strictly necessary to follow spaces and indents in it and never use TAB. Otherwise, you may get a syntax error – for example, an extra space somewhere in the 80th line, which may take you more than one hour to find =).
So let’s open docker-compose.yml.
Item 1. Indication of the version.
First, we specify which version of docker-compose we will use. In our case, we use version 2.4 – it will be enough for us.
To get acquainted with all versions, and what they are for, you can go to the official manual about this: version.
We add:
version: '2.4'Point 2. We declare services.
We add:
services:We announce that our containers will follow.
Point 3. We declare our containers.
Do not forget about the yml format, so we make two spaces and add:
nginx:
php-fpm8.1:
mysql:
It looks like this:
version: '2.4'
services:
  nginx:
  php-fpm8.1:
  mysql:
Item 4: Container LAN.
Let’s announce our network in advance so as not to return to it anymore. The networks key is responsible for the network.
We add these lines:
networks:
  default:
    driver: bridge
    ipam:
      config:
- subnet: 172.16.1.0/24- default – the name of our network. You can use any name.
- driver – the driver of our network.
- ipam – network configuration. In this case, we specify our local subnet 172.16.1.0/24
We get:
version: '2.4'
services:
	nginx:
	php-fpm8.1:
  mysql:

networks:
	default:
  	driver: bridge
    ipam:
    	config:
      	- subnet: 172.16.1.0/24
Clause 4.5. The main configurations and keys of our docker-compose.
- container_name: – container name;
- hostname: – hostname in the container;
- build: – load the Dockerfile, which will store all the commands for building the image;
- extra_hosts: – a point in which we indicate which entry will be in the hosts on our server;
- ports: – ports that we want to throw into the container;
- volumes: – directories that we want to throw into the container.Why is it necessary to forward directories to the container? Every time we rebuild the container, all internal directories will be deleted from us. To prevent this from happening, we forward the directory to the container. After that, all files will be stored on the host machine, and after the container is rebuilt, the files will be safe and sound.For example: We have mysql in a container. If we do not forward the database directory, then all our databases will be deleted after we rebuild the container. Therefore, for all services, it is best to forward all the necessary directories. It is important!
- networks: – ip address that we will assign to our container;
- links: – container loading priority;
- restart: – container restart frequency in case of an error.
Point 5. We write nginx.
Go to the nginx line and indent 4 spaces. yml format (yes, I won’t get tired of repeating it :)).
Specify the name of the container container_name:
container_name: DOMAIN_NAME-nginxSpecify hostname:
hostname: DOMAIN_NAME-nginxWe specify the location of our Dockerfile for the build build:
build: ./volumes/build/nginxWe specify the directories that need to be thrown into the container using volumes. Be sure to drop:
- Site files. To work with static.
- nginx configuration. For quick control if necessary.
- Site configuration files. For site operation.
- Directory with ssl certificates. To quickly connect work via https.
- The directory with the nginx log file. For the convenience of further analysis.
Specify volumes and drop directories with a hyphen:
    volumes:
      - ./var/log/nginx:/var/log/nginx #log files.
      - ./volumes/etc/nginx/nginx.conf:/etc/nginx/nginx.conf:ro #nginx configuration.
      - ./volumes/etc/nginx/sites-enabled:/etc/nginx/sites-enabled:ro #Site configuration.
      - ./volumes/etc/nginx/ssl:/etc/nginx/ssl:ro #certificates
      - /var/www/DOMAIN_NAME:/var/www/DOMAIN_NAME #home directory
The :ro key means read only . It is added for security so that configuration files cannot be changed inside the container.
Specify ports ports:
We open ports 80 and 443 on the host and forward them to the container.
    ports:
      - "80:80"
      - "443:443"
Specify the download priority links:
    links:
      - php-fpm
The nginx container will not load faster than the php-fpm container. This is done so that the user does not see the 502 response code in case of container overload.
Specify how often the container can be reloaded in case of an error:
    restart:
      always
Assign an ip address to the container using networks:
     networks:
       default:
         ipv4_address: 172.16.1.4
As a result, it turns out like this:
 nginx:
    container_name: DOMAIN_NAME-nginx
    hostname: DOMAIN_NAME-nginx
    build: ./volumes/build/nginx
    volumes:
      - ./var/log/nginx:/var/log/nginx #log files.
      - ./volumes/etc/nginx/nginx.conf:/etc/nginx/nginx.conf:ro #nginx configuration.
      - ./volumes/etc/nginx/sites-enabled:/etc/nginx/sites-enabled:ro #Site configuration.
      - ./volumes/etc/nginx/ssl:/etc/nginx/ssl:ro #certificates
      - /var/www/DOMAIN_NAME:/var/www/DOMAIN_NAME #home directory
    ports:
      - "80:80"
      - "443:443"
    links:
      - php-fpm
    restart:
      always
    networks:
      default:
        ipv4_address: 172.16.1.4
We analyze:
We have an nginx container :
- Named DOMAIN_NAME-nginx
- hostname in DOMAIN_NAME-nginx container
- Building from our Dockerfile at ./volumes/build/nginx
- With forwarded directories and files ./var/log/nginx, ./volumes/etc/nginx/nginx.conf, ./volumes/etc/nginx/sites-enabled/, ./volumes/etc/nginx/ssl/, / var/www/DOMAIN_NAME/
- Runs on ports 80 and 443 of the host machine
- Run only after php-fpm container
- Often rebooted in case of error and with ip address 172.16.1.4 .
Point 6. We write php-fpm.
Let’s move on to the php-fpm line.
Name:
container_name: DOMAIN_NAME-php-fpmhostname:
hostname: DOMAIN_NAME-php-fpmDockerfile location:
build: ./volumes/php-fpm/buildlinks download priority: do not need to be specified.
Ports:
   ports:
      - "9000:9010"
Directories to drop:
- Site directory.
- php.ini php-fpm for quick configuration changes (if necessary).
- Site configuration file.
- log file php.
We pass:
    volumes:
      - ./volumes/etc/php/fpm.pool.d/DOMAIN_NAME.conf:/usr/local/etc/php-fpm.d/DOMAIN_NAME.conf:ro #Site configuration
      - ./volumes/etc/php/nxs-std.ini:/usr/local/etc/php/conf.d/nxs-std.ini:ro #php config for php-fpm
      - /var/log/php:/var/log/php #log files
      - /var/www/DOMAIN_NAME:/var/www/DOMAIN_NAME #home directory
IP address:
    networks:
      default:
        ipv4_address: 172.16.1.5
Add rights to all changes in php docker:
    cap_add:
      - SYS_NICE
      - DAC_READ_SEARCH
What is it for? For example php-fpm will need to change the process priority. If this line is missing, we will get an error:
mbind: Operation not permitted
Or, for example, the site works for us from the user DOMAIN_NAME. In order for the site to work in a container, php-fpm needs to add a user to the system. If there is no line, a similar error will be thrown.
Container reload:
restart: alwaysOutcome:
  php-fpm:
    container_name: DOMAIN_NAME-php-fpm
    hostname: DOMAIN_NAME-php-fpm
    build: ./volumes/php-fpm/build
    ports:
      - "9000:9010"
    volumes:
      - ./volumes/etc/php/fpm.pool.d/DOMAIN_NAME.conf:/usr/local/etc/php-fpm.d/DOMAIN_NAME.conf:ro #php config for
      - ./volumes/etc/php/php.ini:/usr/local/etc/php/conf.d/nxs-std.ini:ro #php config for php-fpm
      - /var/log/php:/var/log/php #log files
      - /var/www/DOMAIN_NAME:/var/www/DOMAIN_NAME #home directory
    cap_add:
      - SYS_NICE
      - DAC_READ_SEARCH
    restart: always
    networks:
      default:
        ipv4_address: 172.16.1.5
We have a php-fpm container :
- With the name DOMAIN_NAME-php-fpm ;
- hostname in the DOMAIN_NAME-php-fpm container ;
- Building from our Dockerfile at ./volumes/php-fpm/build . With forwarded directories and files ./volumes/etc/php/fpm.pool.d/DOMAIN_NAME.conf, ./volumes/etc/php/php.ini, /var/log/php, /var/www/DOMAIN_NAME/ ;
- Running on port 9000 of the host machine;
- Often rebooted in case of error and with ip address 172.16.1.5 .
Point 7. We write mysql.
Let’s move on to the mysql line.
Name:
container_name: DOMAIN_NAME-mysqlhostname:
hostname: DOMAIN_NAME-mysqlDockerfile location:
build: ./volumes/mysql/buildlinks download priority: do not need to be specified.
Ports:
    ports:
      - "3310:3310"
Directories to drop:
- Database storage directory.
- mysql config file.
- mysql log file.
We pass:
    volumes:
      - /var/lib/mysql:/var/lib/mysql #Database directory.
      - /var/log/mysql:/var/log/mysql #log files
      - ./volumes/mysql/conf.d:/etc/mysql/conf.d:ro #Configuration mysql.
IP address:
    networks:
      default:
        ipv4_address: 172.16.1.6
Container reload:
restart: alwaysOutcome:
  mysql:
    container_name: DOMAIN_NAME-mysql
    hostname: DOMAIN_NAME-mysql
    build: ./volumes/mysql/build
    ports:
      - "3310:3310"
    volumes:
      - /var/lib/mysql:/var/lib/mysql #Database directory.
      - /var/log/mysql:/var/log/mysql #log files
      - ./volumes/mysql/conf.d:/etc/mysql/conf.d:ro #Configuration mysql.
    networks:
      default:
        ipv4_address: 172.16.1.6
We have a mysql container :
- With the name DOMAIN_NAME-mysql ;
- hostname in the DOMAIN_NAME-mysql container ;
- Building from our Dockerfile at ./volumes/mysql/build ;
- With forwarded directories and files /var/lib/mysql, /var/log/mysql:/var/log/mysql, ./volumes/mysql/conf.d ;
- Running on port 3010 of the host machine;
- Often rebooted in case of error and ip address 172.16.1.6 .
Item 8. The grand total of our docker-compose.yml:
version: '2.4'
services:
  nginx:
    container_name: DOMAIN_NAME-nginx
    hostname: DOMAIN_NAME-nginx
    build: ./volumes/build/nginx
    volumes:
      - ./var/log/nginx:/var/log/nginx #log files.
      - ./volumes/etc/nginx/nginx.conf:/etc/nginx/nginx.conf:ro #nginx configuration.
      - ./volumes/etc/nginx/sites-enabled:/etc/nginx/sites-enabled:ro #Site configuration.
      - ./volumes/etc/nginx/ssl:/etc/nginx/ssl:ro #certificates
      - /var/www/DOMAIN_NAME:/var/www/DOMAIN_NAME #home directory
    ports:
      - "80:80"
      - "443:443"
    links:
      - php-fpm
    restart:
      always
    networks:
      default:
        ipv4_address: 172.16.1.4

  php-fpm:
    container_name: DOMAIN_NAME-php-fpm
    hostname: DOMAIN_NAME-php-fpm
    build: ./volumes/php-fpm/build
    ports:
      - "9000:9010"
    volumes:
      - ./volumes/etc/php/fpm.pool.d/DOMAIN_NAME.conf:/usr/local/etc/php-fpm.d/DOMAIN_NAME.conf:ro #Site configuration
      - ./volumes/etc/php/nxs-std.ini:/usr/local/etc/php/conf.d/nxs-std.ini:ro #php config for php-fpm
      - /var/log/php:/var/log/php #log files
      - /var/www/DOMAIN_NAME:/var/www/DOMAIN_NAME #home directory
    cap_add:
      - SYS_NICE
      - DAC_READ_SEARCH
    restart: always
    networks:
      default:
        ipv4_address: 172.16.1.5

  mysql:
    container_name: DOMAIN_NAME-mysql
    hostname: DOMAIN_NAME-mysql
    build: ./volumes/mysql/build
    ports:
      - "3310:3310"
    volumes:
      - /var/lib/mysql:/var/lib/mysql #Database directory.
      - /var/log/mysql:/var/log/mysql #log file
      - ./volumes/mysql/conf.d:/etc/mysql/conf.d:ro #mysql configuration.
    networks:
      default:
        ipv4_address: 172.16.1.6

networks:
  default:
    driver: bridge
    ipam:
      config:
        - subnet: 172.16.1.0/24
So, we have analyzed the basic keys and commands for writing docker-compose. Now you can write yml yourself, and most importantly, understand what exactly you wrote! But before launching, you need to write a Dockerfile, and in the next article we will analyze what it is, what a Dockerfile is for, and how to write it beautifully. After that, we will run our docker-compose, run WordPress and check its work.