We continue the cycle of training articles for novice system administrators. In the “Setting up a LEMP Server with Docker for Simple Projects” series, we’ll take a look at docker and docker-compose, look at how to build a LAMP+Nginx stack with docker, and tell you the benefits of containerization and virtualization.
Despite the fact that the topic is already covered in sufficient detail on the web, we decided to describe in detail the general standards of administration from scratch, since we regularly receive a large number of basic questions from people who are somehow connected with our field. The purpose of this series of articles is not to show you how to deploy the ideal environment, but only to point out the nuances in operation and to protect beginners from basic configuration mistakes.
A series of articles will be useful to novice system administrators and engineers, so if you are an experienced administrator, you can safely skip this material.
So, in this article we will analyze:
- Comparison of virtualization and containerization.
- What is virtualization?
- Why and when is it needed?
- What are the disadvantages of virtualization?
- What is containerization?
- Scaling and its types.
- Vertical scaling.
- When to use Vertical scaling?
- Horizontal scaling.
- How containerization and scaling are related.
- Docker. BASE.
- Install docker.
- Let’s start with containers.
- What can we do with a container?
- How do we make a request to the container?
- Configuring nginx and apache2 to work in a container.
1. Comparison of virtualization and containerization.
What is virtualization?
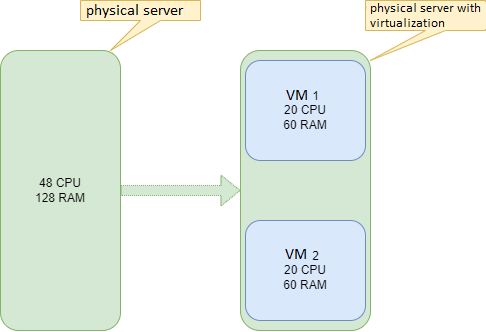
Virtualization is a set of tools that allows us to split a physical server into 2, 3 or more servers. With different operating systems, services, dependencies, libraries, modules, etc.
Example: We have a server with 48 CPU 128 RAM. Using virtualization, you can split a physical server into two servers separate from each other.
Why and when is it needed?
This is most often used to separate the DEV and PROD environments, since it will be safer to test in the DEV environment on a separate server. It is also useful when you need to deploy services that use different dependencies and libraries.
Example: PROD environment runs on php7.2+apache, but tests require a site on php8.1+apache. In this case, apache2 as a php interpreter cannot handle different php versions, so we need a separate server.
What are the disadvantages of virtualization?
- Resource limitation. The virtualization tool will not be able to add virtual machines beyond our physical CPU and RAM cores.
Example: 2 servers were created instead of one with 20 CPU and 60 RAM. Accordingly, if another virtual server is needed, the virtualization tool will be able to add a server consisting of only 8 CPUs and 8 RAM. If you add parameters to the configuration that will exceed the available resources, the virtualization tool will generate an error.
Example: Instead of 8 available CPUs, 9 will be listed.
- Reserving cores for a virtual machine. A VM with 20 CPUs will be created, so the CPU data on the host machine will only be used by the VM. Resources will not be able to be used on the physical server.
- Fault tolerance. If something happens to the physical server, it will affect our VMs as well.
Example: Our server has crashed. -> Our virtual machines have fallen.
Bottom line: If we have free resources of our physical server and we need a new environment for tests. Virtualization is here to help.
What is containerization?
Containerization is an improved vision of virtualization. Containerization also allows you to create separate virtual machines, with only one important difference: containerization uses the kernel of the operating system installed on the physical server. The container will run only the service that is needed, and nothing more.
Example: The container will exclude the launch of other services (for example, GUI), which ensures minimal resource consumption.
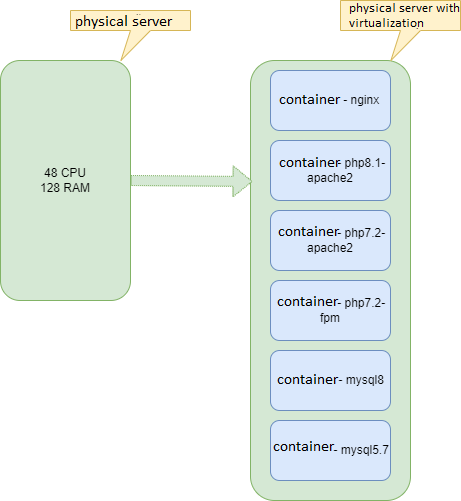
A huge advantage of containerization is also the rapid deployment of the container, since only the base OS is raised without dependencies and unnecessary packages. The container will deploy only the minimum set of libraries that are required to run the service.
2. Scaling and its types.
Imagine that we have a project that currently uses 90-100% of resources. The code on this project has been 100% optimized, which means:
- There are no hung processes in the database.
- There are no hanging scripts in the backend, and no long-running commands.
- Frontend has been optimized. Resources that are rarely used have been cached.
So, there is nothing more to optimize. How to proceed?
Server scaling required. Scaling is of two types:
- Horizontal
- Vertical.
Vertical scaling.
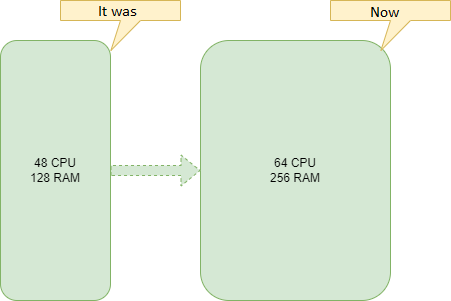
Vertical scaling is when server resources increase, add RAM, increase CPU and disk size.
Example:
When to use Vertical scaling?
- When disk space runs out. You need to buy additional disks.
- When services work out input and output operations for a long time. You need to change the slow drive to a fast one.
- When OOM Killer comes too often due to lack of RAM. Adding RAM to the server.
Horizontal scaling.
Horizontal scaling is when, instead of increasing server resources, services are moved to other machines and duplicated for fault tolerance. For these purposes, it is better to use different data centers.
Example:
- Static files can be moved to a separate server, or you can use S3 storage.
- The database can be split, and then set up replication. One server will work only for reading, the other only for writing.
- Static data search should be sent to a separate server with fast disks.
3. How are containerization and scaling related?
When the container is raised, the parameters that we need in the container are written. yml file with all dependencies, modules.
It is worth setting up and writing a container once, and it will work on any server in the same way, with the very conditions that were set when writing the yml file. That is, by writing a service or services only once, it will be possible to duplicate it (them) on as many servers as you like, and the service will work the same on all servers.
Example: Let’s imagine that our project has grown, and there are no longer enough resources. It was decided to rent a new server. For the new server, it will be enough to duplicate the yml file, in which all the same services that were deployed on the old server will be raised. And at the same time, deploying containers saves valuable time, which is so often missed. After all, it is much more pleasant to deploy a new server in just a couple of minutes than deploying a server in a couple of weeks from scratch. Therefore, containerization is so necessary in vertical scaling.
To get acquainted with containerization, we use the docker containerization service.
In order to understand all the intricacies of docker, you first need to understand exactly how docker works, and then write a full-fledged yml file that will allow you to start all services with one command.
4. Docker BASE.
All settings will be carried out on the new server. Therefore, to begin with, we recommend making the basic settings that we wrote about in previous articles (if you have a new server!).
Install docker:
Preparing the system: update the package indexes and install the required packages to use the repositories over HTTPS.
apt-get update apt-get install \
     ca-certificates \
     curl \
     gnupg \
     lsb-release
Add the official Docker GPG key:
curl -fsSL https://download.docker.com/linux/debian/gpg | sudo gpg --dearmor -o /usr/share/keyrings/docker-archive-keyring.gpgInstalling the Docker engine.
Update the package indexes and install the latest version of Docker Engine and containerd:
apt-get update
apt-get install docker-ce docker-ce-cli containerd.io
All installation information was taken from the official docker manual. For installation on other operating systems and for a more in-depth study, you can check out the main site.
Let’s start with containers.
First we need to choose an image for our container. How to do it? We go to the site with all the container images: hub.docker.com
Example: We need nginx. We are looking for an nginx image on the site. We go to the official website and download the latest image, after which we create an image of our nginx. In this case, it will look like this:
docker pull nginx#:~# docker pull nginx
Using default tag: latest
latest: Pulling from library/nginx
5eb5b503b376: Pull complete
1ae07ab881bd: Pull complete
78091884b7be: Pull complete
091c283c6a66: Pull complete
55de5851019b: Pull complete
b559bad762be: Pull complete
Digest:
sha256:2834dc507516af02784808c5f48b7cbe38b8ed5d0f4837f16e78d00deb7e7767
Status: Downloaded newer image for nginx:latest
docker.io/library/nginx:latestThe image is downloaded and built on our server. To check the images that are already installed and available on our server, use the command:
docker images#:/# docker images
REPOSITORY TAG IMAGE ID CREATED SIZE
nginx latest c316d5a335a5 2 weeks ago 142MBWe analyze the received information:
- REPOSITORY – the repository where our image is loaded and built from. In this case, the official image is from hub.docker.com/_/nginx .
- TAG is our nginx version. We have the latest version of the image.
- IMAGE ID – ID of our image.
- CREATED – the date when this image was built and released to the repository.
- SIZE – image size.
As you can see above, there is an nginx image of the latest stable version posted by the nginx developers 14 days ago. It has id c316d5a335a5 and takes up 142 MB of our disk space.
Now we need to run our image. For this we will need the command:
docker run -d "the name of image"In our case, the command will be:
docker run -d nginxWe launch:
#:/# docker run nginx
d9eceddb3c2b25f6863949b776cdda280f132dc0664a4b89c4fcbe9c563436e
To check running containers, use the command:
docker psChecking our container:
#docker ps
CONTAINER ID   IMAGE     COMMAND                  CREATED              STATUS              PORTS     NAMES
8d9eceddb3c2   nginx     "/docker-entrypoint.…"   About a minute ago   Up About a minute   80/tcp    fervent_allen
The container is up and running. We analyze the received information:
- CONTAINER ID – ID of our container.
- IMAGE is the name of our image.
- COMMAND is the instruction that is executed when the Docker container is started. In this instruction, we can put all those commands that need to be run every time the container is restarted. To avoid doing these steps manually.
- CREATED – the date we built our container
- STATUS – the current status of the container.
- PORTS – ports that are open in the container and to which it accepts a connection.
- NAMES is the name of our container.
We get the following information:
Do we have a container with id a026e61cf29b built from an image called nginx that executes commands? specified in docker-entrypoint.sh. Assembled about a minute ago and with the status up (up and running for about a minute). Working port 80 inside the container and container name fervent_allen.
We got a container (mini virtual machine) on our server.
What can we do with it?
Example: Send traffic to it, and nginx will process this traffic. It is also possible to enter our container. With command:
docker exec -it <> bash #docker exec -it 8d9eceddb3c2 bash
docker@/#This is necessary when we need to dynamically change any parameters without reloading the entire container.
Example: We can reread the nginx configuration in the container. Without reloading the entire container.
Let’s raise another container, just forward port 80 to the host server (our physical server), call it test_nginx and take the latest stable version of nginx.
- For the name of the container, use the –name key.
- For port forwarding, use the -p switch.
We get the following command:
docker run --name test_nginx -p 80:80 -d nginx:latestWe will not use the docker pull command because this command is optional. All images will be downloaded automatically when you run docker run.
We launch:
#:/# docker run --name test_nginx -p 80:80 -d nginx:latest
8d14004eb99c374f8540d3494d4c31fad794a61b878a73bb516d9e794b842164
We check:
#:/# docker ps
CONTAINER ID   IMAGE          COMMAND                  CREATED          STATUS          PORTS                               NAMES
8d14004eb99c   nginx:latest   "/docker-entrypoint.…"   48 seconds ago   Up 47 seconds   0.0.0.0:80->80/tcp, :::80->80/tcp   test_nginxx
8d9eceddb3c2   nginx          "/docker-entrypoint.…"   25 minutes ago   Up 25 minutes   80/tcp                              fervent_allen
As you can see above, we have the latest version of nginx with id number 8d14004eb99c, running on port 80 of the server host, built and up ~48 seconds ago with the name test_nginx. Now all connections that will come to localhost:80 on the host will automatically go to the test_nginx container.
Let’s do one last experiment:
- Let’s send the container logs to the host server. For this, the -v switch is used.
- We will also change the port from 80 to 443 and the name to test_nginx1.
It turns out the command:
docker run -d -p 443:80 -v/var/log/nginx:/var/log/nginx/ --name test_nginx2 nginx:latesttestWe launch:
#:/# docker run -d -p 443:80 -v/var/log/nginx:/var/log/nginx/ --name test_nginx2 nginx:latest
4879ed36031d2b3b7fe461ca19a2784641483cb2ec727c3ed410eddc9a79bd2f
We check:
#:/# docker ps
CONTAINER ID   IMAGE          COMMAND                  CREATED          STATUS          PORTS                                 NAMES
4879ed36031d   nginx:latest   "/docker-entrypoint.…"   44 seconds ago   Up 43 seconds   0.0.0.0:443->80/tcp, :::443->80/tcp   test_nginxx2
8d14004eb99c   nginx:latest   "/docker-entrypoint.…"   4 minutes ago    Up 4 minutes    0.0.0.0:80->80/tcp, :::80->80/tcp     test_nginx
8d9eceddb3c2   nginx          "/docker-entrypoint.…"   28 minutes ago   Up 28 minutes   80/tcp                                fervent_allen
So, we have a test_nginx1 container that listens on port 443 on the host server. It shares a directory with the host server /var/log/nginx. Any file that is added inside the container will automatically appear in /var/log/nginx on the host. This also works vice versa. Any file you add to /var/log/nginx on the host will also be in the container. The directory will be shared between host and container.
What do we end up with? We have three different containers. Two of which listen on ports on the host and one that only works if a request comes in.
How do we make a request to the container?
To do this, you need to know the ip address of the container. We can find it out using the inspect command. When a command is requested, all information about the container will be given, but we are only interested in the ip address. So we use this command:
docker inspect | grep IPAddressdocker inspect test_nginx | grep IPAddress
"SecondaryIPAddresses": null,
"IPAddress": "",
"IPAddress": "172.16.2.4",As you can see above, the ip address of our container is 172.16.2.4. It is assigned automatically when the container is created. It is dynamic, so when the container is rebuilt, the ip address may change.
What if you need a static address? You can assign an ip address to a container. First, let’s create our docker network. Consider the network command. Most often in your work you will need 3 commands:
- create – create a network. docker network create
- ls – list all docker networks. docker network ls
- rm – remove the docker network. docker network rm
First we create a network. It consists of a subnet range and a network name:
docker network create --subnet=172.16.0.0/24 testWe have a docker subnet in the range 172.16.0.0/24 and named test.
We measure:
#:/# docker network ls
NETWORK ID     NAME      DRIVER    SCOPE
58fcfe449655   test      bridge    local
As you can see above, we have here:
- NETWORK ID – network id.
- NAME – network name.
- DRIVER – network driver (bridge by default).
- SCOPE – where this network operates. In this case, it is local.
So, we stop the second container we created, codenamed test_nginx. To stop, use the stop command and the name of the container:
docker stop test_nginx test_nginx#:/# docker stop test_nginx test_nginx test_nginxWe remove the container. For this action, the rm command will help us.
docker rm test_nginx
#:/# docker rm test_nginx test_nginx
Check if the container is missing:
#:/# docker ps
CONTAINER ID   IMAGE          COMMAND                  CREATED          STATUS          PORTS                                 NAMES
4879ed36031d   nginx:latest   "/docker-entrypoint.…"   12 minutes ago   Up 12 minutes   0.0.0.0:443->80/tcp, :::443->80/tcp   test_nginx2
8d9eceddb3c2   nginx          "/docker-entrypoint.…"   40 minutes ago   Up 40 minutes   80/tcp                                fervent_allen
Add assignment of ip address.
This is done with 2 keys.
- The –net switch is the name of the network.
- The –ip key is the ip address we want to assign from the 172.16.0.0/24 range of our network.
We get a command like:
docker run -d -p 80:80 --net test --ip 172.16.0.2 --name test_nginx nginx:latestAttention! Don’t assign an ip address with a trailing one, because by default this is the ip address of the host inside docker. In our example, this is 172.16.0.1. That is, if you need to access the host from the container, you will need to specify 172.16.0.1 instead of localhost in the code.
We do:
## docker run -d -p 80:80 --net test --ip 172.16.0.2 --name test_nginx nginx:latest
b254a1d0a969543466ff77241e8add857054266997674bd6685ff22a589a34a8
We check:
#:/# docker ps
CONTAINER ID   IMAGE          COMMAND                  CREATED              STATUS              PORTS                                 NAMES
b254a1d0a969   nginx:latest   "/docker-entrypoint.…"   About a minute ago   Up About a minute   0.0.0.0:80->80/tcp, :::80->80/tcp     test_nginx
4879ed36031d   nginx:latest   "/docker-entrypoint.…"   16 minutes ago       Up 16 minutes       0.0.0.0:443->80/tcp, :::443->80/tcp   test_nginx2
8d9eceddb3c2   nginx          "/docker-entrypoint.…"   43 minutes ago       Up 43 minutes       80/tcp                                fervent_allen
We also check the connection using telnet, for example, to port 80 in the container:
#:/# telnet 172.16.0.2 80
 Trying 172.16.0.2...
 Connected to 172.16.0.2.
 Escape character is '^]'.
PS: telnet keeps the connection open. In order to close the connection on your part. Use the combination ctrl + c or write quit in the console.
#:/# telnet 172.16.0.2 80
Trying 172.16.0.2...
Connected to 172.16.0.2.
Escape character is '^]'.

quit
#:/# telnet 172.16.0.2 80
Trying 172.16.0.2...
Connected to 172.16.0.2.
Escape character is '^]'.
^CWe see that the connection goes through. Now we can assign a name to the container, an ip address, we can forward directories and ports.
Configuring nginx and apache2 to work in a container.
What do we need for a complete setup?
- config files.
- The name of the container.
- container image.
- Directories that need to be forwarded to the container.
- Site directories (for processing nginx statics) and code (apache2).
- Directory of log files for easy viewing and configuration.
- Ports.
- Network.
Let’s create an apache2 and nginx configuration for our DOMAIN_NAME project. The configuration can be saved anywhere. We are used to the fact that all docker configurations are stored in the /var/apps path, so we create a directory and go there.
mkdir /var/apps
сd /var/apps
mkdir apache2 nginx
We create a configuration:
touch /var/apps/apache2/DOMAIN_NAME.conf /var/apps/nginx/DOMAIN_NAME.confAn important clarification: before setting up, you must already have the project directory configured along the path /var/www/DOMAIN_NAME/, the DOMAIN_NAME user has been created, and the rights to this directory have been granted to the created user. These works are described in our previous articles.
We start apache2. Open /var/apps/apache2/DOMAIN_NAME.conf:
mcedit /var/apps/apache2/DOMAIN_NAME.confWe put in it:
        ServerAdmin webmaster@DOMAIN_NAME
         DocumentRoot /var/www/DOMAIN_NAME/data
         ServerName DOMAIN_NAME.com
         ServerAlias www.DOMAIN_NAME.com
         php_admin_value     session.save_path               "/var/www/DOMAIN_NAME.com/sess"
         php_admin_value     upload_tmp_dir                  "/var/www/DOMAIN_NAME.com/upload"
         php_admin_value     open_basedir                    "/var/www/DOMAIN_NAME.com:."
         CustomLog /var/www/DOMAIN_NAME/log/apache2/access.log combined
         ErrorLog /var/www/DOMAIN_NAME/log/apache2/error.log
         LogLevel error
         <Directory "/var/www/DOMAIN_NAME/data">
                 AllowOverride  All
                 Options FollowSymLinks
                 Order allow,deny
                 Allow from all
- The name of the container is apache2.
- The image is php:8.0-apache.
- Directories – forward the site along the path /var/www/DOMAIN_NAME. We pass log files along the path /var/log/apache2. We pass the configuration along the path /var/apps/apache2/DOMAIN_NAME.conf.
- Ports – we do not need to open ports for apache2.
- Network – since the network has been created, we will assign the ip address 172.16.0.3.
We get the command:
docker run -d --net test --ip 172.16.0.3 --name apache2 -v/var/www/DOMAIN_NAME.com:/var/www/DOMAIN_NAME.com -v/var/log/apache2:/var/log/apache2 -v/var/apps/apache2:/etc/apache2/sites-enabled php:8.0-apacheWe do:
#:/# docker run -d --net test --ip 172.16.0.3 --name apache2 -v/var/www/DOMAIN_NAME.com:/var/www/DOMAIN_NAME.com -v/var/log/apache2:/var/log/apache2 -v/var/apps/apache2:/etc/apache2/sites-enabled php:8.0-apache
 Unable to find image 'php:8.0-apache' locally 8.0-apache:
 Pulling from library/php
 5eb5b503b376: Already exists
8b1ad84cf101: Pull complete
38c937dadeb7: Pull complete
6a2f1dc96e59: Pull complete
f8c3f82c39d4: Pull complete
90fc6462bd8e: Pull complete
c670d99116c9: Pull complete
268554d6fe96: Pull complete
6c29fa0d4492: Pull complete
73e23c50a259: Pull complete
81ac13c96fc2: Pull complete
b60a3e623949: Pull complete
dac5dd67fd59: Pull complete
Digest: sha256:2a251962959a4027456d62a2f02d716b14cd6befc2c16bfdf585e581fe1d6075
Status: Downloaded newer image for php:8.0-apache
e8503234b2458320b38fef304a6040ea455bce45f24fc49a90ec46652c32b45
We check:
#:/var/apps/apache2# docker ps
CONTAINER ID   IMAGE            COMMAND                  CREATED              STATUS          PORTS     NAMES
51eb2aea4093   php:8.0-apache   "docker-php-entrypoi…"   About a minute ago   Up 12 seconds   80/tcp    apache2
The container is up and running.
Start nginx: Open the configuration file along the path /var/apps/DOMAIN_NAME.com.conf:
mcedit /var/apps/DOMAIN_NAME.com.confInsert:
server {
         listen   80;
         server_name DOMAIN_NAME.com www.DOMAIN_NAME.com;
         access_log /var/www/DOMAIN_NAME/log/nginx/access.log;
         error_log /var/www/DOMAIN_NAME/log/nginx/error.log;
         location ~ /\.(svn|git|hg) {
                 deny all;
         }
         location ~* ^.+\.(css|jpg|jpeg|gif|png|ico|zip|tgz|gz|rar|bz2|doc|xls|pdf|ppt|txt|tar|mid|midi|wav|bmp|rtf|js|swf)$ {
                root /var/www/DOMAIN_NAME/data;
                expires max;
                access_log   off;
        }
          location / {
               proxy_pass         http://172.16.0.3; #     ip адрес контейнера apache2
                 proxy_redirect     off;
                 proxy_set_header   Host               $host;
                 proxy_set_header   X-Real-IP          $remote_addr;
                 proxy_set_header   X-Forwarded-For    $remote_addr;
                 proxy_set_header   X-Forwarded-Proto  $scheme;
                 client_max_body_size       10m;
                 client_body_buffer_size    1280k;
                 proxy_connect_timeout      90;
                 proxy_send_timeout         90;
                 proxy_read_timeout         90;
                 proxy_buffer_size          4k;
                 proxy_buffers              4 32k;
                 proxy_busy_buffers_size    64k;
                 proxy_temp_file_write_size 64k;
         }
}- Container name – nginx
- Image – nginx:latest
- Directories – forward the site along the path /var/www/DOMAIN_NAME.com. We pass log files along the path /var/log/nginx. We pass the configuration along the path /var/apps/nginx/.
- Ports – open 80 on the host.
- Network – because the network is created, we will assign the ip address 172.16.0.4.
It turns out the command:
docker run -d --net test --ip 172.16.0.4 --name nginx -p 80:80 -v/var/www/DOMAIN_NAME.com:/var/www/DOMAIN_NAME.com -v/var/log/nginx:/var/log/nginx -v/var/apps/nginx:/etc/nginx/conf.d nginx:latestWe check:
#:/var/apps/nginx# docker ps
CONTAINER ID   IMAGE            COMMAND                  CREATED          STATUS          PORTS                               NAMES
ea9a37a74237   nginx:latest     "/docker-entrypoint.…"   4 seconds ago    Up 3 seconds    0.0.0.0:80->80/tcp, :::80->80/tcp   nginx
51eb2aea4093   php:8.0-apache   "docker-php-entrypoi…"   18 minutes ago   Up 17 minutes   80/tcp                              apache2
We got two containers nginx and apache2, nginx listens for all connections on port 80 of the host and proxies to apache2.
Let’s check. You need to add it to the hosts file on your PC. (If you do not know how to do this, the Internet is full of information about this).
127.0.0.1 DOMAIN_NAME.com
Next, add index.php on the host along the path /var/www/DOMAIN_NAME.com/data.
touch /var/www/DOMAIN_NAME/data/index.phpAdd HELLO WORLD to file:
echo HELLO WORLD > /var/www/DOMAIN_NAME.com/data/index.phpExecute the request with curl:
curl DOMAIN_NAME.com
HELLO WORLD
curl -LI DOMAIN_NAME.com
HTTP/1.1 200 OK
Server: nginx/1.21.6
Date: Thu, 10 Feb 2022 20:44:46 GMT
Content-Type:text/html;
charset=UTF-8
Connection: keep-alive
X-Powered-By: PHP/8.0.15Everything works, congratulations!!!
So, in this article, we got acquainted with containerization, got acquainted with the basic keys and commands. We learned how to search for images on the official website. We learned how to assign an ip address to a container. Learned how to forward directories. This is all the base that we need in the future. As a tip – practice deploying containers. Play with the images. Customize their work. Because the more practice, the better.
Now we have two containers on the host that interact with each other and work without errors. It remains only to upload the site files, install mysql on the host and start working. But this method is more suitable for tests. We can write big commands every time and run them. What if we need to manage containers? If you need to automate the deployment of containers? A multi-container management tool called docker-compose comes to the rescue. In the next article, we will consider it.
[…] Links to our previous articles: Setting up a LEMP server with docker for simple projects. Part One: Base […]