We continue the cycle of training articles for novice system administrators. In this article, we will analyze Dockerfile, docker-compose and how to set up a full-fledged web server using docker. I note that if you are an experienced administrator, you can safely skip this material.
This article aims to explain in simple terms what containers, virtualization and everything connected with it are. Despite the fact that the topic is already covered in sufficient detail on the web, we decided to describe in detail the general standards of administration from scratch, since we regularly receive a large number of basic questions from people who are somehow related to our field. The purpose of the series of articles is only to point out the nuances in the work and protect novice specialists from basic mistakes when setting up.
The previous articles are required reading:
Setting up a LEMP server with docker for simple projects. Part One: Base
Setting up a LEMP server with docker for simple projects. Part two: docker-compose
Setting up a LEMP server for simple projects. Instructions for the little ones. Part One .
- DockerFile
- Let’s start writing Dockerfile .
- Dockerfile php8.1-fpm .
- Dockerfile mysql and nginx .
- Running docker-compose .
DockerFile
Dockerfile is the instruction to build the image. The instructions will indicate the commands that must be executed when assembling the container.
Example: Build a php8.1-fpm image with additional packages libgeoip-dev, libmemcached-dev and geoip, mcrypt, memcached modules installed.
Basic commands.
The main commands with which the Dockerfile is written are:
- FROM – Specifies the base image from DockerHub.
Example:FROM PHP:7.4-cli - ENV – Variable Assignment.
Example:ENV DOMAIN=DOMAIN_NAME.com
Now, when $DOMAIN is called, DOMAIN_NAME.com will be automatically inserted.
Rarely used. Since all env can be assigned in docker-compose.yml. - COPY – Copies a file or directory to a container during the build phase of an image. First, the address of the file/directory on the host, then the address is the address in the container.
Example:COPY docker-entrypoint.sh / - EXPOSE – Open a port in a container. Rarely used as all ports can be exposed in docker-compose.yml.
Example:EXPOSE 8080 - RUN – announces that a command is coming next.
Example:RUN apt-get update - WORKDIR – working directory. You will be taken to this directory when you enter the directory.
Example:WORKDIR /var/www - CMD is the default value for the executable container. There can only be one CMD call per Dockerfile.
Example: php-fpm containers require that php-fpm is always running. If php-fpm is down, the container crashes with an error.
CMD ["php-fpm"] - ENTRYPOINT is similar to CMD. Specifies to run an executable in a container. This file will always be executed when the container is restarted. Can be specified at the same time as CMD.
Example:ENTRYPOINT ["/docker-entrypoint.sh"]
When we restart the container, we will always run docker-entrypoint.sh.
More commands and information about them in the official manual.
Dockerfile layers.
How are the layers assembled?
Docker takes an image from the repository, after which it starts writing layers to it, which are described in the Dockerfile.
As a result, we get a cake of several layers. All this is assembled into an image, after which it is launched on the server.
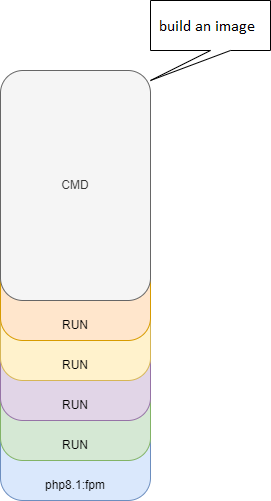
Example: Run the installation of curl and sendmail.
It turns out this cake:
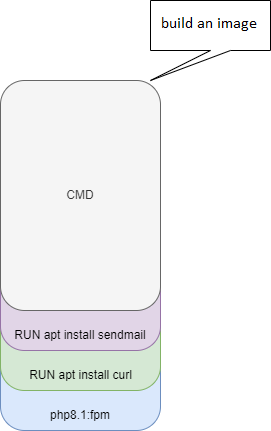
It is important to know that every time you run commands. Docker writes a new layer. The more layers, the more the assembled image will weigh, and the longer the container will be assembled. Therefore, it is always necessary to optimize the Dockerfile layers. Otherwise, instead of a miniature cute cake, it will turn into a huge cake of scales in 3G and assembly in half an hour.
And you with the words “I’m carrying a cake.” Take it to production.
How to optimize layers, we will talk after we write the first Dockerfile.
Let’s start writing a Dockerfile.
How to write a good Dockerfile? We need tactics.
The tactic is that we will make a list in advance of the packages and libraries we need. After that, based on this list, we will test the launch of packages and write commands for the Dockerfile.
Tactics:
- List of modules, services, packages, libraries.
- Testing the installation in a container
- Writing Commands for Dockerfile.
- Transferring the result to a Dockerfile.
- Running a container
Dockerfile php8.1-fpm.
Item 1. List of modules, services, packages, libraries.
We need to know what packages, services, modules we need in containers. We make a list of everything we need. In these articles, we are deploying php-fpm under wordpress, so we take a list of php modules that are necessary for wordpress.
We need modules:
exif, imagick, openssl, zip, bcmath, filter, gd, intl, curl, dom, fileinfo, hash, mbstring, xml, iconv, simplexml, sodium, xmlreader, zlib, pcre.
First we need to check which modules are already installed in the php8.1-fpm image.
We start collecting a test image with a simple command from 1 article.
docker run -d php:8.1.5-fpmdocker run -d php:8.1.5-fpm
Unable to find image 'php:8.1.5-fpm' locally
8.1.5-fpm: Pulling from library/php
1fe172e4850f: Pull complete
012a3732d045: Pull complete
43092314d50d: Pull complete
4f615e42d863: Pull complete
f896b94fc405: Pull complete
86b8a98f8d70: Pull complete
71729f2ef2b8: Pull complete
b2cfcdf44abb: Pull complete
2440531c13bc: Pull complete
6e794559acbe: Pull complete
Digest: sha256:26d0e7a636a4fa140e5958110b6458fd0667a4a24069f0c60aca0d38df6d66ad
Status: Downloaded newer image for php:8.1.5-fpm
3ebf3e9aadb5be40fa10160979fc0a6524307e5078804323b3337b9bdf5d92b6We check:
docker ps
CONTAINER ID   IMAGE           COMMAND                  CREATED         STATUS         PORTS      NAMES
3ebf3e9aadb5   php:8.1.5-fpm   "docker-php-entrypoi…"   5 seconds ago   Up 2 seconds   9000/tcp   pensive_cray
Next, we go into the container with the command from the first article:
docker exec -it pensive_cray bash
@:/var/www/html#
We look at which modules are installed out of the box:
@:/var/www/html# php -m
[PHP Modules]
Core
ctype
curl
date
dom
fileinfo
filter
ftp
hash
iconv
json
libxml
mbstring
mysqlnd
openssl
pcre
PDO
pdo_sqlite
Phar
posix
readline
Reflection
session
SimpleXML
sodium
SPL
sqlite3
standard
tokenizer
xml
xmlreader
xmlwriter
zlib
[Zend Modules]
There are no modules in the container:
exif, imagick, openssl, zip, bcmath, filter, gd, intl, mcrypt
Already in the container:
curl, dom, fileinfo, hash, mbstring, xml, iconv, simplexml, sodium, xmlreader, zlib, pcre.
The list consists of these modules exif, imagick, openssl, zip, bcmath, filter, gd, intl, mcrypt. They must be placed in a container.
Point 2 and 3. Testing the installation in the container and writing Commands for the Dockerfile.
In php containers, the following commands are used to connect modules:
- docker-php-ext-install – install the module.
- docker-php-ext-configure – module configuration.
- docker-php-ext-enable – enable the module.
- pecl install – install modules using pecl.
The first module in the list is exif. Trying to install modules:
Run in a container:
docker-php-ext-install exifInstallation in progress:
:/var/www/html# docker-php-ext-install exif
Configuring for:
PHP Api Version:         20210902
Zend Module Api No:      20210902
Zend Extension Api No:   420210902
checking for grep that handles long lines and -e... /bin/grep
checking for egrep... /bin/grep -E
checking for a sed that does not truncate output... /bin/sed
checking for pkg-config... /usr/bin/pkg-config
checking pkg-config is at least version 0.9.0... yes
checking for cc... cc
checking whether the C compiler works... yes
checking for C compiler default output file name... a.out
checking for suffix of executables...
checking whether we are cross compiling... no
checking for suffix of object files... o
checking whether we are using the GNU C compiler... yes
checking whether cc accepts -g... yes
checking for cc option to accept ISO C89... none needed
checking how to run the C preprocessor... cc -E
We check:
:/var/www/html# php -m | grep exif
exif
The module is installed!
We write the command in the Dockerfile.
RUN docker-php-ext-install exifLife hack: you can just write commands in a text editor. After that, transfer everything to the Dockerfile. CEP time!!!
Next on the list is imagick.
Trying to install:
docker-php-ext-install imagickWe get an error:
/var/www/html# docker-php-ext-install imagick
error: /usr/src/php/ext/imagick does not exist
Can’t find imagick. There is no module.
Let’s try with pecl:
pecl install imagick
downloading imagick-3.7.0.tgz ...
Starting to download imagick-3.7.0.tgz (360,138 bytes)
.........................................................................done: 360,138 bytes
33 source files, building
running: phpize
Configuring for:
PHP Api Version:         20210902
Zend Module Api No:      20210902
Zend Extension Api No:   420210902
Please provide the prefix of ImageMagick installation [autodetect] :
building in /tmp/pear/temp/pear-build-defaultuserDlaKao/imagick-3.7.0
running: /tmp/pear/temp/imagick/configure --with-php-config=/usr/local/bin/php-config --with-imagick
checking for grep that handles long lines and -e... /bin/grep
checking for egrep... /bin/grep -E
checking for a sed that does not truncate output... /bin/sed
checking for pkg-config... /usr/bin/pkg-config
checking pkg-config is at least version 0.9.0... yes
checking for cc... cc
checking whether the C compiler works... yes
checking for C compiler default output file name... a.out
checking for suffix of executables...
checking whether we are cross compiling... no
checking for suffix of object files... o
checking whether we are using the GNU C compiler... yes
checking whether cc accepts -g... yes
checking for cc option to accept ISO C89... none needed
checking how to run the C preprocessor... cc -E
checking for icc... no
checking for suncc... no
checking for system library directory... lib
checking if compiler supports -Wl,-rpath,... yes
checking build system type... x86_64-pc-linux-gnu
checking host system type... x86_64-pc-linux-gnu
checking target system type... x86_64-pc-linux-gnu
checking for PHP prefix... /usr/local
checking for PHP includes... -I/usr/local/include/php -I/usr/local/include/php/main -I/usr/local/include/php/TSRM -I/usr/local/include/php/Zend -I/usr/local/include/php/ext -I/usr/local/include/php/ext/date/lib
checking for PHP extension directory... /usr/local/lib/php/extensions/no-debug-non-zts-20210902
checking for PHP installed headers prefix... /usr/local/include/php
checking if debug is enabled... no
checking if zts is enabled... no
checking for gawk... no
checking for nawk... nawk
checking if nawk is broken... no
checking whether to enable the imagick extension... yes, shared
checking for pkg-config... /usr/bin/pkg-config
checking ImageMagick MagickWand API configuration program... checking Testing /usr/local/bin/MagickWand-config... Doesn't exist
checking Testing /usr/bin/MagickWand-config... Doesn't exist
checking Testing /usr/sbin/bin/MagickWand-config... Doesn't exist
checking Testing /opt/bin/MagickWand-config... Doesn't exist
checking Testing /opt/local/bin/MagickWand-config... Doesn't exist
checking Testing /opt/homebrew/bin/MagickWand-config... Doesn't exist
configure: error: not found. Please provide a path to MagickWand-config or Wand-config program.
ERROR: `/tmp/pear/temp/imagick/configure --with-php-config=/usr/local/bin/php-config --with-imagick' failed
We also get an error:
ERROR: `/tmp/pear/temp/imagick/configure --with-php-config=/usr/local/bin/php-config --with-imagick' failedWe start looking for this error in the wilds of the Internet, after which we find the answer that the libmagickwand-dev and libmagickcore-dev libraries are missing.
We put the libraries in the container:
apt-get install libmagickwand-dev libmagickcore-dev -yLet’s try again:
pecl install imagickWe see that the module is installed.
It remains only to enable it:
docker-php-ext-enable imagickWe check:
:/var/www/html# php -m | grep imagick
imagick
The module is installed!
The commands in our Dockerfile are:
RUN apt-get install libmagickwand-dev libmagickcore-dev -y
RUN pecl install imagick
RUN docker-php-ext-enable imagick
Further, by trial and error, we get the following RUN:
Attention! We recommend that you try to install all the remaining modules yourself, and then check with what we did.
Dockerfile RUN spoiler.
Great, we have all RUN with all the modules, libraries and dependencies we need.
Our layers are ready. It remains to add a cherry on the cake. These are FROM, WORKDIR and CMD.
- FROM – what base image to take.
FROM php:8.1.5-fpm - WORKDIR – home directory
WORKDIR /var/www - CMD is a service that must always be running.
CMD [“php-fpm”]
Point 4. Transferring the result to a Dockerfile.
Delete the test container:
docker stop pensive_cray
pensive_cray
docker rm pensive_cray
pensive_cray
Go to the Dockerfile php-fpm directory:
cd /var/apps/domain_name/volumes/build/php-fpm8.1We insert the result obtained into the Dockerfile php-fpm.
mcedit DockerfileFROM php:8.1.5-fpm
WORKDIR /var/www
RUN apt update
RUN docker-php-ext-install exif
RUN apt-get install libmagickwand-dev libmagickcore-dev -y
RUN pecl install imagick
RUN docker-php-ext-enable imagick
RUN PHP_OPENSSL=yes
RUN docker-php-ext-install xml
RUN docker-php-ext-install filter
RUN apt-get install libzip-dev -y
RUN docker-php-ext-install zip
RUN docker-php-ext-install bcmath
RUN apt install libwebp-dev
RUN docker-php-ext-configure gd --with-freetype --with-jpeg --with-webp
RUN docker-php-ext-install gd
RUN docker-php-ext-install intl
CMD ["php-fpm"]Next, we try to start building the container using the resulting Dockerfile:
docker build -f (путь до Dockerfile)If you are in the directory where the Dockerfile is located, this is what happens:
docker -d build .If the test build completed without errors, then no errors were found when writing commands and you wrote everything correctly!
/volumes/build/php-fpm# docker build .
Sending build context to Docker daemon   2.56kB
Step 1/18 : FROM php:8.1.5-fpm
 ---> 17bca48e4475
Step 2/18 : WORKDIR /var/www
 ---> Using cache
 ---> e5df181ecab6
Step 3/18 : RUN apt update
 ---> Using cache
 ---> 8b9514675b7d
Step 4/18 : RUN docker-php-ext-install exif
 ---> Using cache
 ---> 5558b4578bac
Step 5/18 : RUN apt-get install libmagickwand-dev libmagickcore-dev -y
 ---> Using cache
 ---> 3e4d8b2c9cf0
Step 6/18 : RUN pecl install imagick
 ---> Using cache
 ---> 2d001d41b213
Step 7/18 : RUN docker-php-ext-enable imagick
 ---> Using cache
 ---> a73532e75edd
Step 8/18 : RUN PHP_OPENSSL=yes
 ---> Using cache
 ---> b17d13a149c5
Step 9/18 : RUN docker-php-ext-install xml
 ---> Using cache
 ---> 1e7762060ed7
Step 10/18 : RUN docker-php-ext-install filter
 ---> Using cache
 ---> 361820f59b1c
Step 11/18 : RUN apt-get install libzip-dev -y
 ---> Using cache
 ---> 05dd631e40d2
Step 12/18 : RUN docker-php-ext-install zip
 ---> Using cache
 ---> ce67e77753d0
Step 13/18 : RUN docker-php-ext-install bcmath
 ---> Using cache
 ---> 931aa5e4650a
Step 14/18 : RUN apt install libwebp-dev
 ---> Using cache
 ---> 9bef1b459423
Step 15/18 : RUN docker-php-ext-configure gd --with-freetype --with-jpeg --with-webp
 ---> Using cache
 ---> 184d8ee067a0
Step 16/18 : RUN docker-php-ext-install gd
 ---> Using cache
 ---> 2fbc109397c0
Step 17/18 : RUN docker-php-ext-install intl
 ---> Using cache
 ---> 23bb5f7f91ef
Step 18/18 : CMD ["php-fpm"]
 ---> Using cache
 ---> d74294bc6db6
Successfully built d74294bc6db6
Now we optimize the Dockerfile so that there are not many layers. Now there are 18 of them!
Separate the installation of libraries, modules. This will make our life easier in the future.
We take the commands to install the libraries:
RUN apt-get update
RUN apt-get install libmagickwand-dev libmagickcore-dev -y
RUN apt-get install libzip-dev -y
RUN apt install libwebp-dev
Let’s merge them into one layer using a backslash \ (break to a new line).
We get:
RUN apt-get update
RUN apt-get install -y \
    libmagickwand-dev \
    libmagickcore-dev \
    libzip-dev \
    libwebp-dev
Let’s combine the apt-get update and apt-get install commands. Since these are commands, you must use and (&&).
It turns out:
RUN apt-get update \
    && apt-get install -y \
    libmagickwand-dev \
    libmagickcore-dev \
    libzip-dev \
    libwebp-dev
We have combined the libraries into one layer. In the future, if additional libraries or packages are needed, we can add them to this layer.
Remaining modules. We have commands:
RUN docker-php-ext-install exif
RUN docker-php-ext-enable imagick
RUN docker-php-ext-install xml
RUN docker-php-ext-install filter
RUN docker-php-ext-install zip
RUN docker-php-ext-install bcmath
RUN docker-php-ext-configure gd --with-freetype --with-jpeg --with-webp
RUN docker-php-ext-install gd
RUN docker-php-ext-install intl
We also combine them into one layer using a backslash and (because these are commands) and (&&).
It turns out:
RUN docker-php-ext-install exif \
 && pecl install imagick \
 && docker-php-ext-enable imagick \
 && PHP_OPENSSL=yes \
 && docker-php-ext-install xml \
 && docker-php-ext-install filter \
 && docker-php-ext-install zip \
 && docker-php-ext-install bcmath \
 && docker-php-ext-configure gd --with-freetype --with-jpeg --with-webp \
 && docker-php-ext-install gd \
 && docker-php-ext-install intl
Testing:
@php:/var/apps/domain_name/volumes/build/php-fpm# docker build .
Sending build context to Docker daemon   2.56kB
Step 1/5 : FROM php:8.1.5-fpm
 ---> 17bca48e4475
Step 2/5 : WORKDIR /var/www
 ---> Using cache
 ---> e5df181ecab6
Step 3/5 : RUN apt-get update     && apt-get install -y     libmagickwand-dev     libmagickcore-dev     libzip-dev     libwebp-dev
 ---> Using cache
 ---> 54389f22f55f
Step 4/5 : RUN docker-php-ext-install exif  && pecl install imagick  && docker-php-ext-enable imagick  && PHP_OPENSSL=yes  && docker-php-ext-install xml  && docker-php-ext-install filter  && docker-php-ext-install zip  && docker-php-ext-install bcmath  && docker-php-ext-configure gd --with-freetype --with-jpeg --with-webp  && docker-php-ext-install gd  && docker-php-ext-install intl
 ---> Using cache
 ---> e54e458d6522
Step 5/5 : CMD ["php-fpm"]
 ---> Using cache
 ---> 534c59afa067
Successfully built 534c59afa067
Instead of 18 layers, only 5 were obtained. This is an excellent result!
Dockerfile for php8.1-fpm is ready.
Dockerfile mysql and nginx.
Since in the second article we added a Dockerfile for each container, we need to add which image to use in mysql and nginx. We do not need to install additional libraries, modules in these containers at the moment. Therefore, we add only FROM to the Dockerfile:
mysql:
FROM mysql:latestnginx:
FROM nginx:latestRunning docker-compose.
Basic keys to run docker-compose you need to know:
up– raises the container with output to the console.
docker-compose up-d– raises the container without output to the console.
docker-compose up -d--force-recreaterereads the docker-compose.yml configuration and raises the container with the new settings in docker-compose.yml
docker-compose up -d –-force-recreate--buildrereads the Dockerfile and raises the container with the new parameters in the Dockerfile and docker-compose.yml
docker-compose up -d –-build
We clear all test images using the command docker system prune --volumes --all.
To run docker-compose, you must be in the directory where this same docker-compose.yml is located.
Change to the directory with docker-compose.
cd /var/app/domain_nameWe launch:
docker-compose up -dAfter a short wait for the assembly of images, we get the coveted:
Starting php-fpm ... done
Starting nginx   ... done
Starting mysql   ... done
We check:
# docker ps
CONTAINER ID   IMAGE                 COMMAND                  CREATED          STATUS          PORTS                                                                      NAMES
47d63fac8e4f   domain_name_nginx     "/docker-entrypoint.…"   10 minutes ago   Up 13 seconds   0.0.0.0:80->80/tcp, :::80->80/tcp, 0.0.0.0:443->443/tcp, :::443->443/tcp   DOMAIN_NAME-nginx
941e858869e4   domain_name_php-fpm   "docker-php-entrypoi…"   10 minutes ago   Up 13 seconds   9000/tcp, 0.0.0.0:9000->9010/tcp, :::9000->9010/tcp                        DOMAIN_NAME-php-fpm
ce54ddd5fdd1   domain_name_mysql     "docker-entrypoint.s…"   10 minutes ago   Up 4 seconds    3306/tcp, 33060/tcp, 0.0.0.0:3310->3310/tcp, :::3310->3310/tcp             DOMAIN_NAME-mysql
All containers are up and running.
What if you suddenly have STATUS not UP?
Example:
STATUS
Restarting (1) Less than a second ago
So the container is not running. Most likely there is a mistake somewhere in the configuration files.
We look at the container logs:
docker logs <ID или NAMES контейнера>We fix the error and re-run docker-compose.yml.
docker-compose restartIt remains for us to proxy traffic from nginx to the php-fpm container. To do this, we bring the configuration file DOMAIN_NAME.conf along the path ./volumes/etc/nginx/sites-enabled/DOMAIN_NAME.conf to the following form:
server {

        listen   80;

        server_name DOMAIN_NAME.com;

        access_log /var/www/DOMAIN_NAME/log/nginx/access.log;

        error_log /var/www/DOMAIN_NAME/log/nginx/error.log;

        location ~ /\.(svn|git|hg) {

                deny all;

        }

        location ~* ^.+\.(css|jpg|jpeg|gif|png|ico|zip|tgz|gz|rar|bz2|doc|xls|pdf|ppt|txt|tar|mid|midi|wav|bmp|rtf|js|html|swf)$ {

                root /var/www/DOMAIN_NAME/data;

                expires max;

                access_log   off;

        }

        root /var/www/DOMAIN_NAME/data;

        index index.php index.html index.htm;

        location ~ \.php$ {

                fastcgi_pass 172.16.1.5:9010;

                fastcgi_index index.php;

                include fastcgi_params;

                fastcgi_param SCRIPT_FILENAME $document_root$fastcgi_script_name;

        }

}
In /volumes/etc/php/fpm.pool.d/domain.conf
Specify the user id and group id from /etc/passwd. In our case, 1001 and 1001.
   user = 1001
   group = 1001
Reboot:
docker-compose restartBe sure to check that everything works with docker ps!
All services are working. It remains only to add the code to the home directory of the site and create a database in mysql.
To create a database, you need to go to the mysql container and add a user there.
Let’s deploy the WordPress code.
Go to /var/www/DOMAIN_NAME/.
cd /var/www/DOMAIN_NAME/Download WordPress:
wget https://ru.wordpress.org/latest-ru_RU.zipUnpacking:
unzip latest-ru_RU.zipMove everything from the wordpress/ directory to data/. You can do everything with F6 in mc.
We assign all files to the site user.
chown -R DOMAIN_NAME: /var/www/DOMAIN_NAME/Go to the site in a browser.
Everything is working.
It remains to specify the mysql ip address, database name, user and password.
And you can work!
So, in this article, we got acquainted with writing a Dockerfile, launched docker-compose and raised all containers with a single command. For practice, we recommend writing different docker-composes, experimenting with the Dockerfile, and also trying to install new services in the container. After all, theory is one thing, but practice is quite another.
We have written containers for LEMP projects. It is important that wherever we transfer these containers, they will work the same everywhere. The yml data can be uploaded to the repository storage system (for example, to gitlab), and then uploaded to new servers using git.
Thank you all for reading the Docker series. We hope that this information was informative for you, and it will help you to become a highly qualified specialist in the future.
If you have any questions – ask in the comments, we will be happy to answer them. Good luck with your administration and may your PROD never crash!